

Introduction: Sheet Metal Phone Stand


For years I have been using sheet metal fabrication projects at the beginning of the year for my level one manufacturing class. I've found them a great way to introduce hand tools, safety, measurement, and print reading. Plus, all of our sheet metal is donated from a local manufacturer, which makes these types of project very economical to use in class.
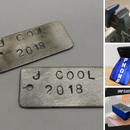
The first project I have them complete is the Dog Tag Project. The students seem to enjoy that one. But, I've always struggled with the second project in my curriculum. I need a project that introduces the students to using try squares, aviation shears, a brake, and sometimes a foot shear. The activity also has to build on the skills from the prior project.
For a couple years I did a project I called the Thingamabob. Which was just a random object that had the kids do a bunch of basic sheet metal operations, but had no value after the students finished it.
Wanting to move to a more useful product to have my students work on, I had them start making Vise Jaw Covers. I liked this activity because it was quick and we could use the covers for the rest of the sheet metal fabrication unit. The problem was the students didn't care to use them. The covers just started littering my shop for the remainder of the year.
This year (2022) I decided to change things up again with a new project. One my students would hopefully find more engaging and relevant. Knowing I can't go 30 seconds during a class period without telling at least one student to put their phone up. I figured I might be able to take advantage of their non-stop phone use.
Supplies
Tools/Equipment
-Foot Shear (Optional)
-Steel Rule
-Try Square
-Scratch Awl/Scriber
-Aviation Shears
-Brake
Material
-3 1/2" x 9 1/2" piece of sheet metal (I use 22-24 Gauge)
Step 1: Video Tutorial
Here is the entire tutorial of the project in a 7 minute video if you are more of a visual learner.
Step 2: Cut to Size
I have my students use this set of plans.

To begin you need to get a piece of sheet metal that is 9 1/2 inches long by 3 1/2 inches tall. The thickness of the metal we use ranges from 22-24 gauge. Use whatever you have just be sure whatever brake you are using is rated to bend the thickness of metal you have.
I use a foot shear to cut my metal to size, but a pair of aviation shears would fine as well.
Teacher Talk
Depending on what I feel my class schedule allows I set up the this portion of the project in two ways. The first option is to have the students cut out their metal to size on their own. The second way is that I take the time to cut out a bunch of metal blanks to size and give them to the students to use for this project. I prefer the latter as the students get to learn how to safely use the foot shear and it saves bunch of time not having to personally prep all the material myself.

Step 3: Layout
With your set of plans in hand, use your rule, try square, and scratch awl to measure and mark all of your layout lines onto your piece of metal.
I have my students start by marking their width lines (the vertical lines shown on the drawing) starting on the left of their metal and working their way to the right.

When you are finished it should look something like this:

Once all of the width lines are marked move onto scribing your 3/4" measurement on your 4 1/2" line. You need to make two marks. Measure from the edge of the metal inwards that 3/4" measurement from both the top and bottom of your metal blank.

Use the 3/4" marks and your 2 1/8" and 6 5/8" lines as endpoints for your angled lines in the center of your stand. I have my students use a steel rule to mark these lines. The setup for marking your line should look something like this:

When you are finished with both sides it should look like this:

To finish your layout use your try square to chamfer the corners of the metal at a 45 degree angle.

You should also probably mark your 4 1/2" line on both the front and the back of the metal. When you get to bending, the last operation you'll complete will be bending your metal on the 4 1/2" line to complete your phone stand. That step is much easier if you have the 4 1/2" line on the back of your metal for reference.
Just be sure you are measuring from the correct end of your metal as that line is not directly in the center of your part.

Step 4: Cut to Shape
TIME TO SHRED! Or I guess technically I should say, TIME TO SHEAR!

This step is pretty quick. Use your aviation shears to trim off the corners of your metal to the 45 degrees you marked earlier. And then cut out the big, shallow tringles in the middle of your metal.
When all is said and done your metal should look like this:

Teacher Talk
This is generally the first time my students will have used aviation shears. Most of my students hate this portion of the project at the start because in their head this process should be as easy as using scissors to cut paper. They don't anticipate the grip strength that is actually needed to cut metal. Most of the time we make these phone stands from scrap, cut off pieces of metal from other projects. I let them know they can always remake their stand if they don't like how it turns out. I also occasionally have them get some other scrap metal and just practice using the aviation shears. After a little bit they usually feel comfortable enough to start cutting on their project.
Step 5: Bend
To form your flat metal into a phone stand you'll need to follow the right order of operations for your bends. I have my students reference their plans and annotate their bend lines with the letters A, B, C, D.

This part of the project does tend to be a bit more "art" than "science". Use your brake to bend your metal in the proper progression.
Start by bending line A to roughly 45 degrees.

Next you'll bend line B. Again this angle will be roughly 45 degrees.
With line C your metal will be in a more vertical position in the brake, you should still have plenty of space left to make your bend to that rough 30 to 45 degree angle.

When you are finished with bends B and C, your metal should look similar to this:

Last you'll want to flip your metal over

and bend line D to an angle past 90 degrees.

All of the angles mentioned are just suggestions I give my students. You are mostly just going for whatever angle you think looks good for your phone stand and what bends allow the stand to sit flat and stable on a table. The rule of thumb I give my students is to lean towards making the bends less than they think they need. It is easier to make the angle of your bend greater, but more challenging to bend the metal back to a previous form.

Step 6: Make Awesome!
You've defied the natural of order of things and used your skills and brawn to turn a flat piece of metal into a thing of usefulness. Time to make it awesome! Give it a coat of neon paint! Maybe clear coat it and leave that industrial metal look. Cover it in stickers. Whatever makes you want to display and use your amazing project!
The metal we use rusts amazingly fast if it is not finished in some way. In class we don't always have time to paint. But, if we do I have my students put a coat of spray paint on them.

At some point someone donated/found at our school a bunch of old rolls of vinyl sticker material. We have a couple of laser cutters in our shops, so I decided to play around with using the vinyl to make some stencils for painting our sheet metal projects. After some trial and error I got them to work pretty well and I'm looking forward to letting the students try designing their own stencils in future.


My students found this project much more engaging and relevant than the previous projects I had in place. It probably helped that they were actually allowed and encouraged to get their phones out to test how their stand worked. This will definitely be a project I keep in the curriculum for the foreseeable future.
Step 7: The End Bit
Thank you so much for checking out my project. I truly appreciate people taking time to view my work. Please feel free to take this project and turn it into something better than what I have here. If you do let me know in the comments below or shoot me an email.
If you teach shop class of some kind I've started a little website to document/compile shop teacher content/curriculum. I'm really just getting started with it but I hope to be posting much more to it soon. If you want a more official lesson plan/class overview of this project it will eventually be on my website. Find it at Shop Class Builds.
Subscribe to my fledgling YouTube Channel Here.
Find me on Instagram @shopclassbuilds
Again thank you for taking time out of your day to scan through my project!

Runner Up in the
Metal Contest


