

Introduction: 3D Modeling Workflows


3D models from 3D scans are amazing, but to some degree they are useless if they just stay inside the program that made them, so what can we do with them? How do we make them useful?
In this lesson I'll show you how to export your 3D models for all kinds of purposes from simple images and videos, to models that can be edited and made into physical objects that are actually functional.
Step 1: Exporting Your Model As an Image or Video

If you want to show off the scan you've created so you can post it on a website or use it in a portfolio, ReCap Photo has some fun tools for generating nice looking images and videos to display your model.
To export a simple image that will be nicer than a screenshot, position your model how you'd like it to be viewed and click on export image under the Export icon. From here you can export a PNG and choose your file size and model display mode.


A static image is fine, but to really show off your model, it's fun to create a video of it in 3 dimensions. To do this, click on the export video icon. Here you can create a simple video that shows your model rotating by selecting 'Turntable'.
Or you can create a more interesting video by clicking on 'Key frames' and then choosing a few model positions you want the video to cycle through. You can even make the model switch between different display modes throughout the video, it's pretty cool :)
Step 2: Exporting for Gaming or VR

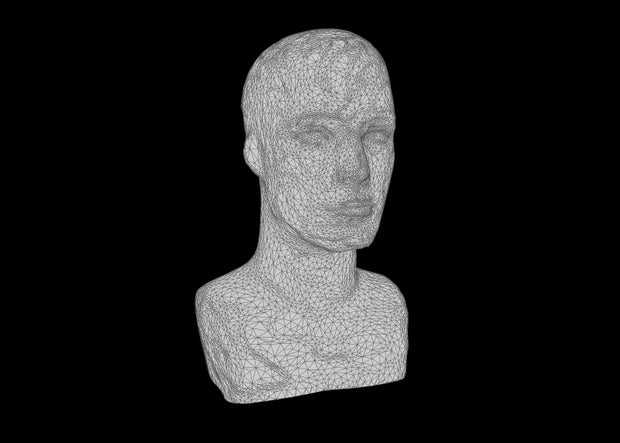
One common application for scans created with photogrammetry is in the virtual world as assets in virtual reality (VR) or gaming. This is when you are most likely to use the textured, or color mapped, feature of your scans. I think photogrammetry models work especially well for these purposes because the textured layer almost always looks better than the solid geometry of the model itself.


As I mentioned in an earlier video, you can decimate your model to a low polygon count while still maintaining the nice look of the textured layer, which is great for VR and games that need smaller file sizes. To export a model like this, use the mesh report function under Analyze to see how dense your mesh is. If it's too dense for your application, you can then decimate it as low as possible without losing its fundamental shape.

To export your model, click on export model under the Export icon. 'Quick export' will let you choose from a set of Autodesk programs to export for and will optimize your model for use in that specific program. To create assets for gaming or VR you might be using a workflow that involved Maya, Meshmixer, Mudbox or Stingray, so you would choose one of those options, and then choose the quality of your model.

If you are planning to use your model in a different program, or just want more control over your export, you can click on 'Advanced' which lets you choose your file type, how much your model is decimated, and options for what kinds of texture maps are created and exported with your model.

Models can be exported to be used as backgrounds and static scenery in games and VR environments, or even transformed so they can be animated to create creatures and characters through applications like Maya.
Check out this great Webinar for more info about workflows that can take ReCap scans and turn them into animation assets using Mudbox, Photoshop and Maya. Starting at about minute 41, Craig Barr gives a great demonstration of how it is possible to turn a scan of a human face into an animatable "digital double". Workflows like this take a lot of advanced knowledge, but it's fascinating to see the possibilities!
Step 3: 3D Printing Your Model

If you want to take your model out of the digital world and make it into a physical object, one easy way to do that is with 3D printing. To 3D print your models, you have to first make sure they are solid, with no glitches or holes in the surface.
To do this, click on Analyze and then the bandaid icon that says detect and fix model issues. Hitting 'Diagnostics' will inspect your model to see if there are any holes, particles (tiny bits of model stranded in mid air), or self intersections (places where the surface of the model folds on itself in an odd way). Clicking through the detected problems you will have the option to either let the tool fix them automatically, or fix them manually yourself. if they are complicated, I sometimes like to fix them myself because the automatic fix can create more weird issues.

When you are ready to 3D print, click on the Export tool and save you file as as the file type you need for your specific printer. STLs are a standard file type for most 3D printers, but check with yours or the 3D printing service you want to use. Also, for more tips on 3D printing, check out JON-A-TRON's awesome Beginner 3D Printing Class.
To see an example of a simple project that uses 3D scanning and printing by exporting directly from ReCap, check out my Starfish Earrings Instructable.

Step 4: Exporting to Other Modeling Programs

ReCap Photo has some great tools for cleaning up your model, but to do some really serious 3D modeling, you will usually need to export your model to another modeling program. As I mentioned before, ReCap Photo has automatic presets for exporting to different Autodesk applications, or if you are more familiar with another modeling program you can just use the advanced export tools to save your model as the file type supported by your program.
Meshmixer is a great program to export to if you want to really be able to edit your mesh, sculpt, fix mesh issues, combine models etc. To export to Meshmixer you will need to save your file as an OBJ which is the file type supported by a lot of mesh editing applications.
If you want to alter your model to make it a more functional object, give it points of attachment, combine it with other models you've created etc., a great program to export it to is Fusion 360. Fusion is another Autodesk program that gives you the ability to create all kinds of 3D designs from simple to complex, organic to mechanical in a user friendly interface. And one of the best parts about it is that it's free! If you are a student, educator, startup or hobbyist, you can download Fusion totally free with all its normal functionality. I'll be talking a little bit about how to use a mesh in Fusion in the next section, but if you want a more in-depth intro to Fusion, check out JON-A-TRON's most excellent 3D Printing Class.
To use your mesh model in Fusion, you need to export it as an 'OBJ with quads'. To do this, choose Fusion 360 in quick export, or OBJ (quads) in advanced export. Meshes can have different structures, the meshes of regular OBJs are made up of triangles, but the these special quad OBJs are made up of quadrilaterals. The geometry of these meshes is better for certain kinds of modeling and is the only way to make meshes editable in Fusion. For a longer discussion about the difference between modeling with quads and triangles, see this great Instructable by Amy Karl.
Step 5: Working With Meshes in Fusion

Bringing scanned models into Fusion is a workflow that opens up a lot of possibilities for creative uses of 3D scanning. When you can manipulate your models in precise ways, you can integrate them into functional objects, or use them as templates to create designs with similar shapes, or components that will interact with them.
To bring your quad Mesh into Fusion, open Fusion and click on Create Form in the top toolbar. This will bring you into the sculpt workspace in Fusion. Fusion has several modeling environments that allow you to create different types of 3D forms using different modeling strategies. The sculpt environment is where you can create and modify forms that are built on T-splines, a type of 3D model surface that allows shapes to be more curved and organically editable.
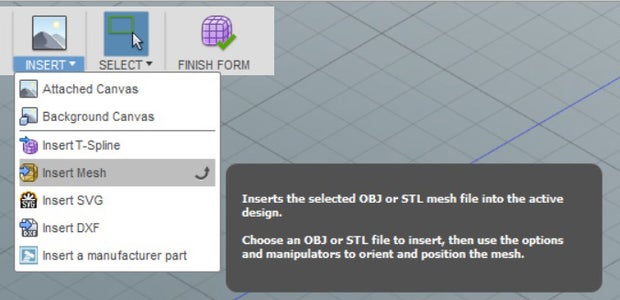
In the sculpt environment click on Insert in the top toolbar, then select insert mesh. Browse to the quad file you exported from Remake and open it. In the dialog box you can set your units of measurement and you can use the blue arrows and gizmo wheels to adjust the position of the model. If your model had a lot of complex detail, you will see that converting it into quads eliminates a lot of this detail and makes the surface much smoother. Sometimes this will work for a design and sometimes it won't, but if you want your mesh to be editable in Fusion, unfortunately you have to accept this loss of detail.

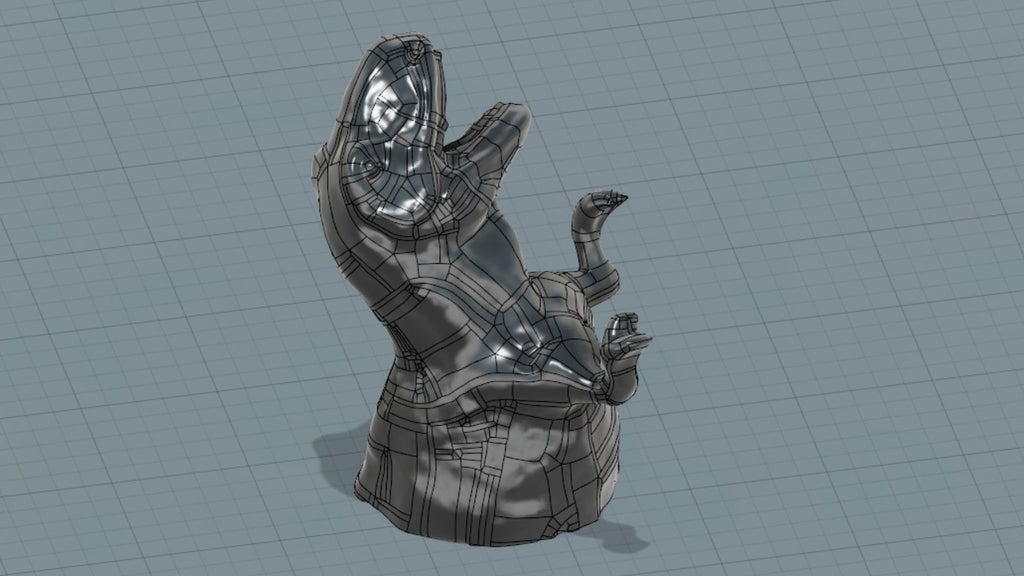
Once your model is imported as a mesh, you will be able to see it, but you won't be able to edit it. To convert your quad mesh to a T-spline body that can be edited, right click on it and choose convert, then click ok in the dialog box. Now you can edit your model using the tools in the Fusion sculpt environment. This means that each face, edge, or vertex of the mesh can be selected and moved around to change the shape of the model. Do this by selecting edit form under Modify, then selecting the elements you want to edit.
You can do any organic, shape related modeling in the sculpt environment, and then click on Finish Form in the top toolbar to bring your model into the Modeling environment. If Fusion detects any flaws in your model as it is trying to convert it from a T-spline to a solid body, it won't be able to make the conversion and an error message will pop up. The flaws in your model will be highlighted and sometimes you will have to patch holes or cut away and re-attach sections of your model to fix it.
When your model does successfully convert to a solid body in in the modeling environment you will be able to edit it using solid modeling tools like sketch, extrude, split, combine and chamfer. You can use these tools to make holes in your model, cut it apart, add more precisely modeled elements, combine your model with other models and much much more. The ability to manipulate your model in these ways can transform it from a knick knack, into something that combines functionality and design.
Step 6: And Now...
Make something awesome with 3D scanning!
Now that you've learned the basics of capturing reality with 3D scanning, try using the techniques I've covered in this class to make something unique. Workflows like the one I just described with Fusion 360 will open up a lot of design possibilities for your 3D scanned objects. Once again, check out JON-A-TRON's 3D Printing Class for some great Fusion tutorials.
There are an endless number of interesting and useful things you can create when you combine 3D scanning and 3D modeling. I've seen people scan broken objects in order to create new versions, sculpt prototypes for products out of clay and then scan them, use scanned objects as references to model around, and hundreds of other unique workflows. To see some examples of what you can create by combining scanned meshes with solid modeling, look in some of the projects in the "What's Next?" section at the bottom of the Class page. Also check out some of the great videos on the ReCap Photo website, like this one about designing custom wine glasses.
If you do create your own project with the skills you've learned, be sure to share some photos of it below and please publish an Instructable about it or enter it in one of our awesome contests!


