

Introduction: Altair - a Tripod Mounted Refracting Telescope


There are many different telescope designs, but they fall into three broad classes: reflectors (gather light with mirrors), refractors (gather light with lenses), and catadioptrics (which use a combination of mirrors and lenses). Each style has its advantages and disadvantages. The classic design that you see in kids books and clipart and in our mind's eye when we hear the word "telescope" is a refractor.
While any telescope can be used for any kind of observing, refractors are particularly good for observations that need high magnification, high contrast, and fine details.
This Instructable documents the construction of a 6-inch refractor using mostly plywood, and fitted with a lens salvaged from a damaged telescope. The build includes a tripod, which could be adapted to other projects.
Step 1: About Refractors


Refractors are usually based on classic, converging lenses, which are like magnifying glass lenses. If you look at the outer edges of a refracting lens, the edges are not parallel, they come together like the sides of a prism. I've you've played with prisms you know they take light and break it into rainbows (see the second image above), and the edges of refractor lenses do the same thing (third image above) -- it makes images in the telescope have colored auras about them. This is called "chromatic aberration."
Chromatic aberration doesn't, in principle, keep you from observing the Universe, but it can be distracting to have stars or the edge of the moon or the edge of a planet look like little rainbows. Galilean refractors usually have a single lens at the front (and can be built from a single magnifying glass lens!).
One way to correct chromatic aberration is to have two or more lenses that work together to bring all the colors of light back together at one point. Modern three lens telescopes are called "apochromatics" and they are almost perfect in their color correction. Since they have three lenses, they are more expensive than their two lens cousins. Two-lens refractors are usually called "achromats" and they have a moderate amount of color correction by making sure that two of the colors (typically red and blue) focus perfectly.
This project begins with a second hand achromat lens -- a cell from a telescope that had been dropped and bent, that has two lenses, shown in the image above on the left (note the dent in the outer ring).
Step 2: Resources and Inspiration


Amateur Telescope Making is a rewarding hobby that has many facets, and is suitable to whatever resources and skills you may have. Some telescope builders can weld and have excellent machine shop skills and build exquisite machines out of metal. Others (the category I am in) have some wood-working skills, and build their scopes with common power tools, and sometimes, hand tools.
There are a wide variety of telescope making resources on the web, in monthly astronomy magazines like Sky & Telescope (particularly in the archive back issues), and in books. For this project, I drew inspiration from one of my favorite telescope making books, Richard Berry's "BUILD YOUR OWN TELESCOPE," which has the motivational sub-title, "Complete Plans for Five Telescopes you can Build with Simple Hand Tools."
Chapter 8 is "Building a 6-inch f/15 Refractor," outlining a much larger telescope than the one presented here. Berry advocates building a structured wooden tube for the "optical tube assembly" (OTA in telescope-speak), and a fixed-leg wooden tripod. We will use this as the beginning point for this telescope.
Step 3: Planning & Layout


The refractor in Berry's book describes all the bits that need to be built, but sizing and layout is unique to each telescope. I also wanted to make some changes, such as:
- I have a considerably shorter telescope
- I wanted the plywood to be clear coat finished, not painted (avoid filler!)
- I wanted adjustable legs on the tripod legs
- I wanted the tripod stabilizer to be simpler
Telescope building often begins with a nice organized sheaf of notes, but it becomes considerably more chaotic as building ensues, because the best planning always has to be adapted!
However, I wanted to have a stable record of the final design, so I laid it out in Tinkercad as well. I needed to learn Tinkercad, and this was a good exercise for that, but the Tinkercad workspace is not quite laid out for pieces this big! You can find the Tinkercad project files for this telescope here: Tinkercad Refractor Project
Step 4: Parts and Materials


Any telescope building project begins with the optics. In this case, I acquired a salvaged primary lens "achromatic doublet" -- two lenses that are carefully mounted together to make a clearer image. They had been part of a commercial telescope that had apparently been dropped, as the cell they were mounted in had a large dent on one side. While mirrors for telescope making are not too hard to find, primary lenses are less common. I found the lens in this project by watching the classifieds at Astromart and at Cloudy Nights.
The lens is a 6-inch (152 mm) diameter lens, with a focal length of 1200 mm (or, an f/8 lens, where f/ is computed by dividing the focal length by the diameter of the lens). Just the optical tube assembly for such a lens set commercially costs in the ball-park of $700, and a field tripod to mount it could cost anywhere from $500 to $1500, depending on how many bells and whistles you want it to have. For this project, I hope to spend considerably less.
Birch plywood has long been a staple in telescope building, since it is typically many plys compared to standard evergreen plywoods, which makes it stiffer and denser for structural uses. It also finishes up beautifully, and is a durable surface. For this project I used two sheets of birch plywood: 1 4x8 sheet of 3/4", and 1 4x8 sheet of 1/4". Depending on your cutting economy, you might need a bit more or bit less plywood, depending on the shape and size of your waste pieces.
Some "uncommon" parts that I don't usually have laying around the shop are shown in the pictures above, so I had to pick them up for this project. The parts list is:
- Objective Lens (for this project: 6" f/8 lens)
- Focuser (for this project: Moonlite CF2, purchased new)
- 3/4" Plywood -- 4x8 sheet or equivalent
- 1/4" Plywood -- 4x8 sheet or equivalent
- (3) 36" lengths of 3/4 inch quarter round
- (3) 1-1/8" Oak Dowels (18 inch lengths)
- (3) 1-inch 2 hole electrical straps
- (3) 3 inch springs
- (6) 1.5 inch hinges
- (3) draw latches
- Formica 909-42 Sparkle Finish
- Small squares of teflon sheet (or teflon furniture sliders)
- (1) 1 inch black iron pipe, 24" long
- (1) Pipe flange for 1" black iron pipe
- (1) 1 inch black iron pipe cap
- Stain and Finish (I used Minwax water-based Polycrylic, high gloss)
The Formica with the "42" number is the "Sparkle Finish", which is slightly bumpy. Together with teflon pads, this is an ideal combination for the telescope bearings, making your scope turn smooth and easy as you are navigating around the sky.
There are also assorted bolts, screws, and so on. Specific bolts needed for this that might not be laying around in your shoebox full of bolts are:
- (4) 5/16 hex head bolts, 5-1/2 inch long (for the Lens Cell pull bolts)
- (4) 1/4-20 hex head bolts, 5 inch long (for the Lens Cell push bolts)
- (3) 3/8 inch carriage bolts, 6 inch long (for the Tripod Legs)
- (3) 1/4-20 hex head bolts, 3 inch long (for the tripod adjustable leg levers)
- (1) 5/16 hex head bolt, 3 long (cradle pivot bolt)
- (7) 1/4-20 Tee Nuts [3 for tripod legs, 4 for Lens Holder]
- (5) 5/16 Tee Nuts [4 for Lens Cell, 1 for Pivot Bolt]
Step 5: Cutting Parts


Making telescope parts takes time, since they are often odd shapes, and have to fit together in specific ways. It can be done with hand tools, or with hand-held power tools.
The most complicated part of making telescope parts from wood is cutting circles. You can free hand circles with a jig saw and with some work with sandpaper will get by just fine. If you want to make more perfect circles, and have a router, you can make a jig and do it (see Step 7 of the Cosmos Mariner Instructable).
For this project, I used a table saw to do all the plywood ripping, and an X-Carve to do the shaped parts cutting. The X-Carve has the advantage of making parts that are almost perfectly matched right off of the worktable, and it makes circles and other complex shapes easy. In the appropriate steps, I've provided the SVG files for the parts along the way; any of these parts can be made without the X-Carve if you don't have access to one.
If you do use an X-Carve, you'll end up with a lot of wood with all kinds of holes in it, as shown above!
Step 6: Cell for the Primary Lens


For the doublet to work effectively, the lenses need to be held rigidly in place relative to one another. I decided to leave the lens in their original (damaged) metal cell, and build the telescope around it -- the cell would be hidden inside the structure of the scope, giving the wood appearance I wanted, but the lenses would be held securely and in precise alignment by the metal cell.
There are large structural vanes on the lower half of the cell -- to work around them, I had to make the supporting wood structure with slots to fit around them. The wood panels that hold the cell are two 3/4" thick panels glued together, with cutouts for the cell vanes. On the side of the wood that faces the lens cell, I ran my router with a roundover bit around the inside edge of the cutout (3rd picture) to make sure it fit snug up against the collar of the metal lens cell (see the last picture).
I cut the two cell mount pieces, the focuser mounting plate, and one of the telescope baffles in a single run of the X-carve. The SVG files are included here:


Step 7: Focuser and Eyepieces


The focuser holds the eyepiece you look through, and adjusts the position of the eyepiece to make the image a sharp focus. On refractors it is mounted on the back of the telescope.
There are a lot of workable focusers on the market from "rack and pinion" focusers (which can be in the $50-$100 range brand new), to very precise and more expensive "Crayford" focusers (which can cost multiple hundreds of dollars). In the first image above, the focuser on the left is the Crayford I used for this telescope, next to a common Rack-and-Pinion focuser.
When choosing a focuser, you should know what eyepieces you will use -- 1.25" eyepieces, or 2" eyepieces. Most 2" focusers can use an adapter that let's it hold 1.25" eyepieces, as shown in the second image above.
If this is your first telescope, and you don't have any eyepieces, you will have to decide what size to start with. Most amateurs prefer 2" eyepieces, but they are considerably more expensive than 1.25" eyepieces, so think about what your budget can afford. If you can only afford 1.25" eyepieces, but think you might "upgrade" in the future, a middle ground is to put a 2" focuser on the telescope, and use an adapter.
I already have a set of 2" eyepieces, so I used a 2" focuser on this project, a CR2 from Moonlite Telescopes.
Step 8: Focuser Mounting


I always like to test my optics before I get too deep into the build, since certain measurements (notably the length) are critical to the functioning of the telescope.
For this telescope, I wanted the front square profile to transition into an octagonal shape in the back, so the rear plate the focuser mounts onto is a perfect octagon, cut from 3/4" plywood. The side to side diameter of the octagon matches the rest of the telescope baffles, 9 inches. In the exact center of the plate, I cut a hole that allows the focuser tube to pass through the plate (the focuser has about 4-inches of range it can focus over, so the tube moves pretty far.
The focuser has a mounting flange on the base, with three mounting bolts. I used the flange as a pattern to mark the location of the bolts with a nail in the plywood plate, the drilled it out. The mounting bolts are 8-32 machine screws with a bevel head -- they pass through the flange, through the octagonal plywood back plate, and are secured with washers and a nylon locknut. The excess bolt length was sawn off with a hacksaw.
Step 9: Optical Bench Setup


Most telescope books will tell you that you can calculate where all the telescope hardware should be located, then just cut and build. As a matter of practical experience, I've discovered over the years nothing beats putting all the optics together and making sure everything works and focuses, and then MEASURING where all the parts should be located.
For this project, I built a makeshift optical bench, shown in the first picture above. It is a 4-foot long 1x10 (from our old deck) with a vertical stop plate screwed into one end.
I used a pair of clamps to secure the octagonal focuser panel to the stop plate, and clamped a ruler on the side. Two additional clamps secured the lens on the opposite end of the optical bench.
Putting the eyepiece and diagonal in, point the optical bench at something very far away, at least 1 mile, and attempt to focus -- since everything isn't perfectly lined up the image won't be great (see the last image, of a distant fence), but you can tell if it is in focus or not.
Generally, I want the focus to be right in the middle of the range the focuser can cover, with the focuser tube racked out to about half it's full range. I carefully moved the lens back and forth until the focus is where I wanted it. It is important to try your setup with every eyepiece you have -- some eyepieces focus closer, some focus farther away, but you want to make sure they are all useable. When you are satisfied with the focus, note the location of the lens against the clamped ruler.
For my lens and focuser setup, the lens needs mounted 38.75 inches from the outside face of the focuser plate.
Step 10: Tube Baffles


The structure of the tube is provided by a set of 3/4" thick baffles. The center of each baffle is cut out in successively smaller circles, slightly larger than the focused path of the light. This optical design helps insure only light from the lens makes it to the eyepiece, improving the sky viewing experience. When the baffles are stacked together the cone shape pattern becomes more obvious.
Each baffle is corner notched, as they are secured together by 4 spars of quarter-round. The notch is slightly shorter than the quarter-round, providing an inset for the plywood skin of the telescope tube to be secured in, flush with the quarter-round.
The SVGs for the remaining baffles are attached here.


Step 11: Lens Mounting Plate


The Lens Mounting Plate is rigidly attached to the telescope tube, and the Lens Cell (Step 6) is attached to it with adjustable bolts that allow the position of the lens to be controlled to align the image (a process called "collimation"). An ideal collimation system uses three adjustable bolts in an equilateral triangle, but I didn't leave myself enough space on the margins to lay them out that way, so instead I have 4 pairs of bolts in a "push-pull" system -- one set of bolts "push" the two pieces apart, and one set of bolts "pull" the two pieces together. When the pieces are in their correct positions, the push-pull bolts are tightened to work against one another to hold the system rigid. The layout of each corner of the system is shown in the first image above.
Like the Lens Cell, the Lens Mounting Plate is two identical 3/4" baffle plates glued together. Compariing the size of the Lens Mounting Plate (this Step) to the Lens Cell (from Step 6), you see the Cell is slightly smaller, allowing it to pivot slightly inside the telescope tube when adjusted.
The 4 "pull" bolts are 5/16", coarse thread hex head bolts that are just inside the corners of the pieces. The bolts pass through a washer on the front of the Lens Mounting Plate and through the plate; between the Lens Mounting Plate and the Lens Cell, there is a washer, a 3-inch spring, a second washer, and then the bolt passes through the Lens Cell. On the back of the Lens Cell, there is a 5/16" Tee-Nut that the push bolts thread into. When tightened, these bolts pull the Lens Cell toward the Lens Mounting Plate.
The 4 "push" bolts are 1/4-20 hex head bolts pass through holes that are drilled just outside the center cut-outs of the two pieces, about an inch from the edge. Each one passes through a hole in the Lens Mounting Plate and thread through a 1/4-20 Tee-Nut on the back of the Mounting Plate. Normally there would be a metal mending plate on the Lens Cell for the bolt to push against, but in this case the metal collar of the original Lens Cell is in the way, and provides an adequate surface to push against.
The two pieces must have identical holes for the 8 bolts, so clamp them together and drill the holes straight through to insure they are properly aligned. The Tee-Nuts are hammered in after the holes are drilled.
Step 12: Tube Spars


The tube corners are spars of 3/4" oak quarter-round, attached to the tube-baffles to make a rigid skeleton. The entire tube assembly is 48" long from the front edge to the back edge, but it makes a transition from a square profile to an octagonal profile starting 15" from the back of the tube. This is just for aesthetic effect ("it looks cool") -- the tube could have been left square the entire length (and might have been easier to build!).
As a result of the transition to the octagon shape, the spars only extend to the transition point, ending on a baffle 15" from the back of the tube. There the spars were cut off to provide a small "shelf" for triangular panels in the octagonal transition to be attached.
To make the shelf, I used a scrap cutoff corner of wood to hold the quarter-round in my mitre box at an angle, then sawed partway down through the curved side of the quarter-round. Securing the quarter-round vertically in the vise of my workbench with one end of the floor, a light strike with a wood chisel knocked off the cut, leaving the desired shelf.
I pre-stained the quarter-round a different color, since I wanted the exposed ribs of the spars to provide a contrasting color (Minwax Red Chestnut stain) against the plywood skin of the tube.
Step 13: Tube Assembly 1 (Front Baffles)


Tube assembly began by securing the front baffles to the quarter-round spars. Each baffle has a small square notch in the corner. Lay the quarter round in the notch, and drill a pilot hole for a #16, 1-inch wire nail.
Put wood glue over both surfaces of the corner notches, then hammer the wire nails through the pilot holes, securing the spar to each baffle.
Assembly was done by doing two adjacent spars, letting the glue dry, then flipping the tube over and doing the remaining spars on the other side.
Step 14: Tube Side Panels


The outer wall of the tube are panels cut from 1/4" birch plywood. Since this telescope was built during the 2020 Pandemic, I was not able to select the pieces myself -- I bought them online and picked them up curbside. Plywood usually has a good side ("A") and a poor side ("C"). The piece of plywood I got had a nice A side, but the poor side had some voids that were filled, together with a remarkable dark figure in the wood grain.
I elected to keep the "poor" side for the exterior side on the scope, even though the filled voids would show. Together with the dark figure grain, I think it ends up looking quite nice.
I ripped four 7-3/4 inch side panels on my table saw, marked a "bevel" from the transition point (15" from the back of the scope) to the width of the last octagon plate in the tube (where the focuser is mounted) and ripped the corners off by holding the cut panels at an angle with the mitre-gauge on the table saw.
Step 15: Tube Assembly 2 (Side Panels)


Three of the sides of the tube are permanently attached, but the 4th is attached with screws and can be removed to give access to the inside of the telescope and the optics, if necessary.
The panels are set on top of the baffles, resting between the lip of the spars so the plywood surface is smooth with the spar edge. Glue is smeared along each of the baffle edges, and the panel is secured to each baffle with 3/4" bright wire brads.
Note that at this stage, the panels are hanging out past the back end of the baffles as free, dangling "tails."
Secure the three permanent panels, and let the glue dry.
Step 16: Tube Assembly 3 (Rear Baffles)


Once the glue on the forward baffles has dried, the baffles in the octagon transition are attached. Begin by attaching the rear octagon plate, where the focuser will be mounted. Glue and brad it in place, and wait for the glue to dry.
Next, secure the remaining two baffles in place. When placing them, make sure they do not extend above the edge of the diagonal cuts in the side panels -- if they do, the corner panels of the octagonal transition will not lay flat!
Once all the baffles are in place, the last side panel can be installed. DO NOT GLUE THE 4th PANEL IN! Drill pilot holes and secure it to the baffles using small screws. The removable panel allows you to install and remove the optics of the telescope when you need to.
Step 17: Tube Assembly 4 (Octagon Corners)


The last panels are the triangular shaped transition panels. I had precomputed their size and shape with a bit of trigonometry, but once you have the other 4 panels installed you can measure their size and shape directly off the telescope tube.
I cut them using the X-Carve, and pre-stained them the same Red Chestnut color as the spars. They are glued and secured with wire brads. The SVG file for the X-Carve cut is below.
Attachments

Step 18: Always a Crisis (Part 1)


I've built a lot of telescopes over the years, and if there is any single truth it is this: there is always at least one crisis in the middle of the build!
In the case of this telescope, there was not enough clearance between the front of the telescope and the first baffle (the Lens Mount) to insert the mounting bolts after the tube had been assembled! I had test fit the entire assembly with the lens mount put together before I started nailing and gluing. *sigh*
So the solution was to trim the front baffle while it was in place, using a hand router and a trimming bit. I clamped a piece of scrap wood against two sides in a corner, to give the bearing on the trim bit something to lean against, then just routed out the corner from a circle to a square, opening up space for the bolt.
In the end, it almost looks like I designed the baffle to look cool on the front. :-)
Step 19: Cradle


The cradle pieces are the most complex shape in this telescope. They can be cut by hand, but the utility of the X-Carve really shows here, cutting out two identical pieces with minimal waste of wood.
The cradle sides provide the structure of the cradle, as well as the vertical pivot points for the telescope. The sides are held together by a simple u-shape construction made from three square cut pieces ripped on the table saw, each 10 inches wide. The front pieces is 3-7/16" tall, the back panel is 4" tall, and the floor between them is 16-7/8" long.
I started by gluing and screwing the front, floor, and back together, and then once it was dry, attaching the two sides.
The entire assembly is glued and fastened with drywall screws to make it solid and rigid.
The SVG files for the cradle sides are attached here; make two of them.
Note Added in Write-up: Sometimes there is a second crisis! The rear panel shown in the pictures is too tall! It blocks the telescope tube from pivoting all the way down to the horizontal, something I discovered only after I assembled the entire telescope. I had to cut the panel shown here down with a razor saw and refinish the cradle; see the next step! The dimensions listed in the writeup above are the correct dimensions for the working final cradle.
Attachments

Step 20: Always a Crisis (Part 2)


I didn't discover the cradle back wall was too high until the penultimate assembly, so the correction was done after finishing. In this case, the fix was relatively easy. The wall was twice as high as it needed to be.
I took my finishing saw, and trimmed down the sides of the cradle backboard to the half-way point. I drilled a hole along the line where the new top edge should be, used my router to make a straight slot to fit my finishing saw, then used the saw to cut the offending piece out.
Since the entire cradle had been assembled with glue and screws, I had to sand the residual glue off, which damaged the (first) finish I had put on the cradle; easily fixed with a day of recoating and waiting for the polycrylic to dry.
Step 21: Azimuth Bearing


In telescope-speak, the "bearing" is a surface the telescope turns on. The azimuth bearing is the surface the scope rotates around to point in any compass direction. The bearing his held together by a bolt that passes through the cradle, through the bearing, and fastens to the tee-nut in the tripod head.
The bearing board here is an 11-inch circular piece of 3/4-inch plywood, attached to the cradle with glue and drywall screws; make sure the heads of the drywall screws are completely countersunk into the bearing board, as they will get covered up by formica in Step 23.
The classic bearing surface used by amateur telescope makers is formica. For this project, I have left-over formica from other projects, but another solution is to cut your bearing boards from old counter-tops or sink cutouts -- keep your eye out for neighbors or family doing renovations, and salvage their old counters for telescopes!
Step 22: Balance and Side Bearings


The side bearings are circles on the side of the telescope tube that sit in the arms of the cradle, and allow the telescope to tip up and down.
For the telescope to be balanced and remain fixed on whatever you have it pointed at, the bearings have to be at the balancing point of the telescope (the "center of mass" for those who remember their physics class).
To find this, you must put all the hardware on the scope: the lens gets mounted in the front, and the focuser gets mounted in the back with the diagonal and an eyepiece!
The balance point is found by putting a large dowel under the telescope, and moving it back and forth until it tips one way or the other. The point where it naturally wants to tip either way (it is hard to balance it on a rolling dowel!) is the balance point. Measure where this is -- it will be the centerline for attaching the side bearings.
Quite by chance, the balance point was exactly on one of my baffles. The 1/4-inch panels of the telescope sides are not nearly strong enough to support the weight of the telescope on the side bearings, so I cut four panels of 3/4-inch plywood, and glued them inside the tube on either side of the baffle where the side bearings were going to be attached.
The side bearings are 7-3/4 inch diameter circles, made from two pieces of 3/4-inch plywood laminated together. They are attached to the telescope with 4 drywall screws into the supporting panels installed at the balance point. Do not glue the side bearings on. Sometimes the formica on the bearings has to be replaced, so having them be removable is a plus!
Step 23: Formica for Bearings


The surface of the bearing board is covered by a piece of formica cut to shape, adhered with contact cement. Once you contact cement the pieces together, make sure to roll it out with a pressure roller to secure every part of the formica.
The formica for the side bearings were long strips cut from scrap ends. I clamped the scrap under a metal straight edge, and cut the strips to the correct width. These are also attached with contact cement, though they are considerably harder to get on straight! Making them a bit wider than necessary is helpful, with the excess trimmed off in the next step.
In order to keep the ends of the strip secured to the bearing, I put a drywall screw with a finishing washer at the point where the strips meet. This not only keeps the strips tacked down, but also helps keep anything that catches on the edge from lifting the formica off the bearing.
Step 24: Trimming Formica Edges


I always cut my formica a bit oversized, to make sure the bearing surfaces are completely covered. The edges need to be trimmed off so they don't catch on things and lift the formica up.
Once the contact cement is dry, use a router trimming bit to make sure it is flush with the wood of the bearing.
Step 25: Tripod Head


The tripod head is where all the weight of the telescope is centered, and is made of three layers of 3/4" plywood glued together.
The three layers have the same outer shape, but different cores, and were cut in a single X-Carve piece, along the the pieces for the tripod hub. The three layers of the tripod head are:
Top Plate: The topmost plate has a hole for the pivot bolt of the telescope, an a tee-nut for the pivot bolt on the underside. In addition, the black iron pipe flange attaches to this plate, and will be encased inside the tripod head (never to be see again). Note how the tee nut is inside, in the center of the pipe flange -- this will let the pivot bolt of the telescope extend into the black iron pipe, if it needs to.
Middle Plate: The middle plate has a large hole that provides clearance for the pipe flange.
Bottom Plate: The bottom plate has a hole just big enough to let a piece of black-iron pipe be threaded into the flange.
I started by gluing the middle plate to the top plate, installed the pipe flange, then glued the bottom plate on and clamped the entire assembly to let it dry overnight.
The SVG files for the pieces are attached here.


Step 26: Tripod Legs 1 (Basic Structure)


The tripod legs are each made of a 4" wide panel of 3/4" plywood, 48 inches long. The sides are trimmed with 1.75" wide strips of 3/4" plywood, each 45 inches long. The side strips provide rigidity and also act as mounting plates for the tripod head.
Drill a 3/8-inch diameter hole 1 inch down from the end of each of the strips; this will be where the hinge bolt of the tripod leg secures.
I rounded off the edges of each of the strips, and stained them the same Red Chestnut color as the spars and corner panels on the tube.
The strips are secured to the sides of the 4-inch wide panels, and extend 2-3/4 inches above the top of the wide panel. When complete, the top of the leg makes a U-shape that will go around the wing sticking out on the tripod head.
Step 27: Tripod Legs 2 (Adjustable Feet)


In order to give the tripod some moderate leveling capability, each leg is fitted with an adjustable foot, which is made from a 1-1/4 inch oak dowel, pinned under a wooden plywood lever that provides tension to hold it in place. The first image shows the raw parts, and the second image shows the schematic cross section.
The first part of the lever is an anchor block made from a 2-inch long by 1.25"x1.25" block cut from a scrap of laminated plywood. The second part is the lever itself, made from a 2-inch by 4-inch rectangle of 1/2-inch think plywood.
Install a 1/4-20 tee nut, 2-3/4 inches from one end of the lever (second picture). Lay the lever on the tripod leg, flush with the bottom of one of the side strips, and make a mark through the center of the tee-nut. Drill a 1/4-inch hole through the tripod leg panel on that mark; a 1/4-20 bolt with a star knob will pass through that hole and secure to the tee-nut to provide tension on the adjustable leg.
A 1.5 inch utility hinge is placed on the outside edge of the anchor block, and on the underside of the lever on the opposite end from the tee-nut (see the schematic in the 2nd picture; the 4th picture shows the assembled piece)
On the underside of the tripod leg, press the long edge of the anchor block against the side trim, flush with the bottom of the strip; secure it in place with glue and two drywall screws.
At the very bottom of the tripod leg, place one of the electrical straps. Locate the strap by first putting one of your dowels flush against the anchor block, as shown in the 7th image above). This secures the adjustable leg, and guides it as you slide it up and down to the correct height. Note the 1-1/4 inch dowels will fit tightly in the strap; I bend them a bit with a pair of vise-grips so they still hold the dowel securely, but let them slide freely up and down.
I didn't want the oak dowels to ride directly on the ground, so I covered them with 1-1/8 inch chair tips, which required sanding the end of dowels down a bit to make them fit. The chair tips will take abuse from the ground, provide a bit of gripping traction, and can be replaced easily when they wear out.
Step 28: Tripod Head Assembly


The legs of the tripod attach to the wings of the tripod head using 3/8-inch carriage bolts. I made a makeshift jig out of cross-hatched 2x3 boards clamped to my drill press, and drilled out the holes for the carriage bolts in each wing, about 3/4 of an inch back from the outer edge.
The tripod stabilizer bar also attaches to the tripod head. It is a 24-inch length of 1-inch black iron pipe that screws into the flange that is trapped in the center of the tripod head. Screw the black iron pipe into the flange; you can use a wrench, but I can tighten it enough by hand that I need a wrench to untighten it!
The tripod hub piece will slide over the stabilizer bar and run up and down it.
Step 29: Tripod Hub Assembly


The tripod hub is the center piece that slides up and down the stabilizing bar (pipe) in the center of the tripod. I changed my mind on the design midway through, but didn't want to waste wood, so I had to hand-tool it, rather than having it cut out by the X-Carve.
It is constructed of two identical circles of 3/4-inch plywood; mine were 6 inches in diameter. Notches were cut in the top piece using a jig saw, 1.75 inches wide, and 1 inch deep. The top piece is then glued to the bottom piece, leaving small pockets that will capture the stabilizer arms that fold down from the tripod legs.
Drill a 1-1/4 inch diameter hold directly through the center of the piece that lets the stabilizer bar pass through without resistance.
In the side of the Hub, between two of the capture pockets, drill a 5/16 inch diameter hole from the outside edge to the center hole, and install a threaded brass insert for 1/4-20 bolts. Inserting a 1/4-20 bolt with a star-knob through the insert will tighten the hub against the stabilizer bar to make the entire tripod assembly rigid.
Step 30: Tripod Legs 3 (Stabilizing Bars)


The stabilizing bars are the secret to making the tripod rigid. They are hinged to each of the three tripod legs, then attached to the tripod hub with a draw latch.
The stabilizing bars are made from 1-3/4 inch wide strips of 3/4" plywood, 8-1/4 inches long.
Secure them in their respective sockets on the tripod hub with the draw latches so it makes a three pronged assembly that can slide onto the pipe at the center of the tripod.
Step 31: Tripod Leg Attach


The tripod legs attach to the three wings on the tripod head with a 3/8-inch carriage bolt, with washers between each wood interface, and secured with a nylon locknut. Don't overtighten the lock nuts -- each of the legs should pivot easily around the wing.
Once the legs are attached stand the tripod up, with the legs roughly spaced at their open distance; for a tripod of this height, and to not interfere with the telescope, the outermost part of each leg is about 18 inches from the center stabilizing bar, and the top of the tripod head is about 52 inches above ground level.
Put the Tripod Hub on the stabilizing bar, and secure it in position with the locking hand knob, about 3 or 4 inches about the bottom of the bar.
With the tripod arms latched to the hub, extend each one out to the leg and mark where the hinge should attach. To make each leg identical, I determine the hinge location directly with the arm on one leg, then measure where the hinge should go on the other legs to be in an identical location.
The hinge is secured to the tripod leg, so when the stabilizer arm is unlatched from the tripod hub, it remains attached to the leg.
The last image shows a complete cross-section schematic of the tripod stabilization system (hub + arms).
Step 32: Cradle Pivot


The cradle attaches to the tripod with a 5/16 pivot bolt on a star-knob, which passes through the center of the tripod head and threads into the trapped tee-nut in the tripod head. The pivot bolt is fastened with a star-knob so it can be attached and removed quickly without the necessity of wrenches.
The pivot bolt holds the bearing surface (the formica on the bottom of the cradle) against teflon pads that will be attached to the top of the tripod head. The hole for the pivot bolt should be drilled directly through the cradle, the bearing board, and the formica.
Locate where the center of the circular bearing board is, and mark its location. I transferred the mark to the cradle side and drilled down, as it was easier to secure the cradle for drilling in a "right side up" position.
Step 33: Bearing Pads


The companion to the formica surfaces are a set of smooth pads for the formica to rub against. The traditional material for pads is virgin teflon (PTFE) available in thin sheets that can be cut to size.
On the cradle, the side bearings ride against tabs of teflon secured partway around the circular cut-out from each other.
For the azimuth bearing, three pads are secured to the top of the tripod head. I didn't have enough virgin teflon on hand to make pads, so I used some nail-in furniture glides. These will work okay, though don't move as smoothly as teflon and will wear down over time. They are an adequate solution for now, and can always be replaced with teflon once I obtain some more.
Step 34: Finishing


Wooden telescopes need to be finished to protect them from water collected on cool nights from the accumulation of dew. Plywood telescopes are often just flat out painted, but I wanted to highlight the wood grain on this scope.
The contrasting elements (the spars, the octagon corners, and tripod leg sides) were stained before assembly so i didn't have to worry about keeping stain off other pieces.
The entire telescope is finished with multiple coats of Minwax Polycrylic water-based polyurethane, with a light 220 grit sanding between each coat. Spar Urethane is also great for finishing telescopes, but the time between coats is much longer.
The interior of the telescope is painted flat black, to absorb as much stray light as possible; this helps makes astronomical images sharp and dark.
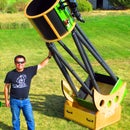
Step 35: Complete Telescope!


To set the telescope up, first secure the cradle to the top of the tripod head with the star-knob bolt. The open box end of the cradle should be loaded with counter-weights to keep the telescope stable. I use a four 5-lb weightlifting plates (I probably need a few more), but any heavy mass should work (like milk jugs filled with water).
With the counterweights in place, lift the telescope into the cradle, and it is ready to go! It should turn easily on both the azimuth and the side bearings, requiring only a little pressure from your hands to move the telescope, and with it stopping as soon as you stop pushing.
The pictures above were taken on the day I finished the telescope. It is a well known Law of Nature that the weather is awful on day day that a new telescope is completed; hopefully it will clear up before the Jupiter-Saturn conjunction on 21 Dec 2020 -- this telescope should shown both planets simultaneously in great detail!
I hope this instructable inspires you to try your hand at telescope building -- let me know if you have any questions, and be sure to share you own builds if you give it a go.
Happy skygazing!

Runner Up in the
Plywood Challenge


