

Introduction: Arduino Robot Arm Bartender


Ever wish you had a robot that could doll out the shots? The future of partying is here with the Robot Arm Bartender! Serve up drinks in style, and impress your guests with the press of a button! This project utilizes a RobotGeek Snapper Arm with a Pumping Station to move some delicious liquids from container to glass! We will be using the Arm Link Software to program the arm's movements.
Step 1: Project Parts List
- 1 x RobotGeek Pumping Station
- 1 x RobotGeek Snapper Arm
- 1 x RobotGeek Spout Kit
- 1 x RobotGeek Mega Workbench
- Nuts, Bolts, and Standoffs
- Silicone Tubing
- You can use the pushbutton from the Snapper Arm kit, or use something like a 9MM Pushbutton, or even a Huge Red Panic Button
- Shot Glasses, Solo Cups, Drinking Vessels of any variety.
- A non-carbonated drink of your choice.
Step 2: Assembly

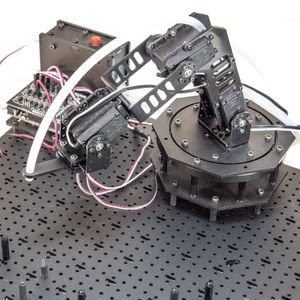
Follow the guides for each of the components:
Pumping Station Assembly Guide
Instead of attaching the gripper to the end of the snapper, we will be making a spout system and running the silicone tubing up the arm, from the pump to the spout. Pictured are just a couple of ways to make a spout. Get creative with this step, there are many ways to do this.
We will also be attaching the Arduino, Pump, a pushbutton, and the Snapper Arm to the Mega workbench. This is so that we have a place to clearly define where to set glasses of a certain size. Put the pushbutton somewhere it can be easily reached, out of the way of the other components.
Step 3: Wiring

| Device | Sensor Shield Port |
|---|---|
| Servos | |
Base Rotation RobotGeek Servo | Digital 3 |
Shoulder RobotGeek Servo | Digital 5 |
Elbow RobotGeek Servo | Digital 6 |
Wrist RobotGeek Servo | Digital 9 |
Relay RobotGeek Pumping Station | Digital 13 |
Activation Button RobotGeek Pushbutton | Digital 2 |
Make sure that the 6V power supply is running the pump, and the 7V power supply is plugged into the Arduino. The Power pins on the Sensor Shield should be set to VIN to supply the full 7V power to the servos in the Snapper Arm.
Step 4: Software Set Up


In order to use this arm, we're going to need to set up the Arm Link software. This isn't hard, but it is involved, so make sure to follow along carefully.
Download the Snapper Arm Sketches
- Download the Snapper Arm Sketches from Github.
- Unzip to your Arduino Sketches folder. You will need to know where this is later.
Setting up the Arm Link Library and Firmware
- Download the ArmLinkLibrary and Extract the ArmLink folder to your Arduino libraries folder.
- Open the Arduino IDE, and open
File -> Examples -> ArmLink -> SnapperArmLinkSerial
- Uncomment one of the following lines:
//#define GRIPPER_TYPE ROBOT_GEEK_9G_GRIPPER
#define GRIPPER_TYPE ROBOT_GEEK_PARALLEL_GRIPPER
It doesn't matter which, because we will not be using a gripper for this project
- Make sure your Robot Bartender is plugged into your PC via USB, and upload the firmware.
Setting up Processing
- Download and extract Processing 3 for your operating system
- Open
Tools -> Add Tool...
and in the window that pops up, click on the Libraries tab. - Search the library for
G4Pand install it. - Search the library for
Video, and install the Video Library authored by the Processing Foundation
Setting up Arm Link
- Download and extract the ArmLink Software for Processing 3
- Make sure your Robot Bartender is plugged into your PC via USB and open
ARMLink.pde. Processing 3 should open to a window with the InterbotiX Arm Link code. - Press the Triangle button in the top left corner of the window. This will run the Arm Link Software.
- Select the COM port your Bartender is on and click Connect.
Step 5: Making the ArmSequence File


- Once you are connected to your Bartender, the Arm Link software will display the Control Panel, Sequence Panel, I/O Panel, and Mode Panel below the Setup Panel.
- Click on
Cylindricalin the Mode Panel. This mode gives us easy to understand control with good reach. The Control Panel will change. - Tick the
Save Digital Outputsbox. - Click on
New Pose. This will let us save each position we set the arm to. - Tick the
Auto Updatebox at the bottom of the control panel. This will move the arm as we adjust the sliders in real time. - Once the arm is in a position you'd like it to be in, you can click the
Save Posebutton to save it to the active sequence. - For each pose you want, hit new pose, adjust the sliders to move the arm to the position you want, and hit
Save Pose. If you want to turn the pump on, tick box13in the Digital Output section of the I/O Panel. Mind thePause (Ms)section of the control panel. This will be the amount of time your pump will stay on. Be sure that if you would like the pump to turn off before moving that the next pose you create has box13unchecked. - Once you have all the poses you want, click the
Save to Filebutton in the Sequence Panel. - Navigate to the
SnapperArm -> SnapperArmPlayback
folder that you downloaded earlier, and clickOpento save.
Step 6: Upload Your Sequence!
Now that your sequence is complete, we can open the
SnapperArm -> SnapperArmPlaybacksketch and upload it to the arduino. Set it up, let it do a dry run, and then run the input tube from the pump to the liquid you'd like to serve up!
Step 7: You're Ready to Party!
Now that you've made a robot arm that can serve up drinks, what else can you do? What would happen if you swapped the input and output tubes on the pumps? Can you make a robot arm that mixes drinks to be served to one glass instead of sending one drink to many? What about adding sensors other than the button to initiate serving drinks? Maybe instead you'd like to use the robot arm to prank an unsuspecting interloper? There's so much you can do, we'd love to know what you come up with!


![Tim's Mechanical Spider Leg [LU9685-20CU]](https://content.instructables.com/FFB/5R4I/LVKZ6G6R/FFB5R4ILVKZ6G6R.png?auto=webp&crop=1.2%3A1&frame=1&width=306)


