

Introduction: Assemble and Detail a Vacuum-Formed Model


Vacuum formed plastic is a good way to get lightweight, cheap, and relatively tough props. But it will need a little reinforcement, and some details are not captured well.
For this Instructable I'm documenting the construction of a set of Lewis Gun ammo drums from http://www.foxflier.com/lewis/, a company specializing in vacuum formed replicas for aircraft restorers.
Step 1: Trim


The first and most critical step in a vacuum formed model is trimming. How these pieces are made is thus; a sheet of styrene is heated and then placed on top of the "bucks," that is, patterns for the pull. Then a powerful vacuum is applied to suck the plastic down on to the forming table and close in to as many of the nooks and crannies of the bucks as is possible.
This means all vacuum formed pieces have a missing "back." They are raised up from the bed like a bubble pack. And the first step is to trim them roughly away from the sheet.
Next you trim to size. Again, since the plastic is pulled down over the top of the original model, the bottom edge will not be clean. It will chamfer out a little. You need to trim off this curved bit or the model will not assemble correctly. Smart kit builders allow some excess on the bottoms of the forms just for this purpose. Others do not, and it is a balancing act between trimming away too little and having that puckered edge, or trimming too much and having the pieces not mate up.
For this project, I wasn't too concerned about fit-up, and the real-world drums were manufactured in haste anyhow, so I just did an eyeball trim with a pair of tin snips. You can also use tough, heavy-duty scissors (preferable is scissors with a sheering edge). Or if your hand is very steady, a cut-off wheel in a Dremel moto-tool. Or if you have a lot of patience, a heavy-duty X-acto knife. In some cases you can score then snap, but I've had indifferent luck with getting a decent cut that way.
For the last stage of the trim you use 100-200 grit sandpaper to smooth out any irregularities in the cut line and make it properly straight.
Step 2: Glue

For most Vacuum formed models, the main assembling is done by gluing the plastic to itself with ABS glue. This glue is a welding glue; it melts the plastic a little and you mush the pieces together. When it dries, the bond is as tough as the original plastic.
My process for these drums was a little different.
Step 3: Reinforcement


Vacuum formed models are thin, hollow, plastic shells. To give them stability to carry around, you need to reinforce them. The most common reinforcement is filling the insides with expanding foam.
We'll get to that.
For the Lewis drums, my first reinforcement is disks cut from 1/4" MDF, which were glued to the inside. Because the top and bottom have relief, two discs are used to fit the shape of the bottom. On the top, one disc is sufficient; that one is mostly there to accept the screws from the strap holder.
(I've tried superglue, white glue, epoxy, and hot glue, and the best bond between ABS and the MDF seems to be ABS cement).
I then created spacers and glued them into the top, so when the bottom was fit into place, it would land at the right height and not "fall in."
Step 4: Modification


As made, the drums did not fit our foam-cast Lewis Gun. The reason being the hardware that catches the bullets and pulls them into the gun.
In the real world, these drums are just shells, with a couple of guide rods running through them. The bullets stack up in a long spiral. It it the "overlap" at the top of the spiral I needed to add.
First, cut the plastic so the last three rounds can be bent down inside. Then there is a slot cut into the MDF pieces. This provides the relief; the next step is making it look like something.
It turned out that I got closer both in looks and in desired dimensions if I added an extra disk of 1/8" MDF on the bottom. Fortunately I had a foam-cast replica as well to take measurements from. To get the placement of the decorative half-holes, I ground up a little HB lead from a mechanical pencil and did a rubbing with my fingertip to transfer the information to a piece of paper.
Then I cut out the paper with an X-acto knife and used it as a drill template.
Step 5: Fill


Once the top and bottom is assembled, I sprayed in expanding foam. Do not use Touch n' Foam (the only spray expanding foam sold by Orchard Supply Hardware, alas); look for Great Stuff if you can find it. If you have to use the crap foam, be aware that it may expand very little or a whole lot, and it can sometimes take up to eight hours to cure. Like I said -- don't use that brand if you can help it.
Then the area around the cut-out is filled with Bondo -- automotive putty.
Like the better (but more expensive) Apoxie Sculpt, Bondo has a "magic moment." For a few minutes after it has set up but before it has complete cured, you can carve it with lighter tools; X-acto, a wood carving knife, dental picks. Or a very useful little panel scribing tool I got at the local hobby store, which makes a great fine-detail scraper.
Step 6: Prime and Sand

And then the usual round for props like this. In this case I used automative filler-primer to fill in the smaller damages, and applied Bondo Spot Putty as necessary between steps of spray, sand, spray, sand.
Many people like to seal the edges of MDF with superglue. I just made do with filler primer and a light sanding.
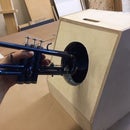
Step 7: Strap Holder


To help ground crews carry around the big 97-round drum, a leather strap was attached to the top. The strap holders varied widely, but basically came in two flavors; a formed or cast set of ears to which the strap ends are riveted, or a folded-metal assembly to which the strap is buckled.
Neither comes with the kit, and both are relatively similar in effort to fabricate. For the former, I would have hand-carved the shape in modeling clay, then cast it in resin.
I chose the latter, because although 1/8" acrylic is out of scale for the metal plate they would have used in period, it is extremely simple to laser-cut the shapes, then create the bends necessary with a heat gun.
Plus, I have a laser.
After looking at a lot of reference pictures, I carefully measured the place on the model where the strap holder would go, then drew up a mock-up on graph paper, cut it out, and placed the mock-up on the drum to see how it fit.
When it passed that test, I reserved an hour on a laser engraver at my local TechShop and brought along a bunch of scrap acrylic. By adjusting the machine's origin point, I could place these small pieces in the uncut parts of the scrap I'd brought.
I assembled the pieces using acrylic glue -- another welding glue -- and bent them over the edge of a piece of left-over hardwood by heating them with the heat gun I use for heat-shrink tubing. Do have good ventilation when working with acrylics and sources of heat. (And that goes double for Bondo).
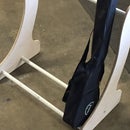
Step 8: Leatherwork


The strap itself is leather. With no good sources for scrap leather in my immediate area, I had to mail order from Tandy. There are also a surprising number of eBay vendors in scrap leather and hardware. But Tandy was cheap, and shipped fast.
As a sanity check, I spent a couple of bucks on a scrap of vinyl at the discount fabric store, and cut strips to both 5/8" and 3/4" to check sizing and fit. I popped them on with Chicago Screws.
Leatherwork calls for a number of odd specialized little tools, of which I own essentially none. Without a leather splitter, skiver, or even trim knife, I had to skive with a tiny wood plane I happened to have lying around. The leather straps I purchased (5/8" veg-tanned) were a little too thick for the prop otherwise.
I also lacked a bevel tool and used my wood carving knife to do that. Then after employing one of my only two tools -- a rotary punch -- I burnished the flesh side and edges with the side of an X-acto knife holder.
To get a really nice antique finish you need either a lot of time, or a lot of supplies. And time. I was in too much of a hurry to wait for ground shipment of antiquing oil stains, and I didn't have enough leather (or time) to experiment with dyes and paints. The best finish is really to put it into use. To expose it to sunlight and stress and wear.
My compromise was to beat up the leather with sandpaper and files, soak it in Neat's Foot, mash it and twist it up in my hands a bunch (also working the oil into the leather) and stuck it out in direct sunlight for a day. I also rubbed a little graphite powder into it to darken it up, especially in the places where grime would be expected to collect.
I'm not trying to make these look ancient -- just used.
The hardware is a simple rivet -- I also bought the basic rivet kit from Tandy -- and some strap buckles, which got the same paint treatment as the ABS.
Step 9: Painting


The key paint problem with these is that the details of the drums -- particularly from the bottom -- is not well replicated by a cast or vacuum form. In the real thing, the rounds are basically suspended in space, with just the bases and the noses held, and you can see all the way into the magazine.
The compromise is to paint things mostly black. So, the first step after priming is to spray the area of the cartridges with a metallic brass. My local supplier was out of the Krylon brass I prefer and I had to fall back on an "antique brass" instead.
To keep that paint from lifting up in the next step, once the brass was tried I protected it with a couple of coats of Blair Spray Fixative.
Then the trick is to spray the whole thing black, then while the paint is wet, use a rag or paper towel to scrub it off the "shells." If done right, this will leave darkened edges and ends and help hide the join between the shells and the voids.
For the black areas, I discovered late in the painting process it helped to add a little texture to break up the surface; a combination of automotive Filler Primer and Bondo Spot Putty.
Then several coats of flat black primer.
Over that, a trick I'd learned on a previous project; hand-rubbing graphite into the paint in a sort of dry-brush technique, both bringing a general oily shine, and highlighting the projecting parts (whereas the paint deeper in the cracks remains flat and dark.
On top of that, as a final pass, a little light dry-brushing (actually, a similar "dry rubbing" technique) with silver Rub'n'Buff. This represents the areas that got the most wear, like the strap eyes and the outer edges, plus the wedge of the ramp.
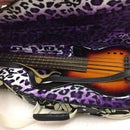
Step 10: Finished

And that's it. As per the references, the strap is riveted on one end and the other is held by a strap buckle as a keeper from sliding through the ear of the strap holder. Because of the modification I made to the bottom of the original vacuum form, they fit on top of an expanded-foam Lewis Gun prop we also have lying around; seen here with the original foam magazine mounted.
There is no top coat, and with that and the Bondo these are not particularly study. But since all they will be is display props, I'm not too worried about that. I'd also like to have more time to work on better looking leather next time...but I'm trying hard not to get dragged into full-scale leather-working on top of everything else!


