

Introduction: Cleaning Up Your 3D Model


It's extremely rare, if not impossible, to end up with a 3D model that has no flaws. Mostly these flaws will come from the point where your object was fixtured, or where it touched the ground, but sometimes there will be other small areas that didn't reconstruct well for some reason. Some flaws are visual and others will present more fundamental structural problems if you plan to 3D print your model. Most flaws can be cleaned up pretty easily, and some are bit more of a challenge. Fortunately ReCap Photo has a well designed set of tools for fixing these problems, that are also easy to learn.
In this lesson, I'll give you an overview of all the toolbars and then show you how to use some specific tools for the kind of model repair you'll be doing most often.
Step 1: Tools in the ReCap Photo Editing Environment

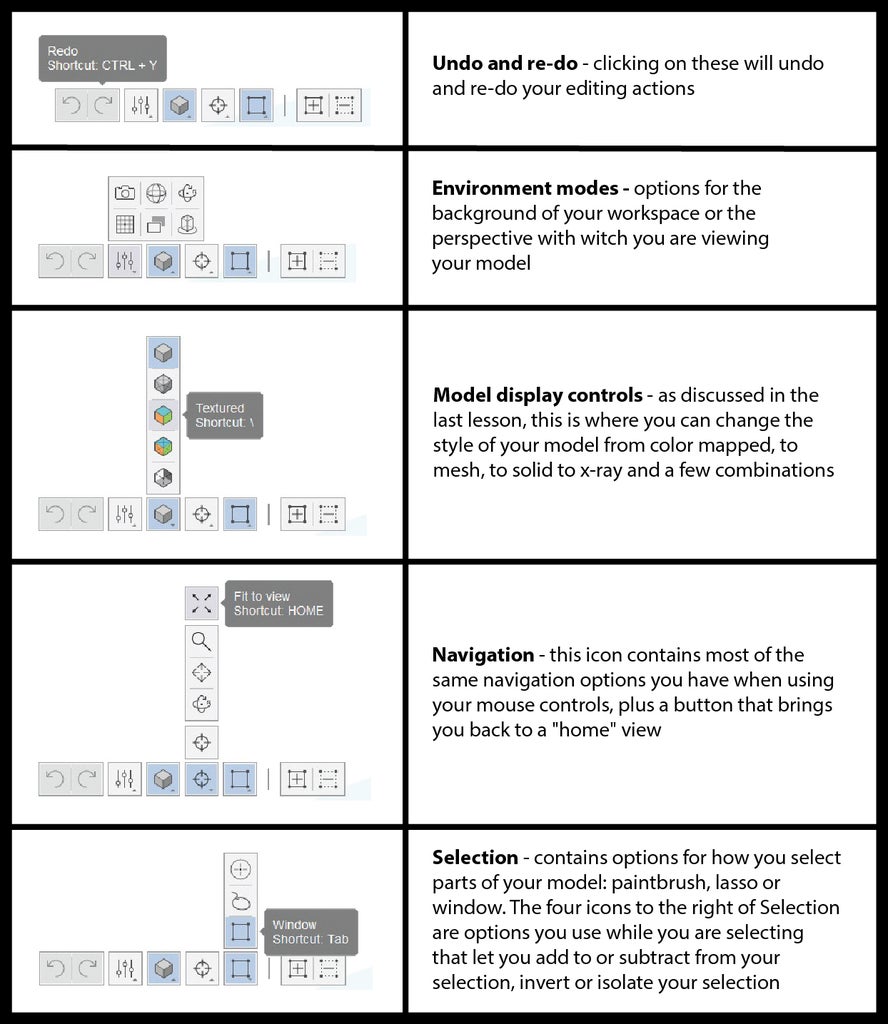
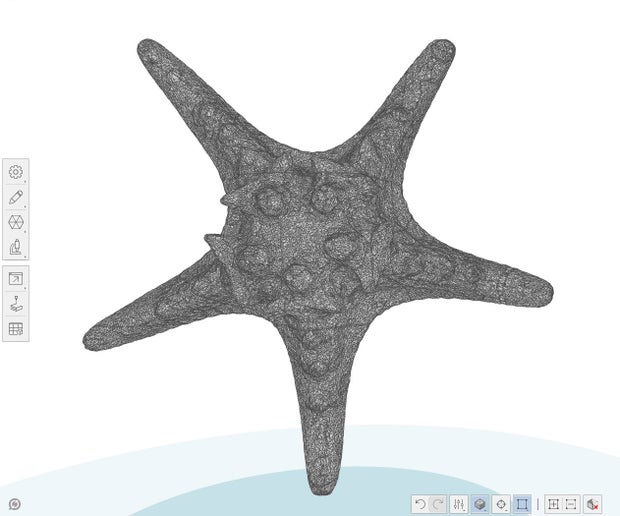
In the ReCap Photo Editor you will find three main toolbars that contain all the functions you need to view and edit your model. Clicking on most of the icons will bring up a menu of further options in that category. I'll give you a basic overview of what's in each toolbar, and in the next section I'll show you which workflows you'll use to most often to clean up your models.
The Navigation Bar is the line of icons at the bottom of the screen.

Here you can access from left to right:
The Action Panel is the vertical menu on the left hand side of the screen. Here you will find from top to bottom:
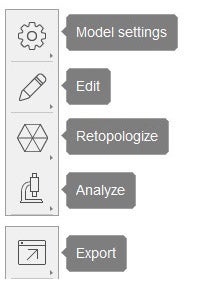
Clicking on each icon opens a menu of further tools that will let you perform certain types of edits to your model.

Step 2: Deleting Parts of Your Model
As I mentioned in the last lesson, when your model is created, there will sometimes be some extra bits around the edges or particularly the base. Deleting these pieces is the often the first part of the model clean-up process.
The simplest way to delete is to use the slice tool, which looks like a little saw blade in the Tools menu. Clicking on this tool will give you a flat horizontal plane with an inner and outer circle. The outer circle lets you move the plane up and down and the inner circle tilts the plane at an angle. Clicking apply will delete everything below the plane. You can also switch which side of the plane gets deleted by clicking on the little black and white square in the dialog box, and you can choose to have the hole created by the deletion left open, or filled.
Another way to delete parts of your model is to use the select and delete tools. This lets you select smaller or more oddly shaped areas of the model.
For example, if you needed to delete a small isolated piece of your model, click on the select tool in the Navigation Bar on the bottom of the screen and pick your selection type. For this, the bottom icon, the window selection, will work best. Click and drag to select this piece then release.
To delete, click on the Tools icon in the Action Panel on the left and select the delete icon which looks like a trash can. The piece you selected will be deleted. Notice that when you are using the window selection mode, you are selecting all the way through your object, not just the visible surface.
If you wanted to delete a more oddly shaped area of your model, you could choose the lasso selection tool. This tool lets you draw any shaped area to select. With this tool you are also selecting all the way through your object, not just the visible surface, so when you hit delete, everything in the area you selected will vanish.
If you want to select more than one piece to be deleted at once, you can use the add to selection button on the right of the Navigation Bar. If instead you want to remove something from the selection, use the subtract from selection button.
If you ever want to undo any action, just click on the undo button.
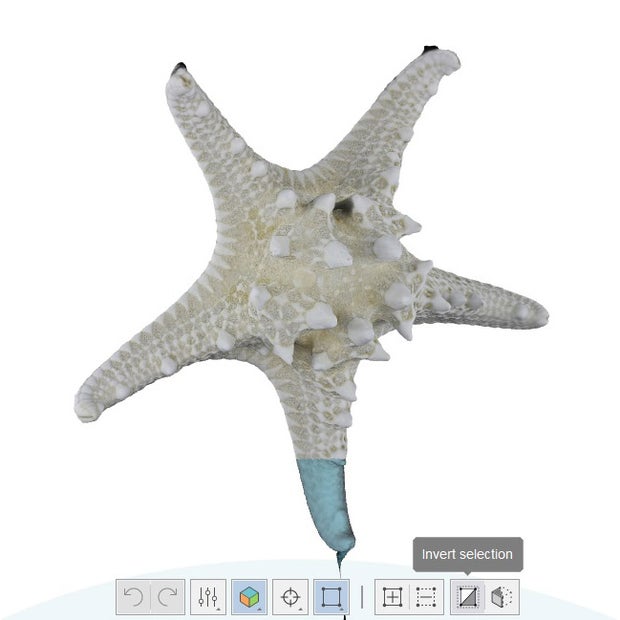
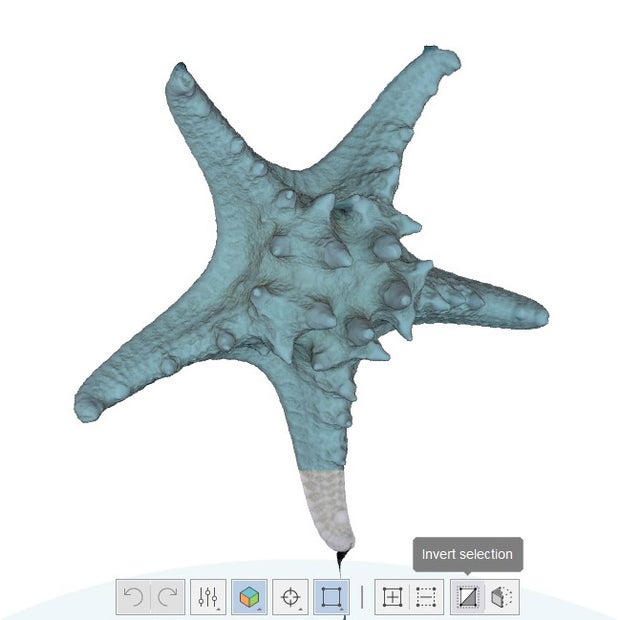
It can sometimes be easier to select what you don't want to delete. In this case, use a selection tool to grab everything but your intended selection, then hit the invert selection button to select the opposite.
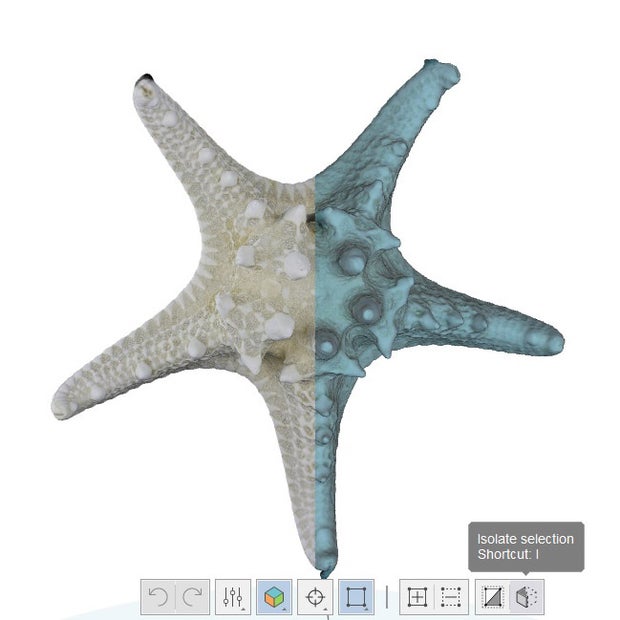
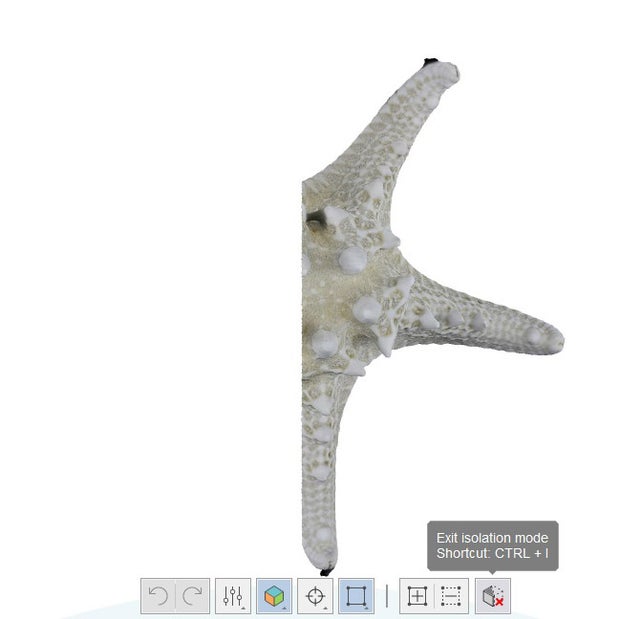
If, instead of deleting part of your model, you would just like to hide it so you can see the rest of the model better, you can use the isolate selection function. Select what you want to keep visible, hit the isolate selection button, and everything else will be temporarily hidden.
If you want to just select part of the surface of your model, instead of selecting all the way through, you use the brush selection tool. This tool acts like a paintbrush, letting you select very small areas on the surface of your model. You can also alter the size of your brush in this tool.
If you delete a selection made with the brush selection tool, it will create a hole in the surface of your mesh, and we'll talk about how to fix holes next.
Step 3: Filling Holes
Sometimes your deleting process will create holes in your mesh, and sometimes there will be pre-existing holes that were glitches from the reconstruction process, either way, they often need to be repaired, and there are a few ways to do this.
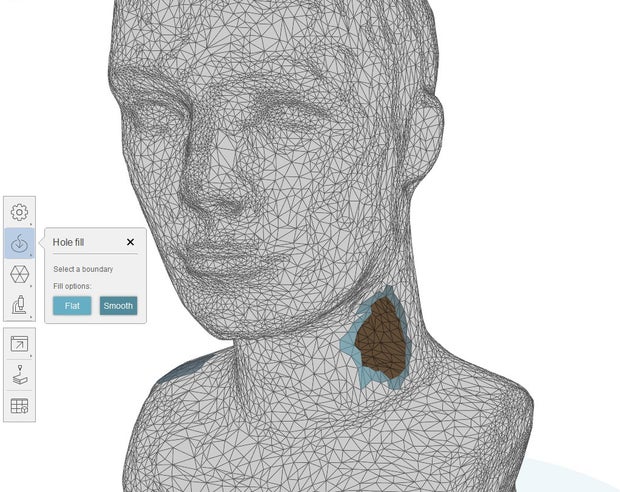
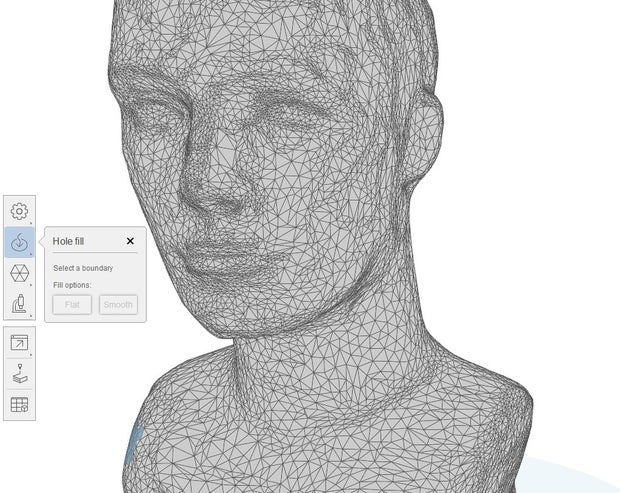
As you saw in the last section, the slice tool will automatically fill in holes created by slicing if you want it to. But if you left your holes unfilled, you can use the fill holes tool to close them easily.
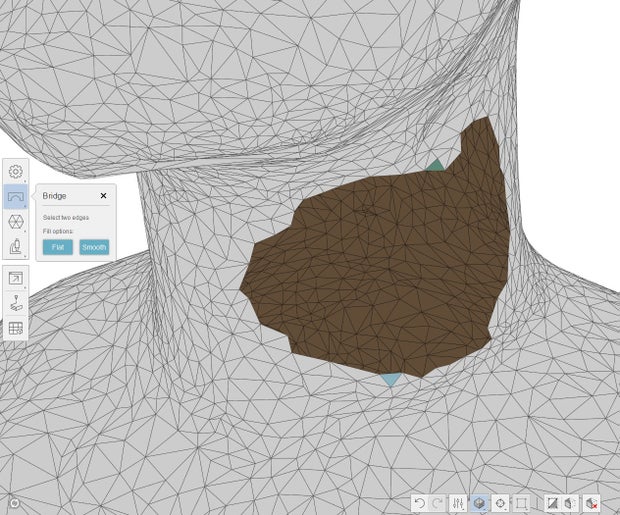
This tool is under the Tools icon and looks like an arrow diving into a hole. When you click on this tool, it will automatically detect all the holes in your mesh and they will be highlighted in brown. The dialog box will ask you to 'select a boundary'. If you hover close to the hole you want to fill, the edge of that hole will be highlighted and you can click to select it. Decide if you want your fill to be 'flat' or 'smooth', and click to apply. If you are filling a hole on a curved surface, 'smooth' is usually a good option. If you are filling something like, say the end of a tube, you probably want 'flat'.
If you need to fill a large hole on a more complex surface, you can use a combination of a few tools to construct a more custom fill. Start by using the bridge gaps tool to divide your hole into smaller holes. When you open this tool, you will be asked to select two polygons on opposite sides of your hole that your want to create a bridge between. Once you select both points a bridge will be created.
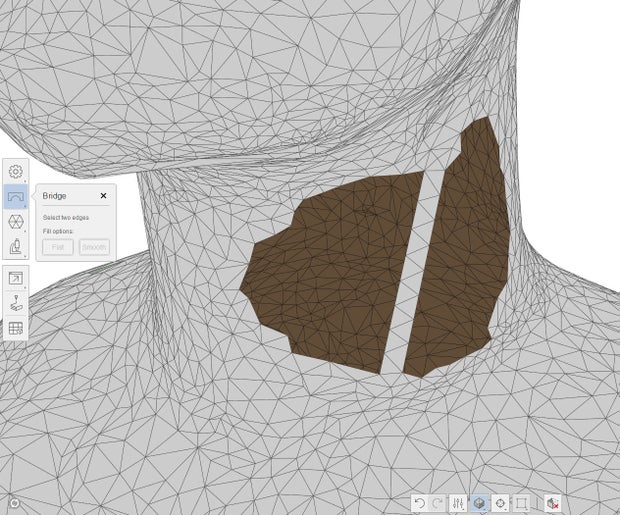
Now you have created a separate hole on each side of the bridge, and you can fill those holes in individually with the fill holes tool. As you can see, using these tools in combination could let you construct some more complex features if you needed to.
Step 4: Sculpting and Smoothing

Some other great tools for cleaning up your models and even adding to them are the smoothing and sculpting tools.
To access these tools, click on Edit and then select surface tools which looks like a mallet. When you click on this tool it will automatically put your model into a wireframe mesh view, but you can change your view to solid if you want, which I think makes it easier to see what you are doing. The dialog box that pops up will give you the option to choose sculpt or smooth.
Smooth will help you fix areas of your model that may have acquired weird unwanted textures during reconstruction. It is a smart tool that both pushes and pulls areas of the surface you are using it on smooth away imperfections. You can choose your brush size and the strength of the smoothing by sliding the toggles. I usually start with my strength low and raise it if I need to. After you've made your adjustment, clicking 'commit' will apply the changes you just made, and 'discard' will undo them.
Sculpt is a more powerful tool that does just what the name says: lets you sculpt your model and add features or details in places where they were lost.
In sculpt mode you can choose to pull or push the surface of your model. Pulling will create raised areas, while pushing will create indents. You can also choose your brush size, the strength of your brush, and whether or not your brush is flat or rounded which will create different effects. On each specific model you will have to play around with the settings to see what works for you.
Small surface changes to your model will not affect the color texture layer, and when you make larger changes, the texture will try to stretch over these new geometries like a skin. Sometimes this works pretty well, and other times it's a bit weird looking. To see how this is going to look, commit your changes and switch your model to textured view. If you don't like what you see, you can always undo by pressing the undo button.
Retopologizing
If you are trying to do some very delicate sculpting and you can't get the detail you want, you can try subdividing your mesh in the area you are trying to edit.
Because the geometry of your model is defined by the polygons in the mesh surface, more polygons means the ability to define more detail. To get more polygons, put your model in mesh mode, select the area you want to edit with the brush selection tool, then click on subdivide mesh under Retopologize. You will see that the area you selected has been subdivided into twice as many polygons. Now try making the edits you wanted with the sculpt tool and see if you get better results.
Step 5: Extruding
The extrude tool will let you add simple features to areas of your model that have been removed. Extrude is especially good for creating bases for things like statues or models of people. If you had scanned a person for example and you wanted to print them in miniature and give them a little base to stand on, you could use the slice and extrude tools to do this.
First, use the slice tool to cut off the base of the figure at the level you want, when you slice, check 'no fill'.
It can be useful to then use the smooth boundary tool (also under the Tools icon) to make sure your slice is as clean as possible. To do this, select the open boundary of your slice and then click 'apply'.
Now select the extrude tool, click on the open boundary again and decide if you want your extrude to be filled left unfilled. You can choose if you want to extrude 'flush to plane' or 'offset from boundary'. Flush to plane lets you use the the movable plane to choose the end point of your extrusion, and 'offset from boundary' extruded a specified distance from the sliced edge.
Step 6: Decimating

When you have made all the edits you want to make to your model and you are ready to export it to another 3D modeling program or some other application, you will often want to reduce the complexity of your model by retopologizing the surface.
As we discussed in Lesson 2, 3D models created from photogrammetry are polygon mesh models, which means the geometry of their surfaces is represented by a large number of polygons arranged in a dense “mesh”. Meshes that come from photogrammetry and other reality capture methods sometimes have a much higher number of polygons or “polycount” than 3D models that were created in a 3D modeling program. Sometimes thousands of times more.
Models like this are often too complex for other 3D modeling programs or applications to handle, so you need to simplify them. To do this, click on the Retopologize icon and select the decimate model tool.
Original model
75% decimated
This tool lets you reduce the polygon count of your mesh without affecting the overall geometry too much. Toggle the slider to choose how much you want to decimate your mesh, then click 'decimate all'. If your mesh changes too much and you lose a lot of detail, you may want to decimate it less. If there is still plenty of detail, you can try decimating it more.
For models that are going to be used in something like gaming or VR with the color texture turned on, you can decimate them to a very low polycount because the decimation won’t affect the textured color layer and the model will still look good even when the actual geometry lacks detail.
Step 7: Measuring and Scaling
Because ReCap Photo has no size reference when it compiles your photos, the size of your model is not necessarily the same as the size of your original object, and even it it was, you might want to change the size before you export.
To measure the distance between different points on your model, click on Analyze, and select measure distance. You can then click on two points on your model and it will tell you the distance between them. Keep in mind it is measuring in 3 dimensions.
To scale your model to the size you actually want it, click on Model settings and select set scale and units. This will put your object inside a box that shows its X, Y and Z dimensions. With 'percentage' checked, you can scale your object by a certain percent, and checking 'value' will let you enter a specific value for X, Y or Z. Or you can select two points on the model like you did with the measure tool and enter a target value for that distance.
Once you hit 'set' your model will be re-sized according to your new values.
Step 8: In the Next Lesson...
Now that you have a nice clean, edited model, what are you going to do with it? In the next lesson we'll learn some useful tools for exporting your model to use in different applications, and explore a workflow that will give you more advanced 3D modeling options in Fusion 360.
But before we move on, fee free to show us how your 3D model is looking now that you've used some editing tools to clean it up!


