

Introduction: Connect the Adafruit Ethernet FeatherWing to Ubidots


The Adafruit Ethernet FeatherWing is the perfect option for permanent installations with wired and reliable internet connections. What we like most about the Ethernet FeatherWing is that it works with the entire Feather board series and can be simply managed to run a number of different applications with high data rates.
Visit the Adafruit site to learn more about the Ethernet FeatherWing.
In the following tutorial, Ubidots will demonstrate how to setup and program the Adafruit Ethernet FeatherWing using the Arduino IDE to visualize and interpret data using Ubidots.
Step 1: Requirements
Step 2: Setup the Arduino IDE With Your Device
The Adafruit Ethernet FeatherWing can be used with any Feather Board, and the sample code provided below was designed openly to fit the series, so choose your Feather hardware freely.
To learn how to setup the Feather boards reference to the Adafruit site
Looking for the Feather HUZZAH ESP8266 with the Arduino IDE setup? Reference to this guide to get you to the right place.
a) Library installations :
1. Go to the Adafruit library repository to download the Ethernet2 library. To download the library, click the green button called "Clone or download" and select "Download ZIP".
2. Now back in the Arduino IDE, click on Sketch -> Include Library -> Add .ZIP Library and select the .ZIP file of Ethernet2-master and then “Accept” or “Choose”. Once the library is successfully you will receive the message "Library added to your libraries".
Step 3: Hardware Setup
1. Plug in the Ethernet FeatherWing into the Feather board.
2. Connect one end of the Ethernet cable to the Ethernet FeatherWing and the other to your hub, router, or switch.
Step 4: Programming
With the following example code, we will publish ANALOG readings taken from the A0 pin of the Feather board to Ubidots
1. To post your first value to Ubidots, open the Arduino IDE and paste this code. Once you've pasted the code, you will need to assign your individual, unique Ubidots TOKEN.
2. Verify your code within the Arduino IDE. To do this, in the top left corner of our Arduino IDE you will see the "Check Mark" icon, press it to verify your code.
3. Upload the code into your Feather board. To do this, choose the "right-arrow"icon beside the check mark icon.
4. To verify the connectivity of the device, open the serial monitor by selecting the "magnifying glass" icon in the top right corner of our Arduino IDE.
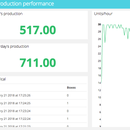
5. Confirm your data in Ubidots. Now you should see the published data in your Ubidots account, locate the device called "feather-ethernet" and visualize your data.
Step 5: Result
With this simple tutorial we are able to POST and publish data to Ubidots with the ease of the Arduino IDE and the Adafruit FeatherWing. If your desire send more than one variable to Ubidots, reference Ubidots REST API to learn how to build the request properly. :)
Now its time to create Ubidots Dashboards to visualize your data and deploy your internet connected monitoring solution!


![Tim's Mechanical Spider Leg [LU9685-20CU]](https://content.instructables.com/FFB/5R4I/LVKZ6G6R/FFB5R4ILVKZ6G6R.png?auto=webp&crop=1.2%3A1&frame=1&width=306)


