

Introduction: Controlling an Arduino Turret With IR Remote


In a previous instructable, we covered making an Auto-Turret with a Pixy. That was great for tracking objects of a certain color and firing on them. What if you want to control it manually? There are several options, such as directly controlling it using a Joystick, or using the motion controls in a Wii Nunchuk, but what if you want to control it from across the room? Using a TV Remote and an IR Receiver, we can remotely operate a turret! Let's get started!
Step 1: Project Parts List
We will be building this with the RobotGeek Desktop RoboTurret. The code we use should work with any Pan/Tilt Turret using 180° Hobby Servos running on an Arduino UNO/Duemilanove equivalent microprocessor. The following parts are recommended, as the wiring diagrams shown later will assume you are using them.
- 1 x RobotGeek Desktop RoboTurret
- 1 x Foam Dart Gun Kit
- 1 x RobotGeek IR Receiver
- 1 x IR Remote, either an old TV remote, or something like this.
Step 2: Assembly


Follow the Assembly Guide for the Desktop RoboTurret
Follow the Assembly Guide for the Foam Dart Gun Mount
Attach your IR Receiver facing the direction you would like to control the turret from. Mind that Infrared communication requires line of sight, and the receiver is designed to function properly in the range shown in red in the pictures above. Depending on your controller, you should expect to be able to control your turret from about 6 meters away, though some remotes work at 10 meters! Be sure to experiment with different remotes to find the one that gives you the best range.
Step 3: Wiring

| Device | Sensor Shield Port |
|---|---|
| Servos: | |
Trigger Servo RobotGeek 180 Servo | Digital Pin 3 |
Pan Servo RobotGeek 180 Servo | Digital Pin 5 |
Tilt Servo RobotGeek 180 Servo | Digital Pin 6 |
| Input: | |
IR Receiver RobotGeek IR Receiver | Digital Pin 11 |
| Output: | |
(Optional) Laser White -'S' Black -'G' | Digital Pin 2 |
When wiring, watch your jumpers. Pins 3, 5, and 6 should be running on VIN for 7V. Pin 11 should be running at 5V. Running Pin 11 at 7V will damage your IR Sensor! Be careful and double check before plugging into power.
Step 4: Programming
We will be using the same libraries as we used in the Using an IR Receiver with Arduino lesson.
Once you have installed the libraries, follow along in the lesson for Using an IR Receiver with Arduino to set up your remotes.h file. We will be dropping the code from this into the remotes.h file for the Turret.
It's a good idea to go through the lesson now to understand the concepts of determining the remote's protocol and grabbing the proper hex code for each key press that we will be using to operate the turret with your remote. If you would rather not, we'll quickly go over using the wizard to grab the code for the remotes.h file.
Load is the IR Remote Wizard. You can find it under:
File → Examples → IRLib → IRremoteWizard
Load the sketch on to your board, open the serial monitor, set it to No line ending in the new line / carriage return dropdown, and follow the prompts.
The first prompt will ask you to press buttons on your remote. This step automatically finds the protocol of your remote on receipt of a signal. Type 1 in the bar at the top and press Enter on your keyboard or click Send in the top right corner.
The next lines that will show up say:
Protocol Section Finished. Start Button reading.
Press the button for RIGHT_BUTTON
Follow the instruction and press the corresponding button on your remote. Upon receipt of the button press, the serial monitor should now read:
Button Found:3EB92 Send any character on the serial monitor to continue
Follow the instruction, repeating the process of typing a character into the top bar and sending it, followed by pressing the corresponding button on your remote. This will continue through asking you for directional buttons, a select button, numerals 0-9, and two buttons of your choosing.
Once you have completed this process, it will spit out a block of code that looks like this:
IR Code Block:


const unsigned long MY_PROTOCOL = SONY;
const unsigned long RIGHT_BUTTON = 0x9EB92;
const unsigned long LEFT_BUTTON = 0xDEB92;
const unsigned long UP_BUTTON = 0x9EB92;
const unsigned long DOWN_BUTTON = 0x5EB92;
const unsigned long SELECT_BUTTON = 0xD0B92;
const unsigned long ONE_BUTTON = 0xB92;
const unsigned long TWO_BUTTON = 0x80B92;
const unsigned long THREE_BUTTON = 0x40B92;
const unsigned long FOUR_BUTTON = 0xC0B92;
const unsigned long FIVE_BUTTON = 0x20B92;
const unsigned long SIX_BUTTON = 0xA0B92;
const unsigned long SEVEN_BUTTON = 0x60B92;
const unsigned long EIGHT_BUTTON = 0xE0B92;
const unsigned long NINE_BUTTON = 0x10B92;
const unsigned long ZERO_BUTTON = 0x90B92;
const unsigned long SPECIAL_1_BUTTON = 0x481;
const unsigned long SPECIAL_2_BUTTON = 0xC81;
Copy this code from your serial monitor, you will need it.
We will now open the Turret sketch under:
File → Sketchbook → RobotGeekSketches → Demos → IR → IRcontrolTurret
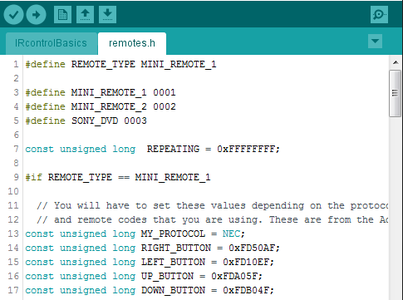
You'll see at the top two tabs, one marked IRcontrolTurret, and one marked remotes.h. Click on remotes.h and you should see a list of remote definitions, followed by code that looks very similar to the code you just made. You can replace the similar code of one of the remotes or add a definition and #elif statement. The main things to consider are:
1.) The definition of the remote you're using. On line 1, you will see:
#define REMOTE_TYPE MINI_REMOTE_1
Change MINI_REMOTE_1 to the name of the remote you would like to use.
2.) The #elif statement. Before the #endif statement, you can add your remote with a line like the following:
#elif REMOTE_TYPE == MY_REMOTE_NAME_HERE
followed by the list of const unsigned longs you got from the wizard.
3.) The const unsigned long integers. You can add any number of buttons that exist on your remote by adding definitions to this list with names corresponding to the hex values you received in the earlier steps preceded by 0x, to indicate that it is a hex value.
Now you can upload the sketch to your board, and everything should be working!
Step 5: Fire at Will!
You're done! At this point you should be able to aim the turret using your remote and fire upon unsuspecting interlopers! This could also be used for remotely aiming a camera, such as a GoPro (which you can easily mount with the hardware in this kit). Maybe you could attach a water pump to spritz your cat when it gets on the counter? We'd love to hear what you come up with!


![Tim's Mechanical Spider Leg [LU9685-20CU]](https://content.instructables.com/FFB/5R4I/LVKZ6G6R/FFB5R4ILVKZ6G6R.png?auto=webp&crop=1.2%3A1&frame=1&width=306)


