

Introduction: DIY Mini Clothespin


Maybe you don't know that the state of Vermont, and its capitol of Montpelier, in particular, quickly became what The New York Times has called "The Silicon Valley of Clothespin Manufacturing" when the United States Clothespin Company (USC Co.) opened in 1887 to manufacture Clothes spin originally designed by David M. Smith but improved by Solon E. Moore.
In this instructable I am not inventing a new clothespin design. My goal is to describe how to simply build a very small 3 cm long one, made of wood manually and with CNC and plastic with 3d printer.
Surely you must know these small mini Clothespin, which can be bought in stores. They are used in the office and also to make arrangements with photos that are very beautiful.
But believe me, you will feel as much satisfaction as mine when you make them yourself (and show them to your friends).
Join this project and enjoy it!
First of all watch the main video..very short with nice music :)
Let's get started ...
NOTES:
(1) If you are interested in history and more information about Clothespin, I suggest accessing this link: https://en.wikipedia.org/wiki/Clothespin
(2) English is not my native language. My apologies for mistakes in writing.
Supplies
- MDF 5,5 mm (*)
- PLA (*)
- Paper clips metal size 33 mm
- Nails Ø1,6 mm x 40 mm
Tools:
- Scroll Saw. (*)
- Printer 3d. (*)
- Router CNC. (*)
- Drilling machine (if possible, better bench) (*)
- Sand paper / Flexible Sanding Sponges (super fine & fine).
- Hammer.
- Bent Nose Pliers.
- Long Nose Pliers.
- Diagonal Cutting Pliers.
- 3D Printer Cutting Pliers (*)
- Milling bit, double flutes spiral carbide flat nose end mill 1mm cutting diamater and 1/8 shank diameter carbide (*)
- Drilling bits Ø2 mm, Ø3,5 mm and Ø5 mm.
- Vacuum cleaner electric (*).
- Metalic ruler.
Personal Protection Equipment (PPI)
- Work gloves
- Protection glasses.
- Ear protector.
NOTES:
(1) All the materials and tools indicated with an asterisk (*) depend on the type of construction you choose (manual wood, CNC wood or 3D printing) and that is described in step 2. The 3D printer is also used to make a plastic template and an accessory to make the spring. If you don't have one, no problem you can order printing from a store.
(2) I use this paper clips metal (size 33 mm, wire diameter Ø0,8). You could use a bigger one too, with the same diameter 0,8 mm.
(3) In one of the photos in this introduction you can see the nail, the paper matalic clips and two white plastic accessories printed in 3D (see step number 3). These are used to model the spring of the clothespin.
Step 1: Design


For the design I used Autodesk Fusion 360 software.
Designing in 3d especially allowed me to create the template and the plastic accessory (tube) to model the spring.
As the clothespin is very small and tolerances are important, I had to modify the design many times until it was based on tests I did on plastic and wood.
The clothespin is made up of:
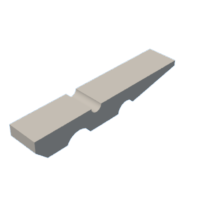
- Two equal individual wooden or plastic pieces.
- A spring made from a paper metal clip (Ø0,8mm size 33 mm).
According to the tools you have, in this instructable we will see three construction alternatives:
a) Made of MDF wood with manual cutting.
b) Made of MDF wood with CNC cutting.
c) Plastic with 3D printer.
To build the spring I have designed one template and one accesory that allows it to be shaped manually from a simple clip.
The manufacturing sequence will be as follows (described in the next steps):
- Create the main parts of the clothespin (wooden or plastic / manual or automated).
- Print the accessory and the template to shape the spring.
- Make the spring.
- Final assembly.
Step 2: Parts Contruction


According to the tools you have, or perhaps also your taste you can choose to build the mini clothespin in in three different ways:
a) Manual with scroll saw (wood)
- I have included a 2d Plan in 1:1 scale 2D Mini Clothespin Cut Drawing Esc1-1.pdf to print in A4 paper.
- This plans must be printed in its original size. Don´t set “Reduce to Printer Margins” at “Page Scalling”. All dimensions are given in millimeters (mm) if they without units.
- Cut out and stick on a piece of 5.5 mm thick MDF wood.
- You should always cut with scroll saw to the line so that the black line just barely disappeears.
- Hit an awl with a rubber mallet in the centers of the holes marked on the plane glued to the MDF.
- Make the two Ø3.5 holes and the Ø5 hole.
- Sand on the back of the wood, to smooth the surface of the wood with holes.
- Make straight cuts following the indicated in 2D Mini Clothespin Sequence of Cut.pdf (*).
- Remove the paper from the wood (**).
- Sand completely.
(*) You can also choose to cut in any other way, but believe me when it comes to cutting two tiny pieces (30mm x 4mm each) the sequence I propose will help you.
(**) You can heat it a little bit with a hot air blower.
b) Automated with CNC (wood)
- I have included an Adobe Ilustrator file 2D Mini Clothespin CNC Esc1-1.ai for use with any software (in my case I import using ASPIRE) to export a gcode format.
- I used a MDF 5,5 thickness rectangle width 100 mm x height 150.
- As the pieces to be cut by the CNC(*) are very small, I suggest add tabs to toolpath to hold the cut to the wood. lenght: 2.5 mm, thickness: 1.5 mm, contant distance between tabs: 100 mm (see print screen ASPIRE software). In the same software, the allowance offset parameter is -0.4 mm.
- Place the wood in the machine and level it correctly.
- Proceed to cut.
- With the help of a cutter proceed to separate the cut pieces from the wood.
- Sand completely.
(*) Note: I don´t have a laser machine, but If you have one, you could do it with it.
(**) I used the excellent DREMEL CNC designed by NIKODEM BARTNIK (with 500w chinesse spindle upgrade). The CNC's work space can may seem limited, but for the hobbyist, and those who have never worked with CNC in general, I really recommend it! https://www.instructables.com/DIY-3D-Printed-Dremel-CNC/
Discard this comment if you have another commercial or larger CNC ;)
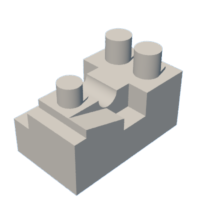
c) Automated with 3D printer (plastic)
-Use the 3D Mini Clothespin Plastic Part.stl file and use any 3d printing software (in my case I used CURA 3D) to export a gcode format. See photos in which position to print.
- Proceed to level the bed and print with the following parameters: Layer Height 0.12 mm / Infill Density 70% / Print speed 25 mm/s.
- You can use filaments of different colors according to your taste. I printed in white, black.yellow, blue, red, and green.
- Clean the plastic remains with the help of 3D Printer Cutting Pliers.


Step 3: Spring Construction


It is a simple piece, but perhaps the most important to build the mini clothespin.
I have designed accessories printed in 3D, in order to facilitate the elaboration of the spring and ensure exact measurements.
a) 3d printed accesories to help modeling (*)
Simple tube:
It is a tube that serves as a support when shaping the spring.
Use the 3D Mini Clothespin Spring Tube.stl file and use any 3d printing software (in my case I used CURA 3D) to export to gcode format and print. See photos in which position to print.
Template for bending:
These are two interlocking pieces (male and female), which are used for the final shaping of the ends of the spring.
With two files 3D Mini Clothespin Spring Template male.stl and 3D Mini Clothespin Spring Template female.stl use any 3d printing software to export to gcode format and print. See in photos in which position to print.
(*) NOTE: before printing proceed to level the bed and print with the following parameters: Layer Height 0.12 mm / Infill Density 70% / Print speed 25 mm/s. Clean the plastic remains with the help of 3D Printer Cutting Pliers.
b) Construction proper.
-Take the nail Ø1.6 mm x 40 mm and pass it into the 3d printed tube described in point a) above.
- In a piece of wood proceed to fix the nail-tube assembly, nailing it.
-Take a paper clip metal (*) and proceed to disassemble it, stretching its ends so that it is smooth (without bends).
- Divide the wire in two and place it on the nail as shown in the figure.
- Proceed to take one of the ends of the wire and with the help of a tweezers, rotate the wire around the nail about 4 turns.
- Proceed to take the other end of the wire and repeat the previous step 3 turns.
- It is a spring of 7 total turns.
- Use a pliers to straighten the ends of the wires again.
- Place the shaped wire on the plastic template as shown in the figure.
- Stretch the ends of the wire as indicated in the figure.
- Remove the parts of the wire template.
- Arrange and straighten the wires if necessary.
NOTE: (*) Instead of using a paper metal clip if you wish, you can look for a wire of the same diameter, special for springs. My original idea was to do it with simpler elements.


Step 4: Assembly


We arrived at the most awaited moment. Assemble the set:
- Take one of the parts (wood or plastic) the pieces built in the step Nro.2.
- Take the spring built in the step Nro.3 and opening both ends, insert one of the parts of the clasp as indicated in the figure, sliding from left to right until you feel a “click” and the end is fixed in the clothespin.
- Open the end of the spring and insert the other part as indicated in the figure, sliding from left to right until you feel a “click” and the end is fixed in the groove.
- After placing the spring and fixing both ends in their grooves, firmly hold the clothespin with your fingers and proceed to cut with a diagonal cutting pliers excess wire comes out of the clothespin (at both ends of the spring).
- If necessary with a nent nose pliers you can adjust the spring.
- The procedure described here is used to assemble plastic and wooden clothespins.
Step 5: Final Words

That's all for this project!
We did NOT invent the wheel but we DO manage to build on our own, a product that is manufactured industrially.
Believe me that on the web I did not find any tutorial / procedure to build these mini clothespin.
For this reason it was a very good challenge for me and a great satisfaction to be able to share it with the entire community of instructables.
I hope you enjoyed this instructable as much as I have enjoyed it.
If you have any question ask them in the comments below!
I would also love to hear what you think about the project.
Happy making!
cfb70
PS1: if you like the project, please vote for this and choose it as a favorite == THANKS ==
PS2 / Credits: (bow and arrow) logo vector created by makyzz - www.freepik.es
PS3 / Credits Music: "Brännö" by Wintergatan - www.wintergatan.net

Runner Up in the
Big vs Small Challenge


