

Introduction: Diabetic Friendly Raspberry Cream Pie


I recently found out that I am one cupcake away from having full blown Type II Diabetes. In order to prevent that from ever happening I decided to go ahead and make a fairly drastic diet change and avoid (for the most part) sugary items like non diet sodas, my favorite dessert items, and the like. However, this doesn't mean I have to give up some of the tastiest stuff out there! It simply means that, whenever possible, I should alter recipes to make them more diabetic friendly. With the help of my lovely fiancé and a recipe found on Rachael Ray's website I was able to craft this awesome dessert without fear of losing a foot.
Step 1: Ingredients and Tools

This pie is super simple to make. The ingredients are pretty cheap and chances are you have several of them in your cupboards and fridge right now. You will need:
1 cup heavy cream
1/8 teaspoon almond extract (please don't use imitation)
3/4 cup Splenda
1 packet unflavored gelatin
10 ounces frozen raspberries
2 teaspoons fresh lemon juice (no plastic lemons allowed!)
1/2 cup sugar free raspberry preserves (more or less according to your preference)
1 package of fresh raspberries
1 9-inch pie crust, baked and cooled
Tools needed:
Medium mixing bowl
Measuring spoon
Measuring cup
Medium saucepan
Electric mixer or whisk
Wooden Spoon for stirring
Spatula
Step 2: Whip It! Whip It Good!


Add the cream and the almond extract to your mixing bowl and whip until stiff peaks begin to form.
TIP: By placing both the bowl and the beaters/whisk in the freezer for ten to fifteen minutes prior to getting started you can drastically reduce the amount of time it takes to complete this step.
Step 3: SIMMER DOWN NOW!


Step 4: The Snozzberries Taste Like Snozzberries!


Add your frozen berries and the 1/2 cup of sugar free raspberry preserves to the still simmering mixture.
TIP: Truth be told, the raspberry preserves are an addition to the recipe that my lady came up with. They can add a lot (or a little) of punch to the finished product. On her notes for this recipe it simply says, "Add a big scoop of Rasp. jam". I guessed on how much she added. Go crazy, add more. Add less. Do your own thing!
Step 5: When Life Gives You Blah, Blah, Blah...


Next up is the lemon juice:
Using the palm of your hand apply some mild pressure to the lemon and roll it back & forth on a clean surface and/or cutting board. This will help you extract more juice when the time comes.
After you've softened it up a bit, cut the lemon in half. You're only going to need half of it for this recipe so place the other half in a plastic sandwich bag and put it in the fridge for later use (read: until you make this pie again tomorrow).
Get a good grip on the half of the lemon you're going to be using and give it a good squeeze. If you really want to you can utilize the measuring spoon to make sure you get exactly two teaspoons but, to tell you the truth, I just squeeze the juice out of the lemon over the saucepan and call it a day. This isn't an exact science.
Step 6: Stir Crazy

After you've added the berries, the preserves, and the lemon juice, you'll need to stir the mixture until it thickens. This will take more or less time depending on the heat of the sugar/gelatin/juice/water mixture and whether or not you actually used frozen raspberries.
TIP: Yes, you can use fresh raspberries for this step BUT if you use frozen they will resist the urge to fall apart during the stirring, and the rapidly cooling liquid will thicken much quicker.
Step 7: Into the Fold


Now we need to fold the sweet berry mixture into the whipped cream we made wayyyy back in Step 2. If you, like me, didn't really know how to properly fold one thing into another, just imagine that you've been asked to draw a figure eight with whipped cream and a spatula. When you're half way done with the figure eight raise the spatula so that you bring the stuff from the bottom of the bowl to the top of the bowl. Give the bowl a half turn and repeat until it looks like the fifth picture below.
TIP: Stir gently while folding the berries into the cream. This will help keep the berries more intact and will make sure that the cream stays fluffy.
Step 8: I Love 3.141592653589793

After folding the berries into the cream, we need to get the new mixture into the pie crust. Using your spatula, slowly 'pour' the cream filling into the waiting pie crust (yes, it's a store bought crust you're seeing. Stop judging me!). Rejoice! You're almost done!
Step 9: Lick the Spatula

Seriously. You're done with it. Clean as you go, I always say.
Step 10: Rinse. Repeat If Necessary.


Open up your package of fresh raspberries and rinse them off using a colander and the spray attachment of your sink. Toss them about while spraying to get the maximum rinsing effect.
Once properly rinsed you should place them onto a few paper towels to dry off.
TIP: By patting the berries gently you can get most of the moisture off of them in just a few seconds.
Step 11: Raspberry. There's Only One Man Who Would Dare Give Me the Raspberry.
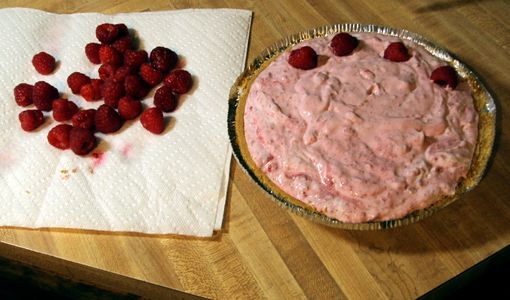


For our final preparation step we simply need to add the fresh raspberries to the raspberry cream pie we just got done making. What? You didn't realize we were done? We are. This is just a garnish to make it look pretty and to add more raspberry goodness. You can add as many or as few as you like. It's totally up to you.
TIP: By adding or subtracting the amount of berries you put on top you are also directly influencing the amount of post pie making raspberries you can eat. Think about it...
Step 12: Chill Out


Now, this being a cream pie, we need to chill it for several hours before it firms up enough to slice and properly serve. If you used a pre-made, store bought pie crust you can use the plastic guard to place over your pie in order to make sure no foreign matter gets in there. Nothing ruins a good cream pie like last nights Chicken Marsala. If you are superior to me and made your own pie crust, find something that will provide protection for your newborn pie and then place it in the fridge for several hours, or overnight.
TIP: To decrease the length of time it takes for the cream pie to firm up properly try placing it in your freezer for an hour before moving it to the fridge.
Step 13: The End
You're done! Eat your pie. Leave constructive comments below. Send me pictures of how yours turned out. Enjoy your pie!


