

Introduction: Dog Shoes


My dog wears shoes when it's hot outside. I bought him some shoes a while ago, but one fell off and was stollen by a crow. So bought more shoes, but now a few of them are starting to get holes. Instead of buying more (again) I decided to make him some.
Supplies
Materials:
- Fabric- My material came from the sleeve of a denim jacket.
- Leather (mine was 1.3 mm, and I believe it was upholstery leather remnant)
- 1/2" wide double-sided hook & loop tape (aka reusable cable ties)
- Thread
- HeatnBond UltraHold Iron-On Adhesive Tape, 3/8"
Tools:
- Sewing Machine
- Iron
- Scissors
- Paper
- Pen
- Ruler
Step 1: Pattern: Main


- Trace the paw and mark where the pad ends.
- Measure 0.125" out from the sides and front of the paw.
- Measure 1" down from the narrowest part of the paw.
- Draw a rectangle around the boundaries of the measurements you just took.
- Round the front corners.
- Add a 0.25" offset all around.
Step 2: Pattern: Toes

- Duplicate the completed pattern from Step 1.
- Slice the pattern horizontally at the midpoint between the end of the pad and the tip of the longest nail. You can choose to eyeball it instead; you just want to cut it to a length that will fully cover the nails and a little bit of the toes.
Step 3: Pattern: Soles

- Duplicate the completed pattern from Step 1.
- Slice the pattern 0.25" down from the end of the pad.
- Starting at the narrowest part of the pawn and going down, draw a rectangle that measures 0.5" high, and slightly less than the width of the paw.
- Within that rectangle and aligned to the top, draw a smaller rectangle that is 0.5"x 0.25".
- Connect the small rectangle to the main pattern by making a trapezoid. The trapezoid should be 1" wide on the side that is closest to the pad.
- Round the corners (optional).
Step 4: Cutting the Pieces


Denim:
- Cut two pieces from the pattern you made in Step 1 (Main).
Leather:
- Cut one piece from the pattern you made in Step 2 (Toes).
- Cut one piece from the pattern you made in Step 3 (Soles).
Hook & Loop Tape:
- Cut a strap that is long enough to wrap around the leg with a slight overlap. For mine, 6" was a good length.
Paper: (optional)
- Cut a rectangle that is is the same size as the dashed rectangle from Step 3 #3).
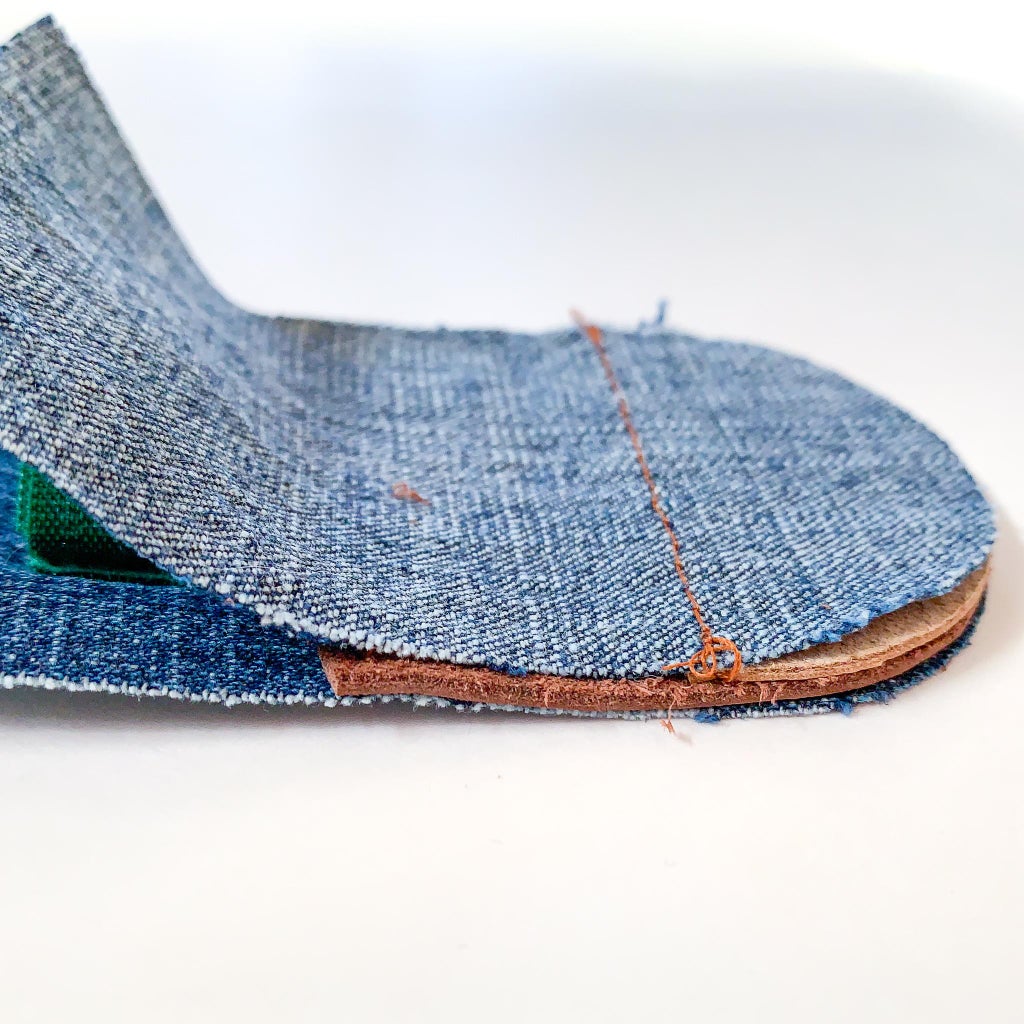
Step 5: Sew: Connecting Leather to Denim


- Take one piece of denim (right side facing up) and place the toe on top of it (right side facing up.
- Take the other piece of denim (right side facing up) and place the sole on top of it (wrong side facing up- you want to make sure to use the rough side so it's not too slippery for your dog).
- Sew along the top of the leather for each piece.
Step 6: Sew: Connecting the Strap


- Place the small paper rectangle in the same place it was in Step 3, when you were making your pattern. Align the edge of the strap to the edge of the rectangle. Stew the strap on, using the paper as a guide to show where the stitching should go.
- Neatly roll the strap up so that it fits in the center without going over any of the edges.
Step 7: Iron: Adhesive Tape

Apply the iron-on adhesive tape to the top (wrong side) of each piece. If you forget (like I did for some of the shoes), you can add it at any point before turning the shoes inside out.
Step 8: Sew: Completing the Shoe


Place the two halves (right sides) together and sew a "U" along the edge of the toe. I tried to sew as close to the edge as reasonably possible.
Then, sew along the entire edge, going over the toe area again (leaving the top open).
Step 9: Finishing Touches


- Fold the tops down over the iron-on adhesive tape and then iron it to secure it.
- Flip the shoes inside out and you're done.

Judges Prize in the
Fabric Challenge


