

Introduction: Create an Animated GIF for Your Instructable


In recent years I have made some Instructables. Some with more success than the other. But that depends strongly on the subject. Recently, I started using animated GIFs within my Instructables. For that, I only used Youtube videos.
In this Instructable, I describe a simple method of how to create an animated GIF, and especially how to convert a (Youtube) video to an animated GIF.
There are some caveats with animated GIFs and Instructables. And I'll address those as well.
Finally, the animated GIF file can be uploades as a regular photo when creating an Instructable.
GosseAdema
Step 1: Why to Use an Animated GIF


These two images show the difference between a regular photo and an animated GIF. The animated GIF consists of only 3 photo's. But this animated image immediately clarifies the entire project. These are illuminated Christmas ornaments whose lights are blinking.
For this image I've used an online webtool to create animated gifs: Gifmaker.me. I've created multiple photos from my project (use a tripod). From these photos I chose three. After uploading the photos and setting the interval time, the animated GIF has been downloaded. Finally, this file is uploaded in the Instructables editor.
Step 2: Animated GIF Basics


The most easy way to explain an animated GIF is by an example. The second image contains 4 frames which are displayed in sequence. In basics that's all.
There are some options, like the delay and the repeat times (or infinitive loop).
An animated GIF is nothing more than multiple images which are placed into a single file. Each image is compressed individually. There is no video compression because the images are compressed one by one. This means that animated GIFs are larger than video files. When creating an animated GIF, we must keep this in mind.
Step 3: Video or Animated GIF

Although both methods show moving images, there is a big difference. The biggest difference is that animated GIFs start playing automatically. Youtube videos require action from the reader.
Animated GIFs are stored inside the Instructables CDN (content delivery network). It's no problem to store large files, but there is a limit for displaying them on the Instructable website. This limits the length and resolution of the animated GIF.
Youtube videos aren't stored on the Instructables servers. They are hosted by Google on Youtube servers, with almost unlimited storage. This makes it posible to create high resolution videos (up to 8K, 7680×4320 pixels).
Animated GIFs have some limitations, but they are very useful to draw attention or clarify certain steps. And as long as they add something to the instructable, they are great to use.
Step 4: Common Errors


Using animated GIFs inside the instructables editor doesn't always work the first time. I've seen several causes where an animated GIF isn't visible in the preview mode of the Instructables editor.
The most common cause is the image file size. The solution is to lower the filesize, and to upload the image again. All image files are processed by the Instructables CDN. This makes it impossible to determine which file size works and which one does not work.
An other cause is the animated GIF being the only (and first) image of a (new) step. This can be solved by adding a second image. If the size of the animated GIF is small enough, the image becomes visible in the preview mode. After deleting the additional image, the animated GIF stays visible.
Step 5: Check the Uploaded Image!

This animated GIF was made with a resolution of 640 x 480 pixels. The file worked perfectly on my local computer. After uploading images to the instructables website, these are optimized by the CDN. And sometimes this fails (the MEDIUM file size failed. It's posible that your device shows a different version). So, always check your uploaded images.
The solution was to alter the resolution to 320 x 240 pixels. This also reduced the filesize.
Note: Every Instructables user has it's own image library. This can be found under "your library" at https://www.instructables.com/upload. Each uploaded image is stored in multiple sizes. And uploading an animated GIF image results in the following sizes:
- TINY (48x48)
- SQUARE (75x75)
- SQUARE2 (130x130)
- SQUARE3 (320x320)
- THUMB (100x75)
- SMALL (320x240)
- RECTANGLE1 (306x255)
- MEDIUM (620x465)
- LARGE (640x480)
The following file (FS32YQMJ86HTPJU) can be found in my image library.

There is more information about the Instructable CDN in one of my previous Instructables: Photo and Video Mosaic.
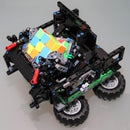
The first image in this step (mBot ranger) is named 'F8T5W8ZJ86HR57N'. The original file is 640 x 480 pixels. The medium size (with the error) is 620 x 465 pixels. The large size file has no errors.
Step 6: Youtube Video to Animated GIF

This part explains how to convert an entire Youtube video to an animated GIF. As an example I chose the following youtube video: Instructables - Share What You Make.
The first step is to download the Youtube video to your computer. This can be done with an online Youtube downloader. Select "Convert a video link/URL" and choose the mp4 video format.
After downloading the video, it can be converted using FFMPEG. This is a program to record, convert and stream audio and video. It is a command line tool with a lot of options to convert images and video.
Use the following command to convert the downloaded video (instructables.mp4) to an animated GIF (instructables.gif):
ffmpeg -i instructables.mp4 instructables.gif
The result is a 83 Mbyte GIF-file. This file is too large to be used on Instructables!
To downsize the video resolution use the scale feature:
ffmpeg -i instructables.mp4 -vf scale=320:240 instructables.gif
This reduces the filesize to 8 Mbyte. This is small enough to be used on the Instructables website.
Finally, upload the animated GIF file like a regular photo when creating an Instructable.
Step 7: Youtube Video to Animated GIF

In this latter example, a number of different possibilities for converting are discussed. This step starts with a short video of a line following mBot Ranger. Although it's my own video, I've downloaded it again for this instructable with an online Youtube downloader. This makes the following steps easily reproducible.
The following line converts the entire video to an animated GIF with a different resolution.
ffmpeg -i Ranger.mp4 -vf scale=640:480 Ranger_640_480.gif
The size of this animated GIF is 45,124,254 bytes. The downloaded mp4-file is 13,771,821 bytes. There is a big difference between video compression and single frame compression.
The first step to decrease the filesize is to reduce the number of frames per second (default = 30). Use the '-r'-option to reduce the number of frames to 15
ffmpeg -i Ranger.mp4 -vf scale=640:480 -r 15 Ranger_640_480_15.gif
The new filesize is 30,981,518 bytes. Reducing the number of frames per seconds helps, but not enough to publish this video as an animated GIF.
The following example reduces the video output format to 320 x 240 pixels. This is 1/4th of the previous examples.
ffmpeg -i Ranger.mp4 -vf scale=320:240 Ranger_320_240.gif
ffmpeg -i Ranger.mp4-vf scale=320:240 -r 15 Ranger_320_240_15.gif
The new video sizes are 12,744,386 and 8,740,702 bytes (as expected, about 1/4th of the previous example).
The final step to reduce the animated GIF filesize is reducing the video length. The mBot Ranger, used in this example, makes multiple rounds. Because animated gifs are played cyclically, we only need to convert a single round. The first round starts at 15 seconds (-ss) and lasts about 12.4 seconds (-t).
ffmpeg -i Ranger.mp4 -vf scale=640:480 -r 15 -ss 15 -t 12.4 Ranger_640_480_15_round.gif
ffmpeg -i Ranger.mp4 -vf scale=320:240 -r 15 -ss 15 -t 12.4 Ranger_320_240_15_round.gif
This results in two files, 5,132,928 and 1,448,695 bytes. Both files should be useful, but Instructables apparently has trouble with the first file.
Increasing the framerate to 30 frames per second for a better result:
ffmpeg -i Ranger.mp4 -vf scale=320:240 -ss 15 -t 12.4 Ranger_320_240_round.gif
Gives a filesize of 2,114,827 bytes. This file has been uploaded in this step. Just like a regular image.
Step 8: Animated GIFs Made Easy


I've been using ffmpeg on the command line, to create all kind of animated GIFs. There is an website 'Online GIF maker and image editor' which uses ffmpeg to create animated GIFs. This means you can use ffmpeg without knowledge about the command line options. And this website isn't limited to converting videos. It contains four modules:
- Video to GIF
- GIF Resizer
- Optimizer
- GIF Maker
And combining these tools makes it easy to create animated GIFs for your Instructable.

GosseAdema

Participated in the
GIFs Challenge 2017


