

Introduction: Gun Wrong


Last time I tackled a replica firearm, I tried to make it in an apartment with hand tools. Now, with a little more experience under my belt and access to a full shop.. I proceeded to, again, do almost everything wrong. Here's hoping you can learn from my adventure.
Step 1: The Demilitarized Zone

This is a Parts Kit. You can find them for under a hundred bucks if you get lucky. For a replica props builder, this looks like a great place to start for a non-firing display model of a period firearm. All the parts are complete. Everything, in fact, but the receiver.
When these are imported into the US and prepped for sale, the receiver (usually, but not always or only) is chopped into several pieces to render it non-functional. At one point this was done with a saw but BATF realized it was too easy for an industrious person to weld the bits back together. Now it is done with a plasma cutter, with long diagonal cuts that remove up to half an inch of metal with each pass.
So, what to do? I could carve a replacement receiver out of a solid block of wood. Trouble is, there are some tricky details that have to be just the right dimension in order for the other parts to fit back on. I could take molds off the parts of the old receiver, and create a master from those and raw dimensions that could be cast in resin. Trouble is, I wasn't sure resin was tough enough to support the weight.
I could fabricate one in aluminium. This seems promising, if it can bear the load. But there don't seem to be any detailed plans readily available, and with the original in little pieces I'm kind of guessing at the way everything fits together. Also, I don't weld aluminium. (Not yet, anyhow).
Which leaves a reweld. Even if I did chose to go forward with a different plan, I'd learn more about the shapes and dimensions if I could weld the jagged pieces back together in some semblance.
Step 2: 80% Tube, 90% Hedgehog


Of course I tackled the worst spot first; the cut across the trunnion.
Since I didn't want to come up with the class fee for the welders at TechShop, I tried to do it with one of those cheapie wire welders. I can weld. I learned on stick and got decent with it. But I was rusty, I had bad light, the wire feed was jamming...and, well, it is a cheap wire welder anyhow.
Do they still call them hedgehogs? We used to call a bad weld that when I welded stick, because of all the broken bits of electrode sticking out of the weld.
Well, it welded. And after a bunch of grinding and some really annoying hand-filing to get into the gap around the bottom of the trunnion, it actually accepted the barrel and barrel shroud.
Which made me think this was a plausible way to proceed.
Yeah, sure. In hindsight, it would have been better to knock the parts apart and build a new tube from scratch to fit them. That's pretty much what the "80 percent" kits are; a somewhat complete receiver tube you weld the various other bits of metal on to.
Of course, I'd picked a gun there were no present 80% kits available for. Besides, I was still trying to save money at this point. Foolish me.
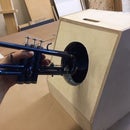
Step 3: Doing the Jig


To align the parts for welding I wanted something structural. And I didn't want to use the actual parts, out of some quixotic desire to leave them pristine for the next builder to make use of. Historical weapon, after all, even if it was originally manufactured in large numbers.
So off to the mill, and the lathe. Oil-soaked wood might work -- might have even worked better -- but I chose to mill my elaborate "weld backing plates" out of scrap aluminium.
So the "bolt" sits in the chamber and keeps the various bits of the receiver tube aligned during welding. The "trigger assembly" sits between the side plates to keep weld metal from creeping in their as I repair the torch cuts made through that section. The "barrel insert" keeps the inside of the trunnion clean and the "magazine" is mostly there to protect the slot where the magazine catch sits.
Of course, I developed this as I went. I didn't even lean how to use the mill until after I'd made the first couple of welds -- so those welds were done with eye, strips of plywood, and lots of clamps.
And, of course, by the time I'd finished all these parts I'd done almost as much machining as it would have taken to create a new tube from scratch.
Step 4: MIG Fighters

So I did the first welds with a nasty little wire welder. But I was wearing out my welcome doing all the grinding at home, so I finally made the move and got a full TechShop membership. Now I could grind there. And learn the mill properly. And make better jigs. Oh, and oh yes, pick up the MIG welder.
Actually, TIG would have been a better choice (especially as I mean to weld aluminium in the future) but I didn't know that until after I'd taken the class.
Between the lousy first welder and the lack of proper jigs during those early welds -- plus my ignorance of what the critical dimensions were and how the other parts actually fit -- I made a pretty fair mess of the side plates and barrel seat. And it was a rare time with Dremel and hand files to clean up things enough where the rest of the parts started fitting inside again.
Of course I tried the mill on the side plates. Which worked okay; but there was so much warpage and error in the assembly, I was removing significant metal to make a flat plane again. Which might not have been so much a problem if I hadn't been jumping ahead again; I wanted to see if things were going to fit at all. Otherwise -- if I had trusted they eventually would -- I could have held off until all the welds were complete and done one big milling pass to make everything nice and straight.
Step 5: Gap Fillers

So of course after the receiver was roughly ground down and milled out to where the actual trigger assembly would fit inside again (and the whole thing would fit in turn into the furniture) I finally figured out how the front of the trigger group works. There's a notched bit of metal that retains the front of the group, and sticks down in front of the magazine catch to protect it from inadvertent deployment.
And, dammit, the rest of the welding had gone well enough that even though the side plates were basically invisible once the gun was assembled, I wanted to build them anyhow.
So I milled out the side plates back to far enough to be able to seat new pieces of metal on them. Carved out a replacement for the end of the notched bit (basically, all the bits that got vaporized by BATF's plasma cutter). Then milled down some scrap plate to the same thickness as the side plates.
I'm actually pretty proud of the rest of that particular process. Took a rubbing of the gap on to note paper, and transcribed that with scratch awl on to the scrap of metal plate I'd milled to thickness. Aligned all the parts and tacked them in with superglue. Then welded it all up.
Of course I got hubris at how well the welds were going, and got ambitious, and splashed weld metal on various random divots that still remained from the previous attempts at welding. And the aluminium backing plates did their job, but they jammed in there real good; it took cold chisel and pipe wrench to get them back out again.
At which point it is really, really clear that I could have drilled and ground off the original side plates and just welded new ones from scratch in the first place. But at least the welding was done.
Step 6: The Daily Grind

The fake bolt is permanently welded inside and there's a bunch of weld metal and bent bits of steel all through the tube, from where the buffer spring would want to be to where the headspace isn't. There's no chance of anyone putting this receiver back in operating condition. It would take less time to make a new one out of new steel. Which is really what I should have done in the first place...but I had to learn the tools, and how it all fit together.
Nasty welds means aggressive grinding. There's plenty of tiny spots where an angle grinder won't go, though, so I wore out a number of Dremel wheels and the chuck stop on my poor little Dremel going after them. Then files. The nice thing about files is it is much easier to define a plane. Even a curved surface. Grinders tend to dish out. Files glide over the low spots, and you rapidly learn how to put the most pressure on the high spots.
That said, the smoothing is only so-so. There's basic errors in the fit-up, and divots from overly aggressive grinding and some ill-advised attempts at milling. Plus voids left from the welder (mostly from that first welder; the MIG did much cleaner work).
So I took it through hand files, to 220 grit, to wet-sanding with 400 grit, and stopped there. Close enough.
(As it turns out, part of the "look" of the original parts is very clear machining marks. My parts are paradoxically too smooth, as well as too uneven, to really look like part of the original gun.)
Step 7: Demilitarized and Thoroughly Passivated


Gun Bluing is basically controlled rusting. The good blue-black "blue" is magnetite, a black oxide. It forms a protective layer that slows the formation of red oxide, the "bad" rust. Bluing is not perfect protection, and it does wear off in time. Which was, in fact, the look I needed to achieve.
I started with Plumming, which is, oddly enough, red oxide. The Plum Brown solution is a nasty acid that promotes accelerated rusting, basically. Which it did; it produced a rather lovely copper color.
And, no. You should not do this at home. The fumes were terrible! And I was messing around with acids and boiling water and all sorts of ugly possibilities right in my living room. At least discretion finally showed and I did not attempt to heat the metal to 270 degrees F as recommended by the manufacturer.
There's also a lot of opinion online that cold bluing goes on better if you heat the metal. Cold blue is selenium dioxide (or similar compounds) and very different from the hot bluing tank at a proper gunsmith. And it is likely that heating the gun doesn't have much of an effect either way. In any case, I was having none of it. Bad enough messing with the chemicals as it was.
I should of course mention cleaning, which is essential to good bluing. I scrubbed with dish soap in the kitchen sink, wiped dry with paper towels, then went over it again with rubbing alcohol (with my hands in gloves all the while to keep skin oils from getting on the metal.
After wiping on bluing with cotton swabs, I killed the process in a bucket of water. Hand-dried, went over it with steel wool, then again.
I finally stopped at three coats of blue over the first coat of plum. Buffed it up good with steel wool and applied a little sewing machine oil to protect it. The color isn't a bad match...it may work.
And since this is a replica period piece, not something I'm pretending to restore, I took the steel wool and emery paper and intentionally took off the bluing around various wear parts. That is to say, I weathered it (or "distressed, to use the theater term for making a prop look dirty and well-used).
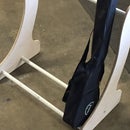
Step 8: Assembly

There are a million freaky little parts in any post-black powder weapon (and some of those, to boot). Since I had pretty much gone real steel and mimicked the original arrangements, I was able to -- eventually -- fit all the parts that were in the bag. The only things left out were the original bolt, and the buffer spring.
Not that it really mattered. Since the receiver is solid and there's no moving bolt, the charging handle doesn't move much. So you can't tell that all three parts are actually deep inside the receiver, correctly assembled! But these were original parts and I didn't want to modify them to fit. I could have, of course, just stuck them in with hot glue and/or epoxy. Which, inevitably, I did resort to...but at least I tried first!
There's no moving bolt. This is actually a big problem. A bunch of the internal parts require you move the bolt out of battery. The charging handle assembles through a tiny hole in the side plates; fiddly enough already, with trying to push against a strong spring, line up a very tiny bit of metal on to a rod, line up six different holes, then tap a hardened steel pin through the whole mess. It gets even worse when you can't move the handle far enough back.
Since it was too deep to mill with regular mill bits I used a twist drill and basically chewed the heck out of the bottom of the aluminium plug in order to lengthen the slot a little. That got me just enough to get the charging handle assembled.
You also have to pull the handle back a little in order to clear the shoulder of the furniture when putting the metal and wood parts together. And you have to draw it even further back in order to be able to spin the end cap on.
So there were several rounds of more and more nasty drilling and more fiddly assembling until it finally all fit.
I took the blued and nearly-finished receiver into the shop to drill the mounting holes for the rear sights and magazine catch. I have a pillar drill at home, but at TechShop I could clamp the thing to the mill table and get everything as well aligned and secured as the warped pieces would allow. Even then -- the aluminium plug inside the receiver caught on the drill bit and it skittered. Twice. I had purchased a couple of nice tension pins to attach the ladder sight, but the holes in the receiver chewed out so badly in that fiasco I dropped them loose in the holes and poured LockTite after them.
The hole drilled for the magazine catch ran into the center of one of the new welds and snapped the drill bit. At least that one was close enough to push the tension pin into it. Then file off the excess.
The last bit was the take-down lever. The original had been peened over. The re-seller tore it out of the receiver with a wrench before making the torch cuts. So I milled the stub flat, drilled it, and since the metal at that end felt fairly soft, went ahead and tapped it for a metric stud. I couldn't find a period-looking slot-head screw and didn't trust I could get the tension right that way, so stuck the stud in with LockTite, put a hex nut on the other end, and trapped a spring washer between them to provide the right tension. Then dabbed the exposed hardware with black paint.
Step 9: Finnish

I mean, finished.
Turns out one of the flats I milled on the fake bolt is just slightly small or off; it catches on the lip of the drum magazine meaning it seats just a fraction too low to catch the magazine catch. It stays in pretty well, though, from sheer friction.
The take-down works, the trigger pulls, safety engages, barrel and shroud take down, the site ladder ladders. Even the cocking handle moves a little.
But that said, after all of that it is really a pity not to be able to cock and dry fire. This is a tough choice anyone facing a reweld has to make, really.
The mechanically simple and properly legal approach is to use a solid chunk of metal, or otherwise weld and pin your reweld so it is essentially the same thing. No bullet will ever go in it again, but it works just fine for hanging on the wall or wearing with costume in the proper controlled environment.
Going up to functional is a whole other ballgame. The moment the original bolt can drop into a rewelded tube, you stand in violation of Federal Law. And unless you know a lot more about welding and temper and basically are a much better machinist than I, you would also risk your own neck if you were so foolish as to attempt to operate it.
Yes, there is a route to a fully legal semi-automatic conversion. It is a route that involves finding out all the various necessary changes, applying for and getting your letter from the ATF approving what it is you want to do, paying the right stamps depending on the final configuration you go for. And a whole labyrinth on top of that about whose tools you are allowed to use, who becomes "manufacturer of record," and on and on into Kafka-eque levels of obfuscation. And that's before you start bending metal, which is a whole world of tighter tolerances and custom parts and inspections and heat-treatments and so on and so forth.
So best to just stick with dummy props.
I took off some of the bluing with emery paper to give the new parts a weathered look, and they look like they fit. It looks real -- like it has been through a war or two, and maybe even been repaired in haste during the course of one of those wars, but it looks period appropriate.
And that's all we really wanted it to do.


