

Introduction: Hand-made Jeweller's Mandrel in Bespoke Presentation Box From Reclaimed Wood, Steel and Leather


This Instructable is about transformation. Transforming rubbish into something lovely.
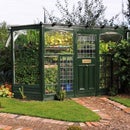
This beautiful tool is a mandrel. I made this from scratch from reclaimed materials, including the rather fetching presentation box, designed to match. I love tool-making and I also have a bit of a thing about boxes, so this was a great project. I am really pleased with how it turned out.
A mandrel is the tool jewellers use to alter the shape of rings. This is the metal cone on the wooden base. The mandrel itself was hand-turned from an offcut of steel bar from a skip, polished to a super smooth cone. The octagonal base is solid oak from the end-panel of a vintage bookcase found in the street. It is collapsible for convenient storage.
The box has solid oak sides with oak-faced plywood top and bottom panels, both salvaged from the same bookcase. All the wood was distressed and aged before applying French polish. The box was uplholstered with red leather aged by having been on a sofa for years.
I love that something so beautiful used to be a load of trashed stuff just found in the street.
I made this for a friend taking up jewellery-making who was looking for a mandrel. I like a challenge, so I offered to make one from scratch. I'd never even seen one in the flesh before, but hey ho!
Handy things
Useful things you might get from this one include the following. They are mostly practical, but the project was also a design challenge about how to make something lovely as well as something useful and pragmatic.
- simple octagonal box making without complex jointing
- some interesting lathe techniques for working metal on a woodworking lathe involving angle grinders (useful if, like me, you can't justify a full-on engineering lathe)
- useful tips about getting high-quality materials for free from scrap objects (oak from old furniture, leather from an old sofa and steel from an off-cut of a steel support)
- the design challenge of making a jeweller's tool that was practical but also aesthetically delightful, fitting for a jeweller (whose job, after all, is to make people feel lovely)
- making a collapsible tool to allow it to be stored in pieces to save space
- distressing and aging oak with physical damage and staining and French Polish
- laying out a bespoke presentation box lining to fit the mandrel (using expanded foam and leather)
Step 1: Raw Materials - a Vintage Oak Bookshelf and a Steel Bar


I am always amazed at the stuff people chuck away. The bookcase here was probably 1950s or 60s and was made from solid 3/4" oak planks and nice oak faced 1/4" plywood. They certainly don't make them like that any more. It was built to last and probably had seen 60+ years service before I rescued it. In your face Ikea chipboard shelving!
It was just lying next to someone's bins along with some ripped out sinks and stuff. It went straight in the car for dismantling in the garden. I got six good planks all about a foot wide, two four feet in length, and four about three foot. The plywood was in five panels held together with some rebated oak struts - result! This went straight into my wood store. I'd had it for a few months before I needed to use it for this project. There's loads left.
The steel bar was from a scrap metal skip. It was part of a supporting upright from something. I'm not sure what exactly. I am not sure either exactly what type of steel it is. I would have expected it to be mild steel, although it has shown no signs of tarnishing after polishing so it might be a stronger alloy, but who knows?!
I just angle-grinded off a piece roughly of the length I needed, about 11". The mandrel body itself needed to be about 9" long, so I allowed a bit more because I needed to form the mandrel body with a threaded bolt on one end all in a single piece. I also needed to allow a plug for the lathe to fit when turning it, which was cut off later.
The leather was from a badly neglected sofa that had been fly-tipped OUTSIDE the local council dump. I presume the owner had been turned away and decided to just lob the thing into the nearby bushes. I spotted it and just cut all the leather off and left the frame behind. You get a lot of leather from a sofa and it is nicely aged from years of use.
Step 2: Making the Mandrel - VERY Crude Metal Turning on a Lathe


The main body of the mandrel was turned from a single piece of round-section steel bar. The challenge here was that I only have a very lightweight wood turning lathe. It is powered by a mid-range electric drill and has no metal cutting tools. It is really just something I use to turn handles for chisels.
And so, this got me thinking about how I would get the bar to fit in the lathe and then how I could mill the shape.
How to hold a wide bar in a narrow chuck
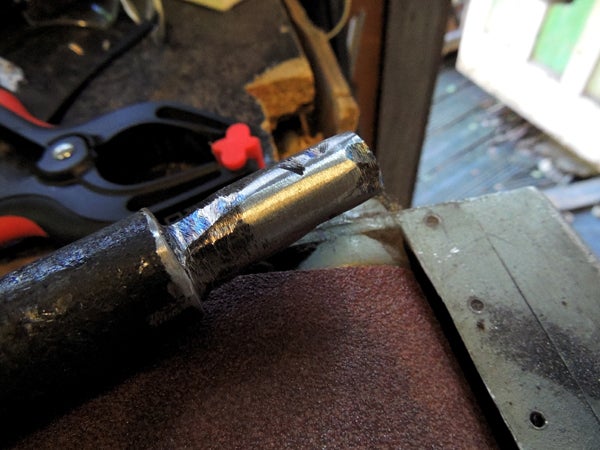
The bar was about an inch in diameter - way wider than the jaw capacity of the drill chuck. To get it to fit, I first had to hand-grind a step down in diameter at one end of the bar to form a narrower protruding cylinder. This would later become the screw thread used to attach the mandrel body to its base. Grinding this down took quite a long time. I roughed it out with an angle grinder to start with, trying to keep the new narrower outcrop in line centrally to the larger diameter bar.
To finish it off I eventually used a belt sander locked in the woodworking vice. to even off the shape. By holding the larger end and rotating it while the narrower end was on the belt, I could smooth the roughed out piece into a pretty even cylindrical shape. This was effectively like a lathe in reverse. I turned it down to about 9mm, because I was going to cut an 8mm thread on it later.
Once I had one end of the bar a size that would fit the drill chuck in the lathe, I ground a conical recess in the other end, to match the conical centre on the lathe tailstock. I then locked the bar into the chuck and locked the other end onto the tailstock, ready to get turning. I tested this well, because it needed to be super secure, because if it escaped, it might throw the bar in my face.
Grinding the mandrel's cone shape from the bar
The main challenge now was how to remove the amount of metal needed to create the cone shape. I initially thought I could do this by using a hand hacksaw held against the rotating bar, but this was painfully slow to make any progress. I had also tried rough metalworking files and they were even slower.
So this got me thinking what if I used an angle grinder to cut the metal. These cut metal really fast. Additionally The lathe was rotating the bar in the opposite direction to the grinder wheel. This meant it was being cut even faster than the basic angle grinder because the cuts were happening at the combined speed of both the lather and the grinder - genius!
The rest of the lathe work was just about patiently forming the shape. This still took a fairly long time - a couple of hours and quite a lot of grinder blades. I broke two diamond blades and ground down a load of carbide ones.
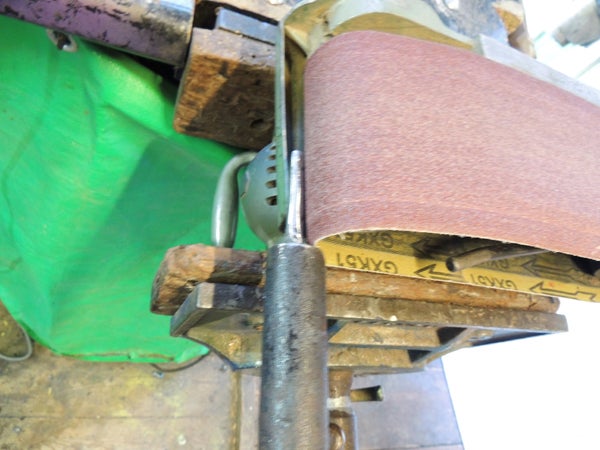
But eventually I had my basic cone shape and you could see the mandrel. It was almost the final shape apart from having a plug of waste metal at the tail end.
Smoothing and polishing
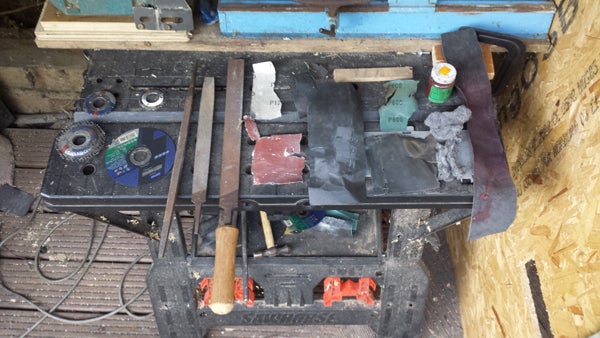
Cleaning up the base shape involved a load of repeated passes on the lathe with increasingly tools and abrasives. You can see the range in this picture.
The angle grinder left a pretty rough finish, so I started with a coarse metalworking file to smooth out the deep cuts from the grinder. Eventually the grooves were only as deep as the file would normally make. I then swapped it for a finer file and repeated this with an even fine one.
I then used sandpaper, starting with 100 grit paper, then 180 grit, then 240 grit, 400 grit and eventually 600 grit. This took hours. I had music on my bluetooth headphones to stave off the boredom. 600 grit leaves a prety smooth finish, but this was made even smoother using fine steel wool.
Eventually the finish was nice and smooth. Once there were no marks left, I used a piece of leather with emery paste to polish super shiny. This is the same method barbers use to get a super fine edge on a cut-throat razor. It works really well. Emery paste is waxy paste with extremely fine powdered grit in it.
The mandrel body was done apart from tidying up the ends.
Step 3: Cleaning Up the Mandrel After Turning


The shiny body of the mandrel was looking good after all that attention on the lathe but it still needed the two end tidying up. This was pretty straightforward
Cutting the thread onto the tail end
The narrow end of the bar that I had ground out was not just to secure it in the lathe chuck. It was also the blank former for a screw thread that would be used to bolt the mandrel onto its wooden base later.
Creating this attachment bolt was very simple. I just used an 8mm die to thread the narrower end. I had deliberately cut it originally to about 9mm so it would be the right size for this.
Cutting off the waste metal stock from the tip of the mandrel
The end that had been held in the lathe using the cone centre in the tailstock was simply cut off with a hacksaw, taking care not to slip and scratch the polished mandrel body. The end was then round off on the belt sander in the vice again and smoothed down using power sanders with decreasing grits in the same way the body had been on the lathe.
The leather piece with emery paste (technically called a strop) was again used to do the final polishing until teh whole mandrel body shape was complete and all nice and shiny.
Step 4: Making the Mandrel Base - Ageing Oak Octagons


The base for the mandrel was made from the oak planks reclaimed from the abandoned oak bookcase. Oak is dense and heavy and takes a fine polish. It also smells great when you are cutting it. I really like working with it.
Making a stable base
The requirement for the base was that it needed to be stable and it needed to look good.
For stability, I didn't want to make it really wide as it would take up too much room when being used (and when stored). So to keep the size down, I wanted to make it heavy, so this naturally led me to make it from two planks, to give it extra height and therefore weight.
I liked the idea of not just making a square shape, so I decided to go for octagons. The eight sides are regular, but not equal. There are four shorter sides and four slightly longer ones. I also decreased the width for the top plank to give a nice tapering step.
To further add interest, I added a rounded stepped edge with a router. I did this by using the router as a table router, by clamping it in the vice. This makes it easier to manage.
TIP - hand routers are powerful dangerous machines and normally have a dead man's switch so you can't lock the power on. To get round this, once clamped (firmly) in the vice, you can use a strong woodworkers clamp to keep the power on.
WARNING - hand routers are powerful dangerous machines and have a dead man's switch for a reason! The router MUST be strongly secured. You should be confident in this before attempting it. If the router gets loose, you will probably get injured, potentially quite badly. If in doubt, then don't try this.
The two octagons were sanded down to remove the old dark varnish leaving them the natural pale yellowy straw colour of raw oak. The base was then finished by joining them together using wood screws. They weren't glued because they needed to be taken apart again later to cut holes in. The top piece needed an 8mm hole for the mandrel thread fit through. The bottom piece needed a wider recessed hole within which the washers and fixing nut would go. It needed to be wider to fit a tightening spanner.
Making the base feel old and lived in
The shape of the base was now finished, but the wood was raw and needed treating to make it look aged and weathered by use. To make it look older and darker, I first treated the oak with some vinegar and steel wash. This is naturally dark and when you apply it to oak reacts with the tannin in it and makes it go black. This made the oak grain dark and by sanding it back makes the wood look much older
A few layers of French Polish were added to add a rich colour. The final base looked like it was some strange old vintage base, just how I wanted it.
Adding a leather anti-slip lining to the base
The final thing I needed to do to the base was give it some protection against slipping when in use on a smooth surface like a table or counter top. To do this first routed out a shallow rebate into the base, just leaving a 6mm wooden edge, mainly for decorative purposes. I used the router as a table router in the vice as above (SEE ABOVE FOR WARNING ON DOING THIS).
Once routed out I cleaned up the interior surface of the recess with rough 60 grit sandpaper in the multi-tool. I finished the edges with fine 180 grit paper that was already a bit worn.
I used some of the sofa-leather to make an octagonal liner for the base. For this, I folded over a hem to make the edges slightly thicker, before gluing in place with a hot glue gun. I cut the central hole out with a scalpel and polished the raw hide round this hole with some dark tan shoe polish so it blended in.
Step 5: Designing the Box Interior Layout


Designing a box is not so simple as one might imagine.
Boxes are practical containers, but they also induce anticipation when closed and excitement upon opening. Like the mandrel itself, I wanted the box to give pleasure more than anything else.
Jewellery is about making things that are beautiful to give pleasure and I was making tools for a jeweller, so I wanted them to be delightful . Why people make beautiful jewellery and how it makes our lives interesting are quite deep things to ponder, but hey - beauty is lovely, so if your going to do it, do it lovely.
Philosophy aside, the two design questions for the box were:
- what should the box look and feel like?
- what should I make it from?
Shape
It was not immediately obvious what shape to make the box. I wanted it to be practical as well as lovely. Boxes are protection for something special enough to need protecting. But of course, most of the time boxes are just containers lying about in your space and needs to take up as little of that space as possible and fit in with lots of other things. After considering a few shapes, I decided to make it a really basic shape that took up as little space as possible while retaining a hint of what is within it. After rejecting lots of fancier shapes, I decided to make it a basic flat, essentially rectangular box, but clip the corners to add an octagonal feel to it.
Feel
BUT boxes are really not just practical things. They have promise. I wanted this box to be something lovely so that getting it out and opening it would be something that pleases...
The first thing was to just lay out the mandrel components and see what looked and felt good. The octagonal base with its rich and warm oak was the largest shape and dominated the layout. The sleek shininess of the steel mandrel then needed to be place next to it in a layout that felt good. The nuts and washers and assembly spanner were then fitted around the base and mandrel.
Step 6: Reclaiming Wood for the Box


The side walls of the box were made by reclaiming the thin oak pieces from the the bookcase. These just happened to be of almost exactly the same width as was needed. They also already had a recessed groove routed in them. In the bookcase from which they came, the grooves held the plywood sheets that would I was going to use to make the two faces of the box (the top and bottom).
The oak as retrieved from the bookcase was covered in dark varnish. To remove this, I used my slightly scary planer-thicknesser. Obviously reclaimed wood has things like nails in it and these will mangle the blades on the planer, so they all had to be carefully removed first.
Finally, I created a rebate along both edges of the pieces with the router. This was easy because I could just rout off one side of the existing recess groove they all had already.
The plywood panels were also perfect because they were oak faced. I sanded the varnish back off these. This occasionally left a slight bar patch, which added to the aged look.
Step 7: Making the Box - Tricky Octagon Joints


Cutting tricky angles
Making a square four-sided box is not that hard. Lots of tools like squares and vices are built to cope with parallel sides and right angles. Octagonal boxes are a bit trickier . The main challenge is forming the mitres on the box's eight corners. A mitre joint for any angle is formed by joining symmetrical angled pieces of wood each of which is half the desired angle. The internal angle of a regular octagon is 135°, so In this case, the box side needed to be 135°/2 = 68.5°. This is not something you can judge by eye (well, unless you make octagonal boxes all day long).
I have a manual mitre saw jig which makes a lovely fine cut, but it's old and wobbly so the joints can come out a bit skew. My portable circular saw turns out to have a 22.5° setting, which essentially is the same as 68.5° when cross-cutting (90-68.5=22.5). This turned out to make a more accurate cut than the manual mitre jig.
Even so, I still needed to mark the joints to keep the saw cut true to the desired angle. I used the sliding gauge to mark this angle on the edges and a try square to mark the square lines across the faces of the pieces before cutting.
The plywood faces were cut together to make sure they were exactly the same shape. This was done by clamping two sheets together with woodworker's clamps.
The build was always going to be a bit bit tricky. It relied on the accurately cut pieces being true to the angles they were cut at and then being the exact length needed. Getting the right length was not that straightforward. The octagonal box faces were the master guide that was used to work out the correct sizes for the sides. It took a lot of checking and placing against the faces to get the various pieces needed to assemble the box.
Because the box shape was a rectangle-based octagon, there were three different lengths needed for the eight sides. The four short sides at the box angles were all identical. The remaining four sides were two matching pairs. One pair for the long sides and one pair for the short sides.
Putting it all together
Once all the pieces had been cut, putting it together was was fiddly but not too tricky. Because all the parts were cut accurately, it was easy enough.
The joints were simply glued and pinned. I used standard woodworker's PVA for the glue and 3/4" panel pins.
I started along one edge then added a corner and worked my way round. Eventually I had all the sides nailed and glued onto one face. Before I added the other face, I reinforced the interiors of the corner joints with some improvised biscuit joints. This was because the box would have a deep base and a shallow lid. The base would take all the stress when loaded with the mandrel, so I wanted to make sure the base walls were strong enough.
To make the biscuit joints, I used a drill in my Dremel to rout out some grooves. The biscuits themselves were small oak pieces pared off with a chisel to the same thickness. I glued them in leaving the biscuits sticking out. I would trim them flush with the box sides later.
I also use a filler past on any small gaps between jointed pieces. This was made from fine oak sawdust and PVA. This forms a nice workable paste that sets to form a very strong but flexible solid fill.
Once all the joints were reinforced, I left the box over night for the glue to set. The next day I trimmed off the parts of the biscuits that were sicking out of the joint using a saw attachment on my multi-tool. I then sanded them back smooth with a sander head, also on the multi-tool. and generally sanded all the edges and faces that would be inside the box when completed.
So now, I just had to nail on the other face. The main thing to do was to make sure that it stayed in the same orientation that it had been when the two pieces were cut together so that the two faces aligned exactly when assembled. This was glued and pinned in the same way. Similarly a few small gaps were filled in with the wood paste. Any excess glue was wiped off with a wet cloth and the now complete box shell was also left to dry over night.
The box was then cleaned up. I sanded all the faces and sides, trimmed all the edges of the recesses flush with the baby plane and sanded the corners to make them and sharp.
Finally, after a day or so setting properly, all I had to do was cut the box in half along its side pieces, to form a nice, matching top and bottom. I did this using my circular saw clamped in the vice. I use the same technique for this, that I do with my router, with a clamp to hold the power button on.
WARNING - clamping a circular saw in the vice with its trigger locked on is even more dangerous that doing it with a router. Do not attempt this unless you are completely confident the vice has the saw locked in and it can't move or escape.
When cutting the box lid off, I cut almost all the way round, then used a piece of waste wood to keep the two sides apart at the same thickness on the part already cut, before doing the final pass on the remaining side.
Step 8: Creating the Padded Box-lining to House the Mandrel and Its Accessories


Creating a template
The box lining was quite a fiddly job. I started by placing the mandrel and its accessories in the box to finalise the layout and make sure it felt right. I then got some heavy cartridge paper from one of my sketch pads and cut it to line the base of the box and then re-placed the mandrel and accessories in the box on top of the paper, so that I could draw round them to create a cutting template.
Before I drew round them, I then spent quite a bit of time adjusting the exact position for the mandrel base so that its octagonal sides lined up pleasingly with the corresponding octagonal sides of the box. This allowed me to work out where to place the mandrel body and its accessories.
I cut out the octagon where the mandrel base would sit, but didn't bother cutting out the shapes for the mandrel itself and its accessories, because I did that directly on the foam later.
I now had my template to draw the correct shape on the padding layer so I could cut it accurately.
Inserting the padding layer
For the padding I used some foamed plastic sheet about half an inch thick in the shed that had been reclaimed from a skip somewhere. This is used to pad things inside crates for impact protection. When I see it thrown away, I grab it. It is useful stuff for other things like making kneeling pads out. It is very easy to cut and retains its shape well when squashed, so makes a great padding.
I drew the box shape onto it using the paper template, then used a long ham-slicing knife to cut the foam out to fit the box and to cut out the hexagonal inner void where the mandrel base would be housed. I then glued the foam into the box using contact adhesive.
I then re-positioned the mandrel and its accessories and drew round them. The larger shapes I cut with a craft knife. The smaller round indentations for the lock nut and washers were formed using a heated metal bar to melt them into the foam. This gave a much more even circle than can easily be cut with a knife for such a small circle.
Fitting the leather over the padding
Once the foam padding was in place, I could add the final leather surface over it. I cut two pieces from the sofa-leather, one for the base and one for the lid of the box. These obviously needed to be larger than the final size to allow for fitting and trimming back
The lid was quite easy. I just created an octagon with a small hem of folded leather to make it slightly larger,. I glued this in place using hot glue. I had to glue the hem down corner by corner to check the exact fit.
The base was more fiddly because of the irregular contours of the padding. I started by gluing down leather into the flat octagonal void where the mandrel base would go. I used contact adhesive for this. pushed the leather into the other holes so it was smooth between them while ensuring they were lined. I then glued the leather in position into the bases of the holes.
For the rest of the padding I just had to work out from the centre of the base to the edge, gluing and smoothing leather down. Before I got to the final edge, I masked off all the wood on the inner side pieces, to prevent glue getting stuck on them. Once done, I then worked my way round trimming the leather to the required size to fit into the edges. I then glued them by tucking them over the edge of the padding with a screwdriver and a flat scraper tool. This took quite a while
Step 9: Assembling the Box and Finishing


Applying French Polish to the lined box halves
I had left the box halves as bare wood before putting the lining in. This was mainly so I could glue it in directly onto the rough wood. This is stronger than gluing onto smooth polish as the glue gets into the wood fibres, rather than just adhering to the surface of the polish.
Coating the interior faces of the box with French Polish was pretty easy. I just covered all the leather with masking tape then applied it with a small brush. Once it had dried it was all carefully removed again. For the outside of the box, I applied the same vinegar and steel wash to stain the grain pores darker, before sanding back and then applying 5 coats of French Polish. As I applied coats, I smoothed the surface down with fine wire wool before applying the next one. I now had the two box halves, fully lined and with their finishes applied. It was time to assemble.
Distressing the ironworks
The hinges, toggle clasps and screws were about the only thing in the whole build that was shop-bought. Although I had bought steel fittings to match the steel mandrel, they were very new looking and appeared to have a protective coating. To match the aged look of the box and mandrel base, I also applied a bit of distressing to the metal, using files, and sandpaper. I wanted them to look like they had been worn over time. The screws had a brass effect coating which I sanded back to the steel underneath
Putting the hinges on
The hinges were attached by cutting rebates into the back edge of the box halves and screwing down, taking care to get the box halves lined up. I had to do a few checks to make sure they aligned when the lid was closed.
The toggle clasps went on last.
Final distressing and finishing
Now the box was completely assembled, there were a few minor misalignments of colour and tone on the boxes parts where they met. To make the box look like it had aged as a complete box, I then distressed the wood by sanding patches down in places. I also used a red hot screw to burn scorch marks across some of the edges.
After scorching, I sanded back the polish round it and reapplied more French Polish to create an even colour all over.
Step 10: Finished Mandrel in Its Box and How It Is Assembled


Here is the finished tool packed away in its presentation box. I am pretty pleased with its vintage/antique look and especially at how well it all blends together in colour and tone.
I was particularly happy with the design that has two user modes. You can use the mandrel with both hands free by mounting on its stand OR you can use it as a hand-held tool. The assembly tool is both spanner and handle...
Mandrel on base
You can see how the mandrel fits together by bolting the body to the base using the nut and washers. This can be tightened using the assembly tool. This is a reclaimed bike spanner with its handle removed. It was filed and polished to match the rest of the metal work. It's essentially a cylinder with a hex interior at one end.
The threaded bolt-end of the mandrel body fits through the wooden base from above and has two spring washer and a plain washer sitting under the locating nut. The spring washers prevent it coming undone without having to really tighten it super tightly. The assembly tool is used to tighten the nut and the spring tension in the washers helps prevent it undoing.
Mandrel as hand tool
If you want to use the mandrel as a hand-held tool, the assembly tool can be reversed and used as a handle. The other end that is not a socket , has a threaded hole to receive the handle of the mandrel. The assembly tool can be screwed on tight and is a pleasant feeling handle.
Step 11: Tools


I used quite a lot of tools on this project.
Tools for woodworking
Most of the tools for the woodworking parts (box and mandrel base) are common tools that you may have if you do any woodworking. Saws, chisels, sanders, drills and planes, odd hammers and punches etc
The more advanced tools like mini power sanders, large belt sanders, routers are perhaps less common, but not strictly essential. The least likely tool is a large thicknesser, but I was only using that to plane wood evenly, which can be done by hand too
Tools for metal turning
Obviously, if you don't have a lathe, then this part would not be possible. However, if you do, then the most unusual extra tools were the angle grinders. The rest of the tools like files and sand paper and leather for a polishing strop are readily available.
Tools for lining and upholstery
These were all really basic tools like craft knives, scissors, a kitchen knife and a few odd tools like screwdrivers and scrapers being used just to push and tuck the leather, so this bit was easy.

Participated in the
Box Contest 2017


