

Introduction: How To: 100lb Anvil Stand


I have had this 122LB Peter Wright Anvil for a few years and it needed a worthy stand! @Doghouseforge on Instagram posted a great sand filled 2x3 construction stand about a year ago and I decided to make my own version of that.
The concept is pretty simple, the 2x3’s make a square frame, with 3/4” plywood as the bottom. This size stand will accept about 100lbs of sand and using large threaded rods and steel you can secure the anvil to the top. Follow along with this project on this video below:
For a detailed write up continue into this instructable. Got questions? Ask them in the comments! Enjoy!
Step 1: Design:

As I said, the original design for this stand came from @doghouseforge on Instagram back in January 2016. For my stand I will choose to use 2 layers of 3/4” plywood as the bottom, and then 11 layers of 2x3s on the flat.
The total height of the stand will be about 17” when its complete. My anvil is about 11” tall, and I am aiming for a finished height of 28”. The proper height of an anvil is about the height of your knuckles when your standing at a relaxed stance with your hands hanging straight down from your elbow.
Step 2: Cutting Up the 2x3s


This project has a few repetitive components and one of them is cutting up the 2 x 3s to length. Since the top is solid 2x3s the 6 pieces of 2x3 will be 15” long. The rest of the stand is 12.5” pieces in a square pattern. I use a stop block on my miter saw stand to quickly cut everything to length. You have to be very careful when using a screwed down stop block with a miter saw, if the material binds up it will go flying. I always allow the blade of my saw to stop completely before moving it back upward out of the cut. BE CAREFUL
Step 3: Cutting Up and Glueing the Plywood Base.


I use the miter saw to cut up the 15” x 15” plywood base. This isn't a very precise build so I didn't have to go so crazy getting these pieces to be perfect. I use a healthy amount of wood glue to secure the 2 pieces together. Then I use a collated screw gun to get about 15 screws in the two pieces making them nice and secure.
Step 4: Assembling the Stand:


The design of the stand is a square boarder with each layer staggered above the layer below it. I use glue between each layer and 1 3” screw on each piece of wood to hold it all together. You could really load this up with screws but I felt with the glue that it was not necessary to use more than 1 per piece of 2x3.
Step 5: Trace Out the Anvil:


The stand is roughly assembled so now I put the anvil on top to trace out the base.
Step 6: Adding the Threaded Rod


The clamp down system is 2 - 5/8” threaded rods, so I drilled 2 - 5/8” holes in 2 of the 2x3s on the top. I kept the tolerances tight on this so I get the best hold when I bolt everything down.
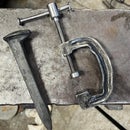
Step 7: Making the Steel Clamping Bars:


The steel bars are 1” x 1” with 1/8” wall. I drilled 5/8” holes in both side of the steel tube and cut each piece down to 12” with my small portable bandsaw. I deburr the edges using a belt sander.
Step 8: Filling the Base With Sand (A Creative Solution):


A base of this side will hold about 90lbs of sand, but you have to really pack it in there to make it fit. At first I tried whacking the side with a mallet and thought i would be able to manually vibrate the base enough to get the sand to settle, I was wrong. It would have taken me a week to shake out the voices with a hammer. So then I tried packing it down with a scrap piece of wood, this worked well but also took too long.
I decide to use my cordless SDS hammer drill to compact the sand quickly. I used a flat shipping bit and a scrap piece of 2x3 to vibrate and compact the sand to a point where it wouldn't move any further down the frame. This worked VERY well and I am really happy with the compaction I got out of the sand.
If you don’t have a hammer drill, a piece of scrap wood will absolutely do the trick!
Step 9: Attaching the Top:


I decided not to glue the top section of 2x3s onto the base. I did this because I think the sand will continue to settle over time and I want to be able to add more sand in the future if necessary. Again I used 3” screws to screw down the top, but first I added the 5/8” threaded rods with a lock washer and nut on the bottom side.
Step 10: Attaching the Anvil:


Now that the top is on and the bolts are sticking out its time to drop the anvil on there and bolt it down! I made everything nice and tight and added more lock washers to keep things from vibrating loose over time.
Step 11: Adding a Tool Caddy:


Once I put the anvil into place and hit it a few times I realized I had no where for my hammers to hang while I'm using it! A quick trip back to the miter saw solved that. I cut up some 1/2” plywood for the sides and a 2x3” for the front section. I attached this to the stand using 3” screws.
Step 12: Swing Away!


As soon as you hit the anvil you can feel the stand doing its job. The impact rings off the anvil and its a really satisfying sound. This is an easy project that you can get done in a few hours. It will make using your anvil that much better! Thanks again to @doghouseforge for the original idea! Got questions? Ask them in the comments and ill be sure to try and answer them! Thanks for checking out this Instructable!

Participated in the
Makerspace Contest 2017


