

Introduction: How to Make a Trout Net


Over the summer I invested most of my time into fly fishing for trout as it is a great socially distant way to hang out with friends while being outside. In the beginning, I did not have a net to put the fish in to get the hook out and take a look at the beautiful colors which led to a lot of lost hooked fish. I eventually bought a net from Walmart, and although it worked, I felt that the fish deserved better.
Years before I got into fly fishing myself, my grandfather took me trout fishing up in the Cascade Mountain Range. I decided to make this one for him for his 70th birthday and as a fun Christmas present.
So... stick around to learn more about how I made this cool net!
Supplies
2'x2' Plywood board
50" Poplar board, 3/4" thick
2.75"x2.75"x8" Ash block
Clamps, lots of clamps...
Titebond 2 wood glue
50" PVC pipe with caps
2" hole saw
Tablesaw
Drill Press
Belt Sander
Drill
Drill Bits
Thin Strip Jig
Coping Saw
80,120,220 Grit sandpaper
Duct Tape
12lb Fishing Line
Step 1: Modeling the Net/Handle


While the final product is made from hardwood, plywood was used extensively to help this project come to fruition. To get started I drew some inspiration from my previous store-bought net and traced it onto a piece of plywood. I then took the dimensions and modeled a similar net on Fusion360. I then edited it to get a feeling of what I wanted for a handle. This took more time than I wanted, but I think the final 3d form turned out great.
After finishing the 3d form, I used the drawing feature to get a 2d version of the 3d object in order to print it out onto a piece of paper and trace it on a small piece of plywood. Unfortunately, I am running the student version of F360 so I can not link a pdf of the 2d printout I will, however, link the 3d file which you can find below if you would like to reference and use it for your project.
The handle dimensions in the modeling environment are 3" wide by 8" long. I forgot that the ash block was only 2.75" wide so I ended up modifying the handle a little more once I traced it on a smaller piece of plywood.
Another thing to note is that this 3d model is only for the formers it is not supposed to be an exact model of the finished product.
Attachments

Step 2: Cutting the Form


Once traced out onto the plywood it can be cut out. To do this I used a jigsaw and got as close to the line as I could and then used a belt sander to get a vertical edge and get it precise. You want to make sure the edges are super smooth as any deviation is shown through to the final form. To make sure there was no, if any, deviation I put duct tape around the sides to create a smooth edge all the way around the form piece. This also protects the edge of the plywood from absorbing the water and warping from the wet hardwood we will be forming with this jig.
We also need to cut holes out in the jig to allow for clamps to be used to help form the wood. To do this I drilled 2-inch holes about a quarter inch from the edge of the jig to allow for enough space for the poplar while maintaining a hard clamp force. This was achieved through the use of the drill press and hole saw.
Step 3: Preparing the Frame


At this point, the next logical step is to cut the poplar and bend it around the form. To be able to bend wood around the form we need to do two things
1. Cut the poplar into thin strips
and
2. Soak the strips in water
By cutting the poplar into thin strips, it naturally makes it easier to bend. Since I want the final hoop to be around a quarter-inch thick, I cut 3 strips at a thickness of 1/8". This gives the hoop 3/8" thickness allowing there to be extra wood for final sanding and shaping. Some people will cut the strips into 1/16" and use 5/6 pieces for different looks as well as ease of bending.
Soaking the strips in water allows it to bend even more which is helpful around the handle where the net hoop connects to the handle. Your setup could be as simple as PVC or as elaborate as a steamer. I soaked my wood for 12 hours and that seemed to be enough time for it to seep into the wood.
Step 4: Bend the Frame


Now for the fun part! Time to bend the wood around the form to create the frame of the net. I made a couple of mistakes along the way which I will point out. Before starting, make sure you trace the plywood handle onto the ash block as once you have the form clamped down you won't be able to use it for the next step. Starting from the top of the form, clamp the wood pieces one at a time. I found that clamping them all at the top and then bending them down one is the best way to go. Make sure you start from the middle of the wood strip or else you might find that you don't have enough on each side.
When clamping, have a scrap piece of wood to take the brunt of the force in order to not have scuffs. For the next template, I am going to create an outside mold that will allow constant pressure all the way around the inside mold. This will make sure that everything is forming properly and will help immensely when gluing the strips together.
Make sure you have clamps specifically where the neck joins the frame. This is the hardest part to get right.
Leave the wood clamped for at least 3 days. You want the wood to dry completely before you take it out of the mold. I recommend going longer just to make sure it is completely dry.
Step 5: Make the Handle


The next step is to make the handle. I ripped the ash block down to a 3/4" thick stock. You can make the length of the handle however long you want but I found that 8" worked well for me. We will use the plywood cutout we made earlier to trace onto the piece of ash. The plywood former is used to replicate the handle over and over as well as have an accurate form for the wood to form to. I used a jigsaw to cut the handle out of the block of ash. Try to get it close to the cut line and make sure to make it's square as we will be gluing the poplar to the outside of the form once we start forming the net. There were a couple of parts of my handle that weren't square and the glue showed through.
Step 6: Glue the Form Together


Now that we have the handle and waited for the wood strips to fully dry we can now take off the form and start gluing it together. Take out the plywood handle form and use the ash block to replace it but leave the net form in to make sure everything is glued correctly. I used Titebond to glue the strips together and to the handle. The waterproof one is amazing. Make sure to fully cover the sides of the strips to ensure a good bond. Layer each strip together and then clamp it down to the form again! Having an outside form is especially useful in this step as there is constant pressure and you have less of a chance of getting small deformities in your net.
I had to cut the strips a little as it was too long for the handle I made as seen in the last picture.
Step 7: Shape the Net!


You now have a net! Well... not quite. It looks more like a racquetball racket. Now it's time to shape the handle and add features you like! I suggest passing the edges through a router to round them off. I hand sanded mine and it took way too long. I did use my belt sander to flatten out any deformities like in the pictures above. You can see small deformities in between the layers of the strips. I tried to patch this up with dust from the sanded bits and Elmer's glue. I also sanded any spots with excess glue on them. This is where you shape the handle. Get it so it feels comfortable in your grip.
Step 8: Cut Holes for the Net Bag


Now it's time to cut the holes to attach the net bag onto your newly shaped net. To do this I started marking at the throat of the net frame and made groups of two 1/16" holes 1" apart. These were then spaced 1-3/4" away from the other groups. I just used a regular drill to make the holes but a drill press will make them nice and straight. I also suggest, if you have one, using a router table to cut a 1/8" groove around the net where the holes are to protect and guide the line we will be using to attach the net bag to the frame.
Step 9: Get Your Net Bag Ready


I bought a net bag from my local fly shop and it was a little too big so I had to cut it down from its initial size. I first marked the row at which I thought the net bag depth looked nice. This was around 6 inches from the bottom of the net frame to the bottom of the bag. I then fed the row through a dowel and cut the row above to lop off the part of the net I don't need.
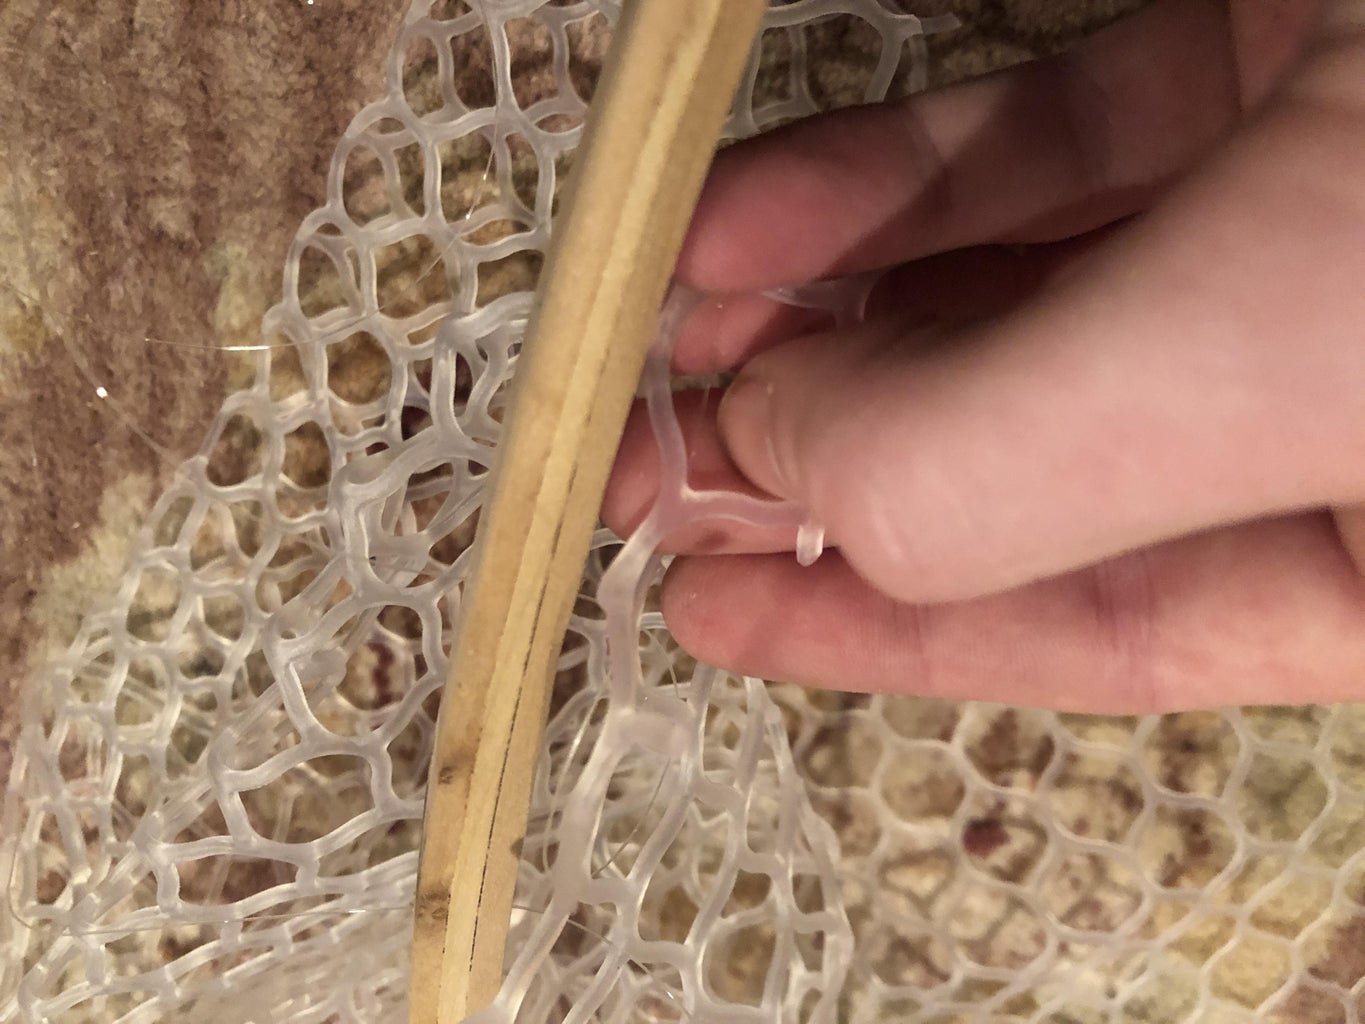
Step 10: String the Net Up!


I used 12lb fishing line to string my net up. I cut about 6ft of line and started from the top of the net and strung every two holes of the net together in one set of holes on the net frame. This worked out very well as I didn't have any leftover once I got down to the neck. Make sure you tighten it as you go. I did one side first then the other to make sure all the slack came out. When you get down to the neck of the net, do as you did before and then thread the line through the same holes again to double it up and then do an overhand knot to tie it off. You can see epoxy or glue to secure it as well if you want.
Step 11: Finishing//You're Done!

Now all you have to do is put on your favorite sealant and you got a new net! Some people also cover it in wax to let the water bead off, but I think this is pretty good. Congrats! I hope you learned some cool things in this instructable! I had a great time making this and I hope v2 will be even better.

Runner Up in the
Plywood Challenge


