

Introduction: Arduino Mp3 Player With ESP8266 and DF Mini Player: Electronic Hymnal


Recently I was going through a GitHub repo ESP8266 audio by earliephilehower which allows you to play audio files via I2S, DAC or with just a transistor and speaker. I did not have an I2S DAC or a regular DAC, the only viable option was to use a transistor and speaker, but according to him it is better not to go that route; due to this, I just opted for an easy option, that is to use DF mini mp3 player. Easy ways are sometimes crooked as the quote goes
It is because they took the easy way out that why rivers, and people, go crooked Jill Peterson
But I decided to be crooked for this project.
Supplies
Step 1: Schematic Diagram
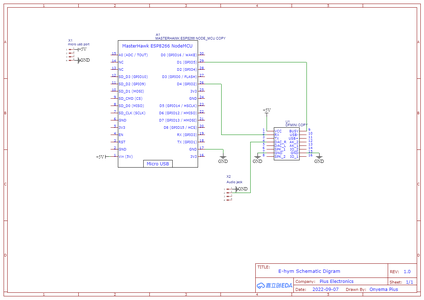
The connections are simple and few, so this shouldn't give any difficulty soldering. There is a design flaw in this circuit that also serves as a security measure. The node MCU gets power via its VIN pin; however, its micro USB port is not connected to the VIN pin, so if you power the board via its micro USB port when trying to upload code the mp3 board will not get power but they share a common ground and the TX pin of Serial1 of the node MCU is connected to the Mp3 module, so when you try to power the board via its micro USB port, the Mp3 module will try to pull power from the TX pin which will render the node MCU unable to enter download mode for code upload. With this feature😁 no one can change or re-upload a new code to your node MCU unless they know if this feature😁. A workaround is to upload the code before adding the node MCU to the circuit or power both the mp3 and the node MCU like this

If the so-called security feature confuses you, you don't have to understand it to build this project; just ignore it.
NOTE: To power the whole circuit you only need to connect the micro USB port on the Vero board to 5v and that is all, but If you want to upload code while the node MCU is part of the circuit you will have to plug in both micro USB ports.
If you want to create a professional PCB rather than do it by hand like me, you can download the Gerber file from here.
Step 2: Uploading Code and Other Files
Before you upload the codes you would need some libraries. To download the libraries, in your Arduino IDE, navigate to sketch>include library> manage library, then type in DF mini player and download the one by Makuna

, also download ArduinoJSON by Benoit Blanchon

You can find the code for this project in my GitHub repository You will also need LittleFS uploader for Arduino, to get it, go to this repository by earlephihower. hmm, this is the second time his name has been mentioned. The repository contains instruction on how to install and use it. After you have done that open ehymn2 folder, it is part of the items you get when you clone my GitHub repository, after you have opened the folder, open the ehymn2.ino file with Arduino IDE ( make sure you do not use Arduino 2.0 as it doesn't support tools like the LittleFS uploader), navigate to tools and click on ESP8266 LittleFS Data Upload, after the LittleFS data upload is complete upload the code.
Audio Files
The audio files would obviously be stored on the sd card, must be in a folder called MP3,

and be named in four figures i.e the number, one should be written as 0001, 10 would be written as 0010, the same applies for all numbers. The file names must be four-digit numbers.

You can download all the hymns audio file from here.
Step 3: Why Did I Create an Electronic Hymnal?
Before I go on, I want to talk about why I created this e-hymnal. I can be a very lazy person to the extent that I attend church on Sunday in the evening while most people go in the morning, but the downside to this is that the choir comes to church in the morning, so the people present have to sing, and it doesn't end well and kills the vibe in the church, so the engineer in me decided to take up the challenge and build an electronic hymnal. My intention when building this e-hymnal was not to replace the choir but to assist in their absence, as a result, this e-hymn is not sophisticated enough to replace the choir.
You might not be religious or christian in any way, but you could repurpose the knowledge you will gain from this article to build something else, for example from this article you will learn how to play mp3 files with df mini mp3 player module, how to create a webserver with esp8266 etc.
P.S. It was my school choir.
Step 4: How to Use the Device
If you have successfully created the circuit and uploaded the code and the other files using LittleFS data upload, then the next step is to connect to the device via WiFi.

During the first use, the name of the device is Ehymn and the password is 12345678. Connect to it and then open any browser of your choice and type in ehymn.com and you will be greeted with this webpage.
![]()
The four text boxes you see at the bottom of the image above are where you insert the hymn numbers of the hymns you want to play for entrance, offertory, communion and closing period in the church. After you submit the form you will be taken to the controls page.
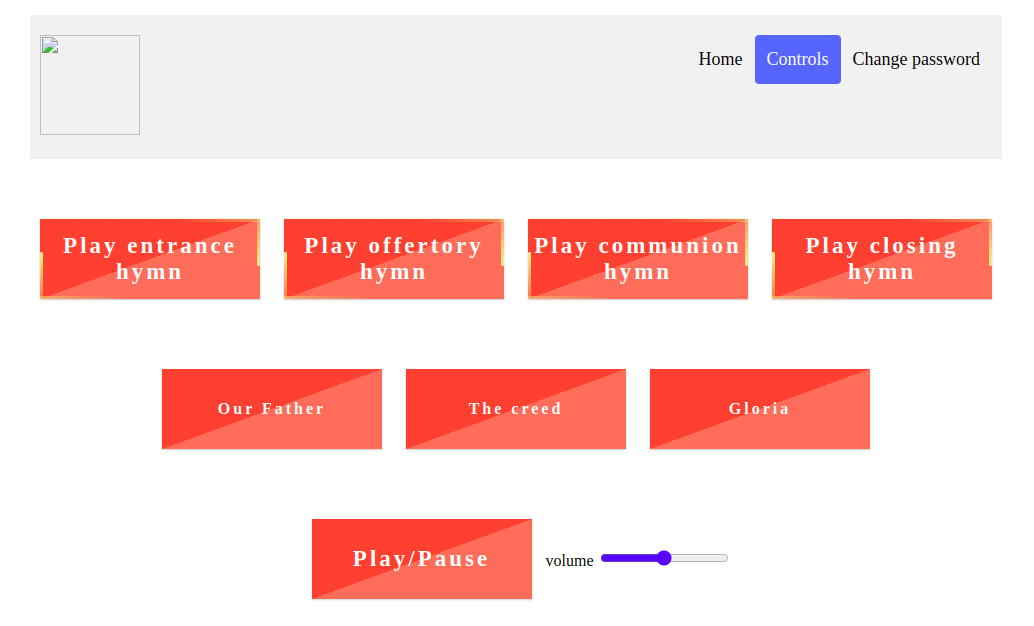
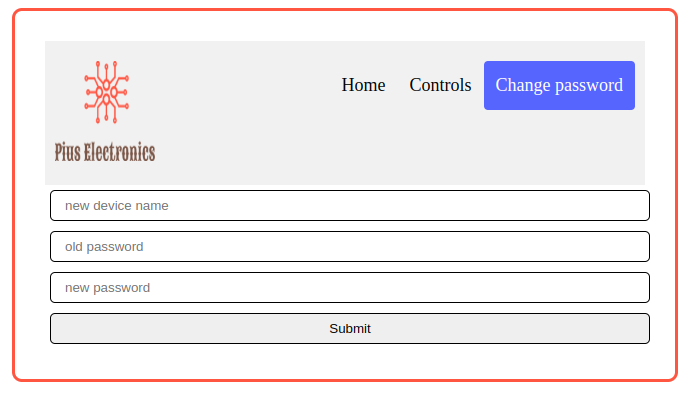
This page is self-explanatory the buttons tell you what exactly to do. The last page Change password allows you to change the device name and password. Whatever name you chose for the device _E-hymn will be appended to it.
Step 5: OTA Updates
OTA means, Over The Air, which involves sending your codes or files wirelessly to your board. In the case of ESP8266, you can achieve this via wifi. For this project, I used a library called Elegant OTA, which makes adding OTA to your ESP boards as easy as two lines of code. Check it out on GitHub here.
Updating code via OTA
While you are connected to the board, in your browser type in ehymn.com/update, you should now see this webpage

To send the compiled code to your board, we would need to export compiled binaries; In the Arduino IDE click on Sketch>Export Compiled binary, then wait for it to finish compiling. Then open your sketch folder or just use the shortcut CTRL+K. You should see a .bin file in your sketch folder.

Drag and drop the file into the OTA webpage and wait for the upload to complete and that is all.
If you make any changes to your code, delete the old binary file and recompile via Sketch>Export Compiled binary.
Updating File Sytems (LittleFS) Files via OTA
On the OTA webpage select filesystem, then in the Arduino IDE, click on Tools>ESP8266 LittleFS Data Upload, but without your board connected via USB cable, you will get an error since the board is not connected; In that same area where you see the error scroll up until you see something like this

Find the location of the highlighted text, that is the location of your LittleFS binary file

Drag and drop the file on the OTA web page and wait for the upload to finish. That's all for OTA, easy peasy right?
Step 6: Code Overview
For those interested in how the code works here is a video which gives a brief overview of the code.
Step 7: Conclusion
I saw a problem in the church and tried to solve it, so I am challenging you guys👷️ to try to solve everyday problems you find around you no matter how little as far as it is helping someone or some people. That is all for this instructable, thank you for reading.
Participated in the
Microcontroller Contest


