

Introduction: Immeasurable Beauty - a Comb That Is Also a Ruler


Combs and rulers resemble each other. Both things are handy to have in ones pocket or purse.
Have you ever needed to measure your hair? What if you need to comb some pasta or fur? Now you can.
Included in this instructable is tips and tricks on how to design, print, or cut your own ruler comb for your measuring and combing desires.
Step 1: Draw! Think! Dream.

When do you most need rulers? Do you mostly use your rulers as straight or measuring tools? Are you a inchy imperialist or a meterish metrician? How wide is your hair? How deep is your hair? How long is what you are measuring?
These are things to consider when designing your own ruler comb.
I always try to start on paper before going into a CAD tool. Paper doesn't hold me back like software can.
Here a page from my sketchbook.
Step 2: Reverse Engineer | ɿɘɘniǫnƎ ɘƨɿɘvɘЯ


Measure your ruler!
Measure your comb.
Decide your material ahead of time, as different materials will require different thicknesses.
My base comb had teeth that were about an inch long. They were 0.050"in wide and 0.10"in thick at the base. The gaps were about twice the width of the teeth.
For you metric folks, thats 25mm x 1.5mm x 3mm or so.
I used these numbers as my basis in CAD.
Step 3: Computer Aided Drawing
This is the longest step.
If you already have an environment you are comfortable in, I would recommend using it.
I started my ruler with a two-dimensional ruler I made with my very own Online Vector Ruler Generator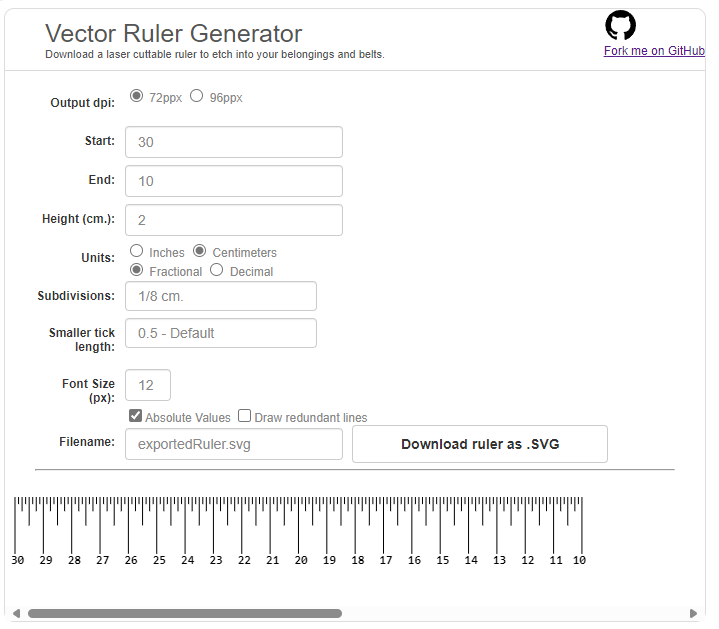
I then took the SVG into Adobe Illustrator (free alternatives mentioned in link above) and thickened it up, changed the fonts, and added the title. I then took the Illustrator file as a .DXF into CAD and extruded it into a 3D comb. Then I filleted (rounded over) all the edges and exported a .STL for printing. I used a few programs for the 3d bits, and found them all to have shortcomings. Rhino was the easiest, but behaved strangely with the fillets. Fusion 360 looked better, but choked up on the SVG import. Inventor worked well, but had trouble with the hundreds of fillets.
There are as many CAD programs as hairs on your head and each has its own strengths and weaknesses.
I used Rhinoceros at first and later Fusion 360. Other good choices might be Inventor, SolidWorks, SketchUp, or a hundred others. Keep in mind there are a lot of corners to round, and some software may be unhappy about that.
If you are brave, make it in OpenSCAD and make it customizable for others.
Step 4: Print or Cut Your Comb!


There are so many ways to make a rulercomb.
Modern combs are injection molded from a thermoplastic like ABS. We are not going to make a million of these things, so I figure an easier process might suffice. If someone goes ahead and makes a million of these, I'd like a couple.
The internet has some combs made from bone, stone, wood, plastic, tortoise shell, or solid gold.
Depending on what tools you have available, your material choice will vary.
3D printers are great. They allow for rounded corners, good flexibility, and low risk of user injury. If you are printing it out, I think nearly any filament type would be suitable. PLA comes in fun colors and flexes well. I used a resin-type Objet printer, and the combs came out strong. I also printed one on a replicator and it came out pretty well.
I would recommend against any brittle materials, such as Acrylic(Plexiglass), stone, or glass.
Laser Cutters are great too. A good laser cutter material would be Delrin/Acetal plastic. It is a very strong and flexible plastic that laser cuts very well. It comes in Black and white. It is not cheap, but it is very useful to have around. Unlike Acrylic, which is the most common laser cuttable plastic, Delrin will not snap as soon as it touches your hair. ABS may be a good option as well, but I have never laser cut it before. PVC(Vinyl) and Polycarbonate(Lexan) will release toxic fumes and destroy the laser. Sandblasting the cut part may round the edges somewhat, making for a more enjoyable combing experience.
Hand Craftsmanship is also great. Another option would be to print it out on paper and glue the paper to a sheet of material. You have very few limits on material this way. A nice hardwood with the grain parallel to the teeth would be very nice. Coping saws, bandsaws, files, jewelry saws, sand paper, and a good work ethic would allow for combs of any number of nice materials. Steel, copper, PVC. Walnut, Maple, Ironwood. Pre-embargo ivory, some sort of seashell, the sky is the limit when you don't use robots.


Step 5: Paint the Letters!


The letters are inset, so I just globbed a ton of gold nail polish on them. Once it dried, I took acetone and removed the excess. Nail Polish Remover is typically acetone-based.
Once I scrubbed away the excess, they looked great.
Step 6: Comb Your Hair! Measure Some Things!
The comb is yours. Go crazy.
Post pictures, post comments.

Participated in the
Hair & Makeup Contest


