

Introduction: Intro to Sonic Pi and Playing Media


Want to add audio to your project? Or perhaps you want to play a video or slideshow? The Raspberry Pi has you covered. In this lesson, we will go over how to configure audio output and a few different ways to play sounds and video.
To follow along with the examples you can download sound files at http://www.freesound.org/ or download the attached .wav files onto your Raspberry Pi (open this lesson in your Raspberry Pi web browser).

Step 1: ALSA: Advanced Linux Sound Architecture
Being a Linux distro Raspbian comes with a software framework called ALSA. ALSA comes with a host of tools to use that can play, record, and set audio output. It is also a great way to do test an external sound card that you are hooking up to your Raspberry Pi.
What is a sound card? It's the circuit board that is responsible for producing sounds that come from the headphone jack and speakers hooked up to your Raspberry Pi. Just about every computer comes with one. If you want higher quality sound or different functionality the default one can provide you can disable the default sound card and replace it with one you buy. You can purchase ones that plug into the USB port. They will need drivers to run a new sound board on the Raspberry Pi. To learn more about that there is an Instructable called Use USB Sound Card in Raspberry Pi you can check out.
Step 2: Configuring Audio
The Raspberry Pi has two options for audio output, through HDMI and the 3.5mm jack. It does its best to guess at which audio output you want to use but sometimes you need to tell it. There are two ways to set the audio output both of which are through the command-line:
1) ALSA
Use ALSA's tool amixer to set audio output:
HDMI
amixer cset numid=3 2
3.5mm headphone jack
amixer cset numid=3 1
Automatic
amixer cset numid=3 0
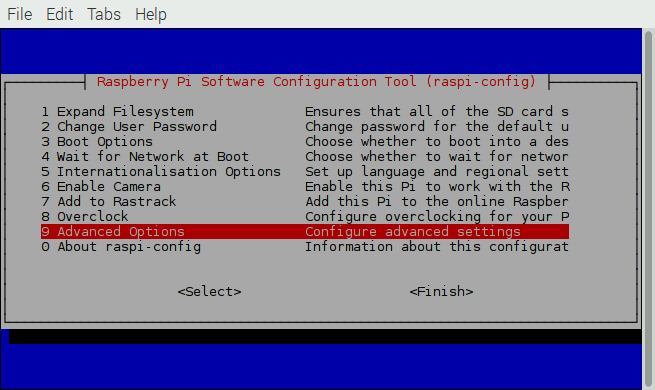
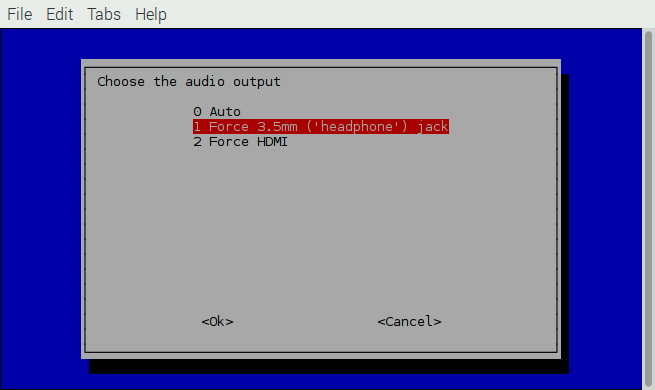
2) raspi-config
sudo raspi-config
Use the down arrow to choose Advanced Options. Then choose Audio and the output you would like to use. For my examples, I chose the 3.5mm headphone jack because my HDMI display does not have speakers (but many do).

Step 3: Play Audio
There are several ways to play sound on the Raspberry Pi. I will show you four ways to trigger sounds and play audio files.
Remember, to play a sound file that is in the sounds folder you need to use the file's pathname relative to your current location in the file system. For example, to play a sound file called bass3.wav in the sounds folder, use sounds/bass3.wav, assuming you are currently in your home folder. You can also cd into the sounds folder and then just use the file name bass3.wav. The examples assume that you have put a sound file in your home folder. Drag and drop a file from your sounds file into your home folder to work with the commands as written.
mpg321
Mpg321 is a command-line mp3 player. It's very lightweight making it a popular choice when all you need is a to play some mp3 tunes with little latency.
sudo apt-get install mpg321 -y
play mp3 file:
mpg321 fileName.mp3
Find out more:
mpg321 --help
omxplayer
Omxplayer is mainly used for playing videos but you can use it to play audio files as well. I've successfully played mp3 and wav files using it:
omxplayer fileName.mp3
You can also set the output through omxplayer.
3.5mm headphone jack:
omxplayer -o local fileName.mp3
HDMI:
omxplayer -o HDMI fileName.mp3
Find out more:
omxplayer --help
Later on you will also learn to play audio files inside Python programs using Pygame.mixer.
Step 4: Play Video
Omxplayer is a video player made for the Raspberry Pi. It can play most videos encoded with the H.264 video codec and in a video format with an extension like .avi, .mov, .mkv, .mp4, or .m4v. There are lots of keyboard controls and options for you to use while a video is playing.
Play a test movie that comes with Raspbian:
omxplayer /opt/vc/src/hello_pi/hello_video/test.h264
Step 5: Intro to Sonic Pi

Sonic Pi is an instrument and educational tool built by Sam Aaron. It's for beginners and seasoned musicians alike promoting live coding through creative musical expression. Its goal is to introduce programming concepts through instant feedback, all while building unique sounds or composing a full song.
You can learn everything you need to know through the software program itself, plus plenty of experimentation. I've chosen some basics and super fun parts to show you here to get you started. You can also find examples and documentation on Sonic Pi's website and a Github tutorial page Sam Aaron put together.
Launch Sonic Pi from the taskbar or application menu.
To make some room on your screen, click on the maximize window icon on the Help page. This will allow the Code Editor and Log Viewer to have more room to expand. Keep the Help pages open and take a look at the 1.2 Exploring the Interface section under Welcome to Sonic Pi.


Let's make some music!
Play Notes
You can stay in Buffer 0 if you like just highlight and delete the default text to start with a fresh page. Start by using play with a number next to it:
play 60

Hit Run. You hear a note play! If you don’t hear a note, you may need to set your preferred sound output in the Preferences menu accessible through the button in the upper right corner of the window. The lower the number the lower the note, the higher the number the higher the note. Play around and see how low or high you can go until the note becomes inaudible. Make sure the volume is turned down a bit as you get higher. Notice how there is an autofill? Once you typing a command a menu pops up with a list of commands that start with the letters you have typed. This is not only a convenient way to look up how to type something but it can lead to new discoveries too!

For those musicians out there, you can use traditional note names instead of numbers. Just make sure to put a colon in front of the note:
play :C
Play multiple notes at once by typing them out then hitting Run.
play 60
play 63.5
play 67
Notice the decimal number! You can don't have to use/play whole numbers. For more info on playing notes visit the 2.1 Your First Beeps under the Synths chapter of the Sonic Pi Help page.
Play Melody
To play a note one after one another rather than at the same time use sleep. This puts a silent pause between notes. Depending on the speed of the pause, the notes can overlap each other. Try it out:
play 60
sleep 1
play 63.5
sleep 1
play 67
sleep 0.2
play 60
sleep 0.2
Step 6: Sonic Pi: Switching Synths

You can already do so much just with play and sleep, but Sonic Pi has a lot more to offer. So far you have been playing with the default instrument called beep which produces sine waves. Sonic Pi has a range of instruments called synths to choose from to change up to sounds of your notes. To see all the different synths that are available, go the Help page and choose Synths in the bottom left menu. To play with a different Synth use:
use_synth :coolNewSynthName
Choose an empty Buffer and try it out. Notice how when you type out use_synth the autofill menu pops up with all the synth names that you can cycle through using the up and down arrows, how convenient! This is a great way to see and choose a new synth too.
use synth :blade
play 38
sleep 1
play 50
sleep 1
play 62
sleep 1
Try playing these all at once for some synthy goodness. Next, try out some new Synths or all of them!

Amplitude and Options
You can control more than a note's frequency. Sonic Pi comes with options that are passed to play in order to modify properties of the sound you hear. An option is typed in line with the play command, separated by a comma with a colon and a control value. For example, you can change the sound to a quarter of the volume using the amp: option. Let's play one note without options and one with to compare:
use_synth :dpulse
play 62
sleep 1
play 62, amp: 0.25
To change the duration and the amplitude you can change a sound's amplitude envelope. To learn more, check out 2.4 Duration with Envelopes under Synths in the Help files.
use_synth :dpulse
play 62
sleep 2
play 62, amp: 0.25, attack: 0.3, sustain: 1, release: 1

Step 7: Sonic Pi: Iterations and Loops

Iteration
Say you make a really awesome melody and want to repeat it, you can choose how many times to repeat it by using x.times do where x is the number of times it repeats. To properly finish an x.times loop use end at the well... end:
3.times do
   use_synth :dpulse
   play 62
   sleep 2
   play 62, amp: 0.25, attack: 0.3, sustain: 1, release: 1
end
The code that repeats needs to be indented in order for the loop to work.
Loop
To repeat a piece of code forever until you tell it otherwise, you use loop do. This is an infinite loop that will not stop until you press the Stop button.
loop do
   use_synth :dull_bell
   play 62
   sleep 2
   play 62
   sleep 1
   play 50
   sleep 1
   play 47
   sleep 1
end
Step 8: Sonic Pi: Save and Play Your Sounds

You can save the code you wrote as a .txt file but clicking the Save button. To save the audio hit the Record button. When the button starts to flash hit Run to play your song. When it's done, click Record again and save the wave file.
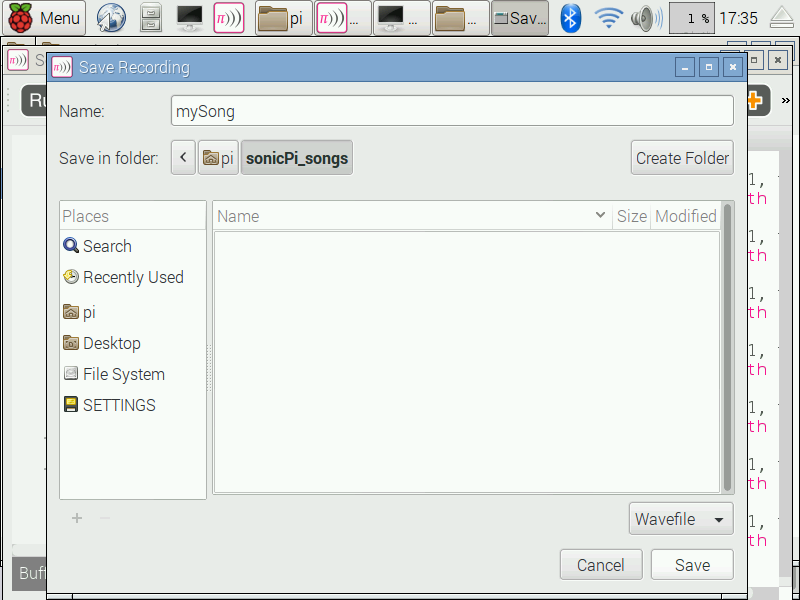
Create a new directory called sonicPi_songs to store all your creations. To play your song on the RPi, use omxplayer, aplay, or Pygame.mixer as you learned earlier in this lesson. Make sure to use the correct file path and audio output.
omxplayer -o local mySong
When the file is saved it is not automatically given a .wav extension, although it is a wave file. So, writing it like this:
aplay sonicPi_songs/mySong.wav
will not find and play the file, but if you remove the .wav it will:
aplay sonicPi_songs/mySongYou may also add the .wav extension when you save the file or by renaming the file in File Manager, in which case you would use the extension when referring to the file in commands.
Step 9: Write a Song or Sound Effect!
Create a song, jingle or sound effect with SonicPi. Save it as a wave file and upload it. If you need context, this sound could be played in your photo booth as a backdrop song or be a sound effect that plays when the upload is done or when someone pushes the button to start taking photos.

![Tim's Mechanical Spider Leg [LU9685-20CU]](https://content.instructables.com/FFB/5R4I/LVKZ6G6R/FFB5R4ILVKZ6G6R.png?auto=webp&crop=1.2%3A1&frame=1&width=306)


