

Introduction: Sparklab - Invent a Musical Instrument


Welcome to Spark!Lab digital. This is an online invention space where you .space where you get to practice your inventive creativity. There are no wrong answers. Think like an inventor: how does your design solve a problem?
You can invent an instrument using common items found around your house. What type of instrument will you create? How will you make sure that your instrument does not make so much noise that it disturbs other people in your home?
Supplies
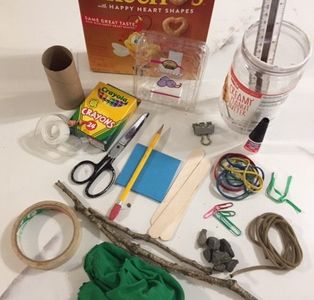
Visitors to Draper Spark!Lab at the National Museum of American History spend time thinking about, sketching, and building their creation — and, of course, testing their invention and seeing what others have made! But we use everyday materials on purpose so that our visitors can invent at home, too. Invention can happen anywhere, anytime, with anything. There are lots of everyday materials you can use to build your invention. For this project, you will need:
- Something to build on: cardboard in all shapes and sizes; paper like newspaper, packing paper, or construction paper; recyclable (and clean!) plastic containers
- Ways to join two things together: tape works great, but you could also try string, wires, or brads
- Ways to make a frame: straws of lots of different sizes, sticks or stems, chenille stems, and craft sticks all work really well
- Ways to add color: Making your invention look good is really important, too! Add color with markers, leaves, flowers, magazine pages, or construction paper; or choose materials in different colors to decorate your invention.
You will also need...
- Your imagination
- Websites or books with projects and techniques that can inspire your instrument inventions
- Your own inventive tweaks to your musical instrument invention
Step 1: Invention Is a Process

There are just two things to keep in mind as you create your musical instrument:
1. The invention process is not always linear, but inventors engage in these steps in some form or another:
- Think it : Have a great idea for an invention
- Explore it: Investigate inventions and ideas of the past
- Sketch it: Draw pictures and diagrams to figure out how your invention might work
- Create it: Build a prototype or model of your idea
- Try it: Test your invention
- Tweak it: Keep improving your idea
- Sell it: Market your invention to people who might buy it
2. We also know everyone is inventive — and we do mean everyone! Today, you become the inventor. You will try new ideas, take risks, and learn how to keep going when things don’t go as planned.
Step 2: Think It

The first step of the invention process is to "think it," meaning to identify a problem you would like to solve and begin to imagine your solution.
Instruments can be stringed, percussion, wind, or electronic. What type of instrument do you want to create?
Step 3: Explore It

The next step of the invention process is to "explore it.” Inventors ask: “How have inventors solved this problem in the past?” and then conduct research to learn more about the problem they want to solve or to understand solutions that already may exist. They learn from what others have already tried and make sure that their solutions are new or different.
Instruments types can be defined using the Sachs-Hornbostel System.This system classifies instruments on how they vibrate. There are 5 different categories: Idiophones, Membranophones, Chordophones, Aerophones, & Electrophones.
- Idiophones are instruments that make sound via vibrating solid materials, for example, symbols or maracas.
- Membranophones use a vibrating stretched membrane to create sounds, for example, a drum.
- Chordaphones create sounds from a stretched vibrating string, for example, a guitar.
- Aerophones produce sound by vibrating a column of air, for example, a flute or a horn.
- Electrophones are instruments that produce music electronically, for example, an electronic keyboard or a theremin.
Explore more about instrument classification online here.
Visit the Smithsonian's online collection to explore more about music and instruments.
Acknowledgment
The Lemelson Center gratefully acknowledges support of the David H. Horowitz Fund for this music innovation activity.
Click the following links to learn more about Innovative Lives programs from the David H. Horowitz Music Innovation series:
INNOVATIVE LIVES: AUTO-TUNE INVENTOR ANDY HILDEBRAND
INNOVATIVE LIVES: DJ J RAWLS WITH MARTHA DIAZ, MODERATED BY JON WEST-BEY
Step 4: Sketch It

Inventors use sketching as a way to organize their ideas.
Drawing an idea allows inventors to imagine what their invention might look like and how it will work. Try sketching out your invention before building! Take some time to sketch your ideas, images, and thoughts about your instrument.
You can sketch your ideas with paper and pencil, or you can try using a digital format. Remember! Inventors rarely get it right on the first try. Whatever the method, you may need to erase and re-draw your invention as you continue to think through how you want to solve the problem.
Click here to learn more about inventors' sketches in the Smithsonian Collection.
Step 5: Create It


Now it is time to build a prototype of your invention idea. In this step, inventors get to see their idea turn into something real. Building a model can also help you learn about any issues there are with their invention design. Your prototype will show the size, shape, and sound of your instrument.
Look around your house to see what unused items you can transform into a musical instrument. In Spark!Lab we often use cardboard, paper clips, chenille stems, craft sticks, straws, markers, colored paper, tape, and wire but, you can use anything you have at home! Not sure where to start? Try checking for office supplies and art materials or look in your junk drawer, the recycling bin, or even your backyard.
What will your instrument sound like? What types of materials will you use to build it? What class of instrument will you create: Idiophone, Membranophone, Chordophone, Aerophone, & Electrophone?
Step 6: Try It

Now that you have created your musical instrument prototype make some sound with it.
- What types of sounds does it make?
- Is there a way to play a song with your instrument?
- What type of instrument is it?
- What do you call your instrument?
- Can your instrument be played without disturbing others in your home?
- Is there a way to decorate your instrument?
Show your prototype musical instrument to others. Have them try to play it. Ask them for their input about your instrument.
- What did they like best about your instrument?
- What did they think needed improving?
- What new ideas did you get by sharing your invention with them?
Step 7: Tweak It

Now that you’ve created your musical instrument, played it, and shared your idea with others, it’s time to tweak your invention! Now is the time to ask yourself, "What changes can I make to improve my musical instrument?”
Inventors typically don't succeed with an invention on the first try. Inventors make changes to their prototypes to make them work better. Usually, they tweak their idea many times before it is finished. Once tweaks are made, inventors test their inventions again. It can take many tries to get it right.
Step 8: Sell It

The final step of the invention process is to sell your idea. Selling your invention is not only about putting it up for sale. Selling an idea often happens when you share your idea with others after you have made your final tweaks.
Tell us about your invention on social media!
- Who will use your invention?
- What makes your invention unique?
- How does your invention work?
Follow us on Instagram at @si_invention or Facebook@lemelsoncenter and use the hashtag #sparklab on your posts.


