

Introduction: Lesson 2: Documenting a Project


The best way to learn what Instructables is all about is to show you how it’s done with an example. In this lesson, I'm going to walk you through the process of documenting my sugar cookie recipe.
I'll show you how, where and when I take photos, and give you lots of tips so you can make sure you have all the photos and notes you need to make a great instructable!
Step 1: Gather Your Materials!
One of the most important parts of documenting: making sure you have everything you need!

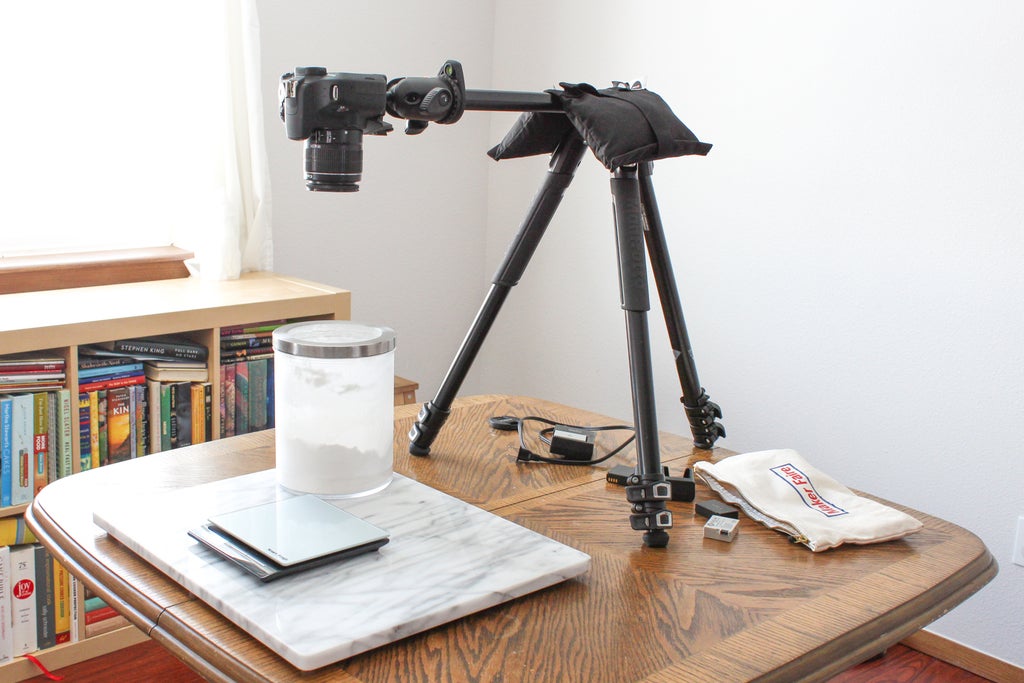
For my instructable, I've gathered up the following things:
- My cookie ingredients
- Tools needed to make the cookies
- My camera + tripod
- Marble pastry board to take photos on (I like this as a background for photos)
Step 2: Finding a Good Place to Work
One of the most important parts of making your instructable is finding a clean place to work with good lighting. I like to work during the day near a window because indirect sunlight makes lovely photos without the need to plug in additional lights.
Have a look around your house and see which rooms are sunniest throughout the day. Try to work near east facing windows in the morning, and west facing windows in the afternoon. If you have southern facing windows, you'll have great light all day!
Try to find a location like the photo above to work in - next to a window with lots of light! This will give you the best photos with little effort.

If I find there are a lot of shadows opposite the windows, I like to use a white bounce to help reduce them.
This particular "bounce" is simply the white cardboard back from a bookshelf. You can also use poster board or foam board. :)
Step 3: Taking Good Photos
Taking good photos is really easy! Here are the basic rules I follow:
- Indirect sunlight is always best. Document during the day near a window if possible.
- If you're taking detailed and up close photos make sure to use the macro setting on your camera. Almost every camera (and some camera apps on smart phones) have a macro setting. This tutorial will walk you through it!
- If you're shooting in low light or you have an older camera - use a tripod! Older cameras tend to not have any sort of stabilization feature, and low lighting is always where camera shake shows up the worst. I have both a tabletop tripod and standard tripod for this reason. You can also use stacks of books, shelves, whatever works to get your camera steady!
- Clean up the area you're shooting in! Try to keep the surface you're working on and the wall behind it nice and clear (or at least organized) if possible. If not, take process shots in another location. You want your project to be the focal point, not the mess you make while creating it. :D

You should also check out audreyobscura's fantastic Photography Class! It's free and you'll learn all about your camera, lighting, and photo composition. I've learned so many great tricks from her over the years.

If you're shooting photos using a smart phone, I recommend checking out my "How to Take Great Photos With an iPhone" instructable. You'll learn lots of great tips for taking better smart phone photos, and you’ll see that your phone’s camera can be just as effective as a digital camera.
Step 4: Make Sure You Get Enough Photos
It's a good idea to take tons of photos when documenting! That way you'll know you've covered the important bits.

The first photo I always take is my tools / supplies / ingredients / materials shot. I don't always take photos of the tools I use, but if it's something very important to the success of the project, I will! You want to assume your readers have no previous experience with whatever you're doing.
Once I've got the ingredient shot taken for the sugar cookies, it's time to start making them and photographing it. I like to shoot top-down when I do recipes to show the readers what's happening in the clearest way, but use whatever angle is best for your project!

(P.S. While I use a fancy tripod now for these top-down shots, I used to stand on a stool for each photo. Works just as well and it's a bit of a workout. Get creative with what's around for better photos!)
A good way to think about when you need to take a picture is any time your project changes in appearance. In a recipe, that will mean mixing or cooking ingredients. In another project, it could mean taking photos of a wooden object before and after sanding.
Always let the reader know what to expect from lots of photos. (When in doubt, take more photos!)
Step 5: Staging a Main Image


Main images show what your project is about, and should capture everything in one clear shot. Think about how you browse Instructables - you're probably judging every project from the main image and deciding whether or not to click. Apply the same thinking when you're taking photos!
Now that my cookies are finished baking, I want to take the main image for my instructable. A good main image is clear, bright and colorful. It should clearly express what your project is!
For food, I almost always do top-down or up-close images.

If you think your project needs it, you can also stage an "action" shot or something to show extra detail. In this case, I've just taken a bite out of one of the cookies and sprinkled some crumbs.
For other projects, this might mean modeling a knit hat, showing a cake with slices cut, or maybe even an action shot of shaving with an ax.
Step 6: Taking Notes While Documenting

I worked on this recipe four times before I documented it. Each time I made notes about what did and didn't work and slightly changed things until I got it right. Your Instructable certainly doesn’t have to be perfect to share, but notes will be extremely useful when writing the instructable!
I also make note of important processes and techniques that are essential to making the project. Always try to set your readers up to succeed - give them all the info they need!
While I often use a pen and paper to take notes, it can be helpful to take notes directly into the Instructables editor.
Step 7: Now Let's Learn About Using the Instructables Editor!

Now that I have all the photos and notes done from completing the sugar cookie recipe, I can start making an instructable!
In the next lesson, I'll walk you through writing up my sugar cookie recipe in the editor. I'll also cover editing and uploading photos.
>>Click HERE to go to Lesson 3: Writing an Instructable and Adding Photos<<

![Tim's Mechanical Spider Leg [LU9685-20CU]](https://content.instructables.com/FFB/5R4I/LVKZ6G6R/FFB5R4ILVKZ6G6R.png?auto=webp&crop=1.2%3A1&frame=1&width=306)


