

Introduction: Mathematical Pi (π) Model

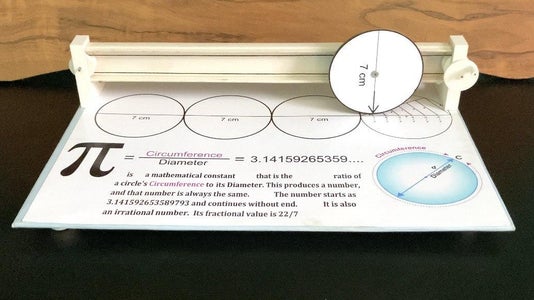


Pi (π) is a mathematical constant that is the ratio of a circle's Circumference to its Diameter. This produces a number, and that number is always the same. The number starts as 3.141592653589793 and continues without end. It is also an irrational number. Its fractional value is 22/7
In this instructables I made a Simple Mathematical Pi Model using Scraps and Some 3D Printed parts.
Lets start making it.
Supplies


Cardboard
Compass
Scissors
Pen or marker
Screws
Glue
Thread
Spring
Hard disk bearings
Colour paper
A4 photo paper (2 sheets)
Small rods
Tools
Vernier Caliper Digital
Try square
Mini Drill machine
Mini Handsaw
3D Printer
Color printer
Electrical wire duct/casing of length = 30 cm
Step 1: Cardboard Sheet Preparation


We have to prepare a Cardboard Sheet of dimension for base (30.5cm X 21.5cm).
Use a measuring tape and pencil to measure and mark the desired length on the Cardboard. Ensure your marks are straight and even.
Use sandpaper to smooth any rough edges created during the cutting process. This will provide a clean and finished look.
Cut the colorful papers into desired size for decoration.
Apply glue to the surface of the Cardboard. Work in small sections to prevent the adhesive from drying before you apply the paper.
Place the cut colorful papers onto the glued surface. Smooth out any bubbles or wrinkles.
Let the decorated Cardboard dry completely before handling or displaying.
Now we have a Cardboard decorated with colorful paper. This can be a great base for this project.
Step 2: Prepare 3D Printed Parts

Prepare 3D printed of the stands and pulley
Design two pulleys with a diameter of 20mm. Ensure to include features like a groove for the belt and a hub for mounting.
A 3d Printed mount to hold hard disk bearing and four 3d printed feet.
Also design Stands/supports to hold Electrical wire duct/casing on either ends.
Export the Design as an STL file.
Load the STL file into your slicing software and adjust settings such as layer height, infill density, and print speed according to your printer’s capabilities and the desired quality of the print.
Start the printing process and let your 3D printer work its magic! Depending on the complexity of the design and the settings, it may take several hours to complete the print.
Once the print is finished, carefully remove the pulley from the print bed and remove any support structures if necessary. You can also sand or smooth out any rough edges for a cleaner finish.
Now the 3D printed parts are ready to use.


Step 3: Circle


Draw a circle of radius = 3.5cm (Diameter = 7cm) on the cardboard using the pencil and compass. This circle represents the circumference of the circle.
Cut out the desired circle from the cardboard using mini hand saw.
Print the two PDF files attached below on a A4 photo paper sheets using color printer.
Cut out the 7cm diameter circle from the photo paper sheet and paste it on the cardboard cutout with the help of glue.
After drying, Drill a hole at the centre of the circle.
Attachments

Step 4: Slider Mechanism


The slider mechanism consists of electrical duct casing holding between two 3D printed stands and a slider holding HDD bearing (which is to be attached with rotating circle).
Cut the upper part of the duct casing with the help of mini handsaw as per the dimensions:-
Two pieces of 10mm each
And one piece of 20mm
And a small piece attached with a spring.
To make a slider cut a 20mm piece from the upper part of the duct casing and drill a hole at the centre of size as that of the HDD bearing. Also attach a small piece of casing having a spring attached to it.
Step 5: Assembly of Parts


Paste printed photo paper sheet of the circle drawing on the base cardboard with the help of glue.
Attach the 3D printed stands of the slider mechanism on the cardboard sheet with the help of screws.
The stands to be attached in such a way that the rotating circle rotates along the lines drawn on the printed sheet.
Insert the electrical duct casing inside the space provided in the stands and attach the cut pieces on either ends.
Drill the holes on the duct casing through the holes provided in the 3D printed stands.
Insert the pulleys on both ends of the duct casing.
The pulleys are attached in such a way that one pulley rotates free and other pulley to be driven by the user.
For this purpose I inserted a piece of pen refill in the pulley which is to be driven by the user.
Insert the small steel rods inside the pulleys.
Now take a thread/string and rolls it on both pulleys and the ends of thread/string attached at the back of the slider spring.
Now, Insert a screw in the centre of the circle and attach it to the HDD bearing with the help of screw driver.
Now attach a 3D printed rotator to left pulley. A small steel rod is inserted in the rotator handle to provide strength to it.
The Mathematical Pi model is ready to use now.
Step 6: Working


See the arrow on the rotating circle. This arrow is coinciding with the one end of the circle printed on the sheet.
Start rotating the circle as we rolls the rotator in the clockwise direction.
Rotate the circle until the pointed arrow completes one revolution.
On the sheet there are markings on the 4th circle.
You can see that the diameter of the circle is divided in seven equal parts. This helps us to calculate the value of pi easily.
After one complete revolution you see that the arrow pointed on the value 1/7.
Step 7: Calculation


We know that the one complete revolution of the circle is equal to its circumference.
This one complete revolution is equal to total distance travelled, which is equal to diameter of three circles and 1/7thof diameterof forth circle.
Mathematically,
Circumference = 3 x Diameter + 1/7x Diameter
According to definition of Pi (π),
Pi (π) = Circumference / Diameter
Pi (π) = (3 x Diameter + 1/7x Diameter) / Diameter
Pi (π) = 3 + 1/7
Pi (π) = 3.14285714 approx..
As per the definition of value of pie the ratio of the circumference of a circle to its diameter is approximately equal to 3.14285714
Step 8: Final Words
This simple model visually demonstrates the relationship between the circumference and diameter of a circle and helps understand the concept of Pi.
Hope you like this project. If you have any questions and suggestions let me know in the comments box.
Thanks for reading.

Participated in the
All Things Pi Contest


