

Introduction: Navigating the Raspberry Pi's Software: Part 1


In this lesson, you will learn how to navigate your Raspberry Pi using the command-line interface. You will create folders, move from one directory to the next, and learn how to take a screenshot to capture all your work throughout the class!
We'll start with identifying and defining some key terms and concepts around the Raspberry Pi's software. You will be introduced to the desktop environment and start using the command-line interface.
Navigating the Raspberry Pi's Software: Part 2 continues your command-line education with some key commands that you may not use extensively throughout the class but will want to be aware of so you continue your education and experimentation with the Raspberry Pi.
Step 1: Say Hello to Linux
At the heart of the Raspberry Pi is its OS which in our case is Raspbian. Raspbian is a free operating system based on Debian optimized for the Raspberry Pi hardware. Debian is based on yet another piece of software, the Linux kernel. This makes Debian a Linux distribution, also known as a Linux distro.
What is Linux?
Linux was created by Linus Torvald and it was shared with the world in 1991. It's mostly referred to as an OS but Linux is really the kernel at the core of the OS. The great thing about Linux is that it is open source. Open source means that all the source code is available to download, use, and alter if you choose. Linux is free to download and use as well as any Linux distros made, such as Raspbian. This contrasts with Apple's OS X and Microsoft's Windows operating systems. These operating systems are closed source meaning you can not obtain the source code and everything is created in secrecy. Software written for OS X or Windows will not work with Linux but there are plenty of free and open source alternatives to some of your favorite Mac and Windows applications available for Linux.
To learn more, listen to Linus himself speak about Linux in his TED talk above. Let's explore some other concepts that are key to a computer's software.
What is an Operating System?
An OS is a collection of software that manages storage, hardware, software, and more.
Some of the things an OS does:
- manages files and folders
- recognizes and installs drivers for peripherals
- manages system security
- allows software to communicate with hardware
- loads and runs software applications
- displays graphics and text of applications
- provides applications access to memory and storage
The Kernel of an OS
A kernel is a central component of an operating system. The sole aim of the kernel is to manage the communication between the software applications and the hardware (CPU, disk memory etc). The kernel manages the core features of an OS some of which are listed above. If useful applications and utilities are added on top of the kernel, then the complete package becomes an OS.
Step 2: Getting Around
There are two ways to get around the Raspberry Pi's software:
1) Desktop Environment
The desktop environment is known as a GUI (Graphical User Interface). This is what you have been using on your personal computer as you open windows, drag and drop items, create new folders, etc. The desktop environment was designed to mimic an actual office desk with a notepad, calculator, and folders to file written documents in. In this lesson, I will point out where you can find stuff but I mainly assume that you know how to get around and use a desktop environment.
2) Linux Shell
The shell is a program known as a CLI (Command-Line Interface) because it takes keyboard commands and passes them to the operating system to carry out. Almost all Linux distributions supply a shell program from the GNU Project called Bash. The name is an acronym for Bourne Again SHell that references the author of the original shell program is was derived from, Steve Bourne. You can do the same things within the shell that you can on a desktop. Except instead of clicking on icons you type commands. Command-line is the way people got around computers decades before there was a GUI and in this class, it is what you will primarily be using.
Step 3: Using the Desktop Environment
The desktop in an application called LXDE, which is short for Lightweight X11 Desktop Environment. This application already comes installed on the Raspberry Pi bundled with programs ready for you to use.
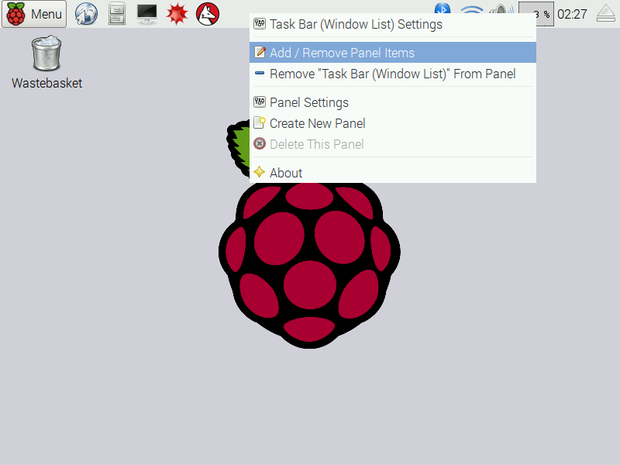
The desktop is split up into two main areas: the taskbar and desktop area. You can see the wastebasket icon is in the desktop area. This icon is called a shortcut. You can add and remove shortcuts by right-clicking on an application and choosing create shortcut.

The taskbar can hold a number of items called applets. From left to right the applets in the pictured taskbar are:
- Menu
- Application Launch Bar
- Task Bar
- Bluetooth
- WiFi Networks
- Volume Control
- CPU Usage Monitor
- Clock
- Ejector

All of these applets in the taskbar can be taken away, added to, and rearranged.
To add or take away applets right-click on the taskbar and choose Add/Remove Panel Items. A window will appear with four tabs running along the top. Click on the tab Panel Applets. Click on Application Launch Bar and then the Preferences button in the right menu.

A second window will open that is split into two columns. In the left column, you find the current applications in the application launch bar. The right column holds a list of applications installed on the Pi you can choose to add. As an example, let's remove these two, since we wont be using them in this class:
- Mathematica
- Wolfram
And add one:
- SonicPi (under “Programming” category)
To remove, click on the application and then the Remove button in the middle. It's that simple! This doesn’t delete the program from your Pi, just the shortcut from the taskbar. To add, choose the application from the right column and then click the Add button.


SonicPi's icon is now in the taskbar where the other two apps used to be.

Step 4: Shutdown + Reboot From GUI
You may have already noticed that the Raspberry Pi 3 (and all other models for that matter) does not have an on/off switch. So, how do you shut off the Raspberry Pi? Simply pulling the power plug while the Raspberry Pi is still running can potentially corrupt the data on the SD card, so don't do that! The best and safest way to switch the Raspberry Pi off is to shut it down through the software. To do this, go to the Menu in the upper left corner and choose Shutdown.
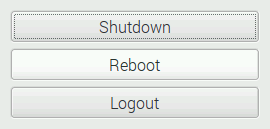
A window pops up with three options
Shutdown
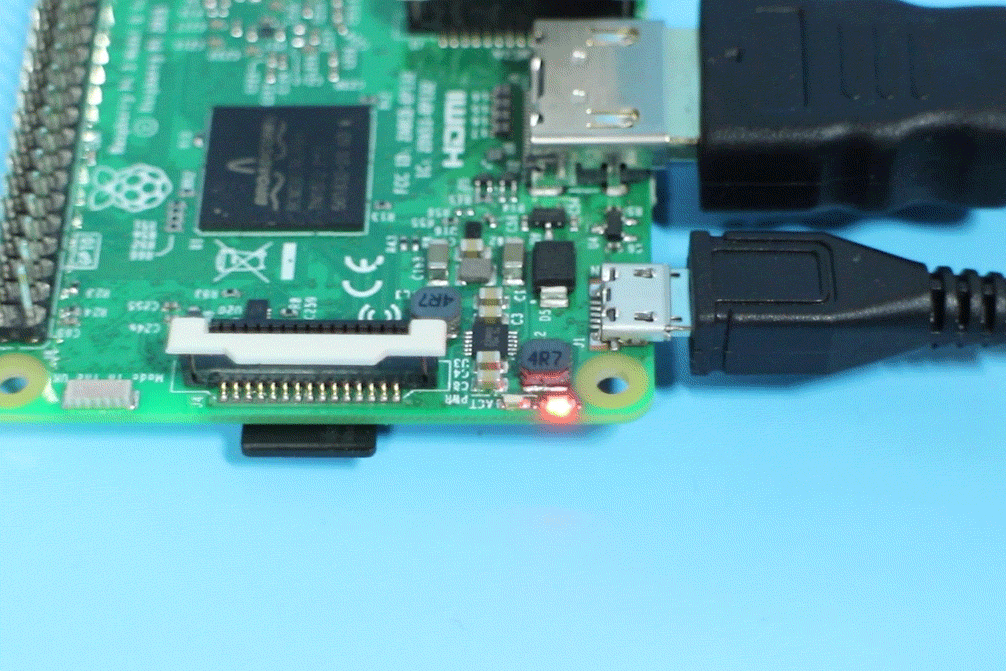
Shutting down your Pi in this way safely stops all processes and shuts down the system. It's extra safe to wait 60 seconds until removing the power supply. Alternatively, you can watch the green ACT LED. It will flash 10 times then become steady notifying it has shutdown.
Reboot
This option safely restarts the Raspberry Pi. This is sometimes necessary after installing software and configuring the Raspberry Pi.
Logout
The Raspberry Pi can have more than one user in addition to the default Pi user. This option log outs the current user.
Step 5: Using the File Manager
A large part of a computer's OS is the file system. The File Manager is Raspbian's application for accessing and managing the Raspberry Pi's file system which is comprised of directories (folders) and files (like Windows Explorer or Finder on Mac). Let's open it up and check it out.
Click on the file cabinet icon in the taskbar. You can also find it under Menu > Accessories > File Manager.


Step 6: Using the Command-Line Interface
The command-line is also referred to as the terminal or the console. The default terminal application in Raspbian is called LXTerminal. LXTerminal is another program that allows you to interact with the shell. It is technically known as a 'terminal emulator' which means that it emulates the old style video terminals (from before GUIs were developed) in a graphical environment.
To get started we need to open up a terminal window. Press the keys:
Ctrl+Alt+t
Or head to the upper left corner and click on the computer monitor icon with the black screen.

A terminal window will pop up with a short line of characters and a cursor. This is called the command-line prompt.
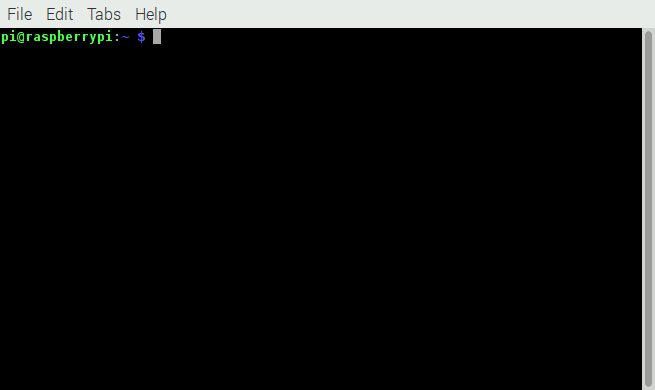
That line of characters in order from left to right are the username, hostname, path, and symbol:
- username is the name of the current operating user that is signed into the Pi.
- hostname is the name of the Pi
- path is where the user is operating from on the computer, also known as the current working directory. The default is the home directory of that user. We are logged in as the user "pi". "~" is the same as the path "/home/username" or "/home/pi" is this case.
- symbol indicates what kind of user the current operator is. "$" means normal user "#" means root user.

Using this knowledge, the above line means the user pi is logged into the computer named raspberrypi and is currently in the home directory as a normal user.
The cursor is sitting there waiting for input from you, let's give it something to do!
Step 7: Take a Screenshot!
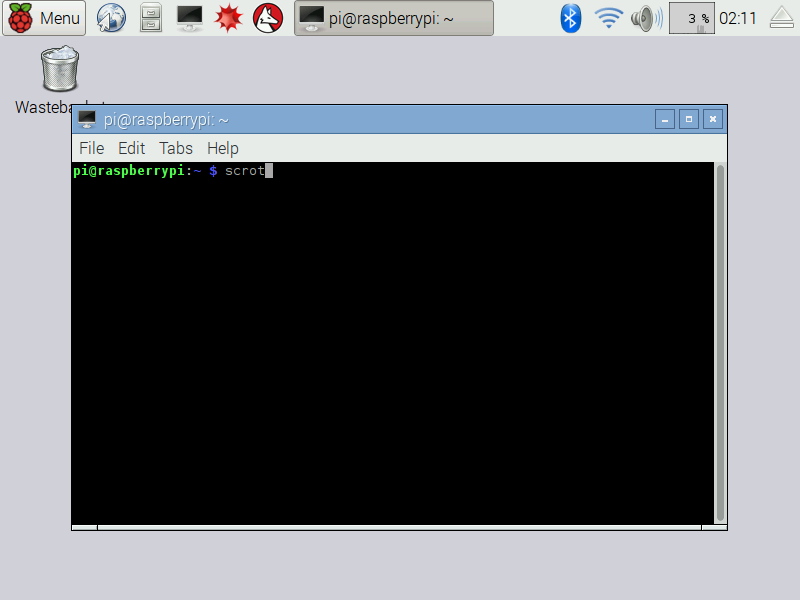
For your first task, you will learn how to take a screenshot so you can document your progress throughout the class. To take a screenshot you will use Scrot (SCReenshOT). This is a command line screen capturing application I used to take all the screenshots for this class. Scrot comes bundled with Raspbian so there is no need to install it. To take a screenshot of your desktop type:
scrot
The screenshot is automatically saved to your home folder. Go and check it out using the File Manager. The screenshot will look like this:
Below are more Scrot commands that will useful as you document your progress. Try each one and check out the results in the File Manager.
Take a screenshot after a 5-second delay:
scrot -d 5
Countdown a 5-second delay then take a screenshot:
scrot -cd 5
Take a screen shot of the currently active window on the desktop, which in this case is terminal:
scrot -u -cd 5
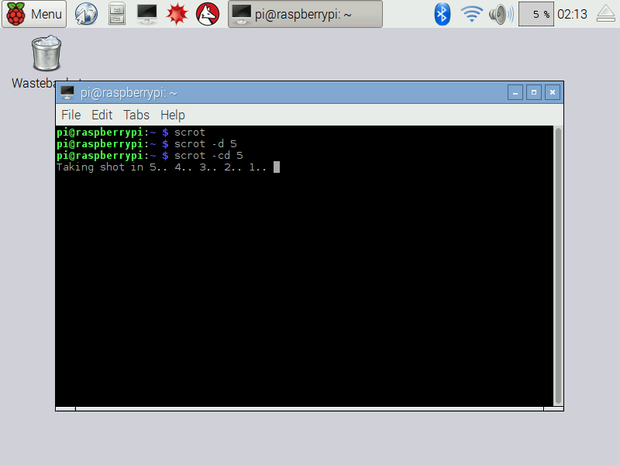
Countdown to screenshot.

Screenshot of the current active window (Terminal).
Step 8: Sudo, Root, and Permissions
The Raspbian operating system allows for more than one user to login to the Raspberry Pi. By default, the Raspberry Pi has two user accounts: pi and root.
Pi is considered a normal user account. Root is a superuser account with additional permissions that allows it to do things a normal user can not. This distinction helps prevent you from accidentally wrecking the operating system and protects the OS from potential viruses. You will mainly stay logged in as a normal user but are able to execute commands as the superuser when needed. This is done by using the command sudo. This command is short for superuser do. Putting sudo before another command issues it as the root user giving it root privileges for performing administrative tasks. These tasks include installing software, editing core files, and other powerful tasks.
Step 9: The Directory Tree
Your Raspberry Pi's file system is arranged in a hierarchical directory structure. This means that the file system is structured as a series of directories branching off from a single directory. As a diagram, the system resembles a tree. To keep in line with a tree analogy in the Raspbian file system the single directory that the directory spawns from is called root.
Path
In the directory tree, each file has a path that points to its location.
Absolute Path
The absolute path is a file's path starting from the root directory. For example, in the File Manager you can see the absolute path of the Documents directory is:
/home/pi/Documents
The first forward slash "/" represents the root directory.
Relative Path
A relative path is the location of a file starting from the current working directory. When you first log into your Raspberry Pi (or start a terminal emulator session) your current working directory is set to your home directory. The relative path of the same Documents directory example used above is:
Documents
Notice how there is no forward slash; this is an indicator that you are using a relative path.
Step 10: Getting Around and Creating Files
Just like in a desktop environment, you can create and move around files and directories in the command-line. Follow along in a terminal window.
pwd = present working directory. You can always find out where you are in the directory tree with the this command. Try it out:
pwd
mkdir = make a new directory. Put the chosen name of the new directory after mkdir. For example, call this one boof:
mkdir boof
cd = change directory. This command moves you into the directory you point to:
cd boof
The prompt will update with the path of your new location which is now your current working directory:
pi@raspberrypi:~/boof $
While you are in the boof directory make another folder called fotos:
mkdir fotos
Go into the directory called fotos.
cd fotos
ls = list directory contents. To see if there are any files in this directory you can take a look around with the ls command:
ls
When you hit Enter another prompt prints but nothing else. This is because right now the directory you are in is empty. You haven't put any files in it yet (nor boof for matter). Let's create one now by taking a photo with the camera module!
Step 11: More Useful Command-line Stuff
Command History + Editing
If you find yourself typing similar or the same command repeatedly in the same session you may want to try to copy and paste to save time. Ctrl + C and Ctrl + V won't work in the terminal. Instead, you want to utilize the command history. If you press the up-arrow key you can see and use all your previous commands. To edit a command use the right and left arrows to move the cursor.
Ending a Terminal Session
To end a session and close the terminal window use press Ctrl + D or use:
exitor just close the window by clicking your mouse on the X button in the corner.
Step 12: Snap a Photo!
Raspistill is a lightweight command-line application that comes with Raspbian. It is used to take and manipulate photos with the camera module. So, you know what this means, right? It's time to take a selfie! By default, the camera will show a preview on the screen for 5 seconds before it takes a photo. Position your camera to point towards your face. To take a photo and save it as a jpeg named mePic type:
raspistill -o mePic.jpg
Nice! You just took your first photo with the Raspberry Pi. If there were no errors, you will see a new prompt. If it gave you an error, check for a typo in your command, revisit the configuration to be sure your camera is enabled, and be sure your camera is plugged in properly (requires restart after replugging).
To see if the photo was successfully created, take a look in your cwd (current working directory):
ls
If it is not listed make sure you are at the correct address and try again:
pi@raspberrypi:~/boof/fotos $
If the photo did save correctly, mePic.jpg will be listed. You have now successfully created and moved through files but how do you open them? You can simulate a double-click on a file to open it by using the xdg-open command. Open your picture and check it out:
xdg-open mePic.jpg
Here is mine:

You can write over mePic.jpg as many times as you like. You can then email yourself the photos, or load it onto a USB flash drive to copy it from your Raspberry Pi.
Step 13: Command-line Flags and Getting Help
When you look at these commands you have used so far:
raspistill -o mePic.jpg
scrot -d 5
scrot -u -cd 5
What are -o, -u, -d, and -cd all about? When you see a character with a "-" in front of it this is called a flag. A command-line flag is a common way to specify options for command-line applications and tools such as Scrot and Raspistill. You can look up all the options available for a command-line application and tool with the man command. For example, to take a look at all the options Scrot has to offer type:
man scrot
The man command is short for manual. This brings up the manual pages where you can read a description of the application and all the options available to use.
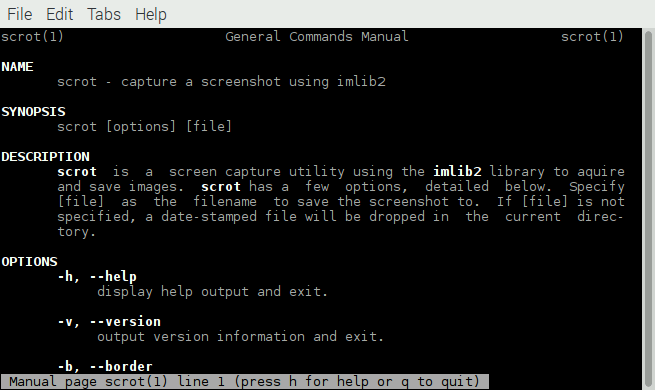
If you ever want to know more about a command, man is the first thing you should use! You can look up the manual pages for any command using man like so:
man scrot
To exit out of the manual pages press "q".
If a command doesn't have a manual page use -h or --help after a command or application name:
scrot -h
raspistill --help
or info :
info raspistill
I encourage you to use the man and --help commands with every new tool, application, and command you use in LXTerminal. It's an excellent way to learn how to use them making it a great habit to get in the groove of now.
Step 14: Look Up Manual Pages and Take Selfie With Camera Module!
Upload two images as described below:
1) Using a web browser, search for a new Linux command. Upload a screenshot of you using man to find out more about the command. You can log into this class in your Pi web browser or email yourself the screenshots.
2) Upload your selfie taken with the Raspberry Pi camera module. :)

![Tim's Mechanical Spider Leg [LU9685-20CU]](https://content.instructables.com/FFB/5R4I/LVKZ6G6R/FFB5R4ILVKZ6G6R.png?auto=webp&crop=1.2%3A1&frame=1&width=306)


