

Introduction: New Player Kit for Table Top RPG


Our table top D&D games have been virtual during the entire Pandemic, but when we are playing face to face at the table, I always welcome new players into the group with a New Player Kit, especially if they have never played before. The New Player Kit contains the essentials for an evening of Table Top RPG play in our group, including:
- a new set of Dice
- an initiative tent (dry erase!)
- several Token styles
- a carry-all box
It's a simple gesture of welcome that helps put tools immediately in the hands of players and helps them get integrated in the game, and provides all the necessary pieces to join the group and participate in the evening game.
Step 1: Materials

Before we play, I've usually chatted with each of my players, and know something about what they are planning, hopefully at least the general details about their character -- I almost always ask them to find or provide some art that fits the image of their character they have in their head. This core art becomes the basis for the images on the tokens and initiative tents described in this instructable.
If I can also extract from them some info about their favorite colors I use that to pick a set of dice to gift them during our first session together. Most of you probably know players are attached to their dice, and have opinions about all of them, but it never hurts have extras.
The essentials for producing one of these simple kits is:
- small storage box (mine are 4"x 3", found in the school supplies section of your local department store)
- Polyhedral dice set (you can buy dice of every color you can imagine, either in sets or in bulk)
- cardstock (preferably white)
- heavy cardboard for Tokens (I use the backs of old notepads)
- Moving and Storage tape (used to make "dry erase" surfaces
- 0.75 inch Binder Clip (box of colored ones from office supply store)
- Glass Stone Token (bag of colored glass stones for vases from craft store)
- Scotch Tape, Glue Stick
Step 2: Box Insert


I make a folded box insert that I tape together and drop into the storage box to separate the dice from the tokens and other supplies. You could just throw everything in the box without a divider, but I like the little bit of organization it offers.
I provide the pattern for my boxes in the PDF file below, but it could be adapted and scaled to any box you like. The pattern has folding tabs that I secure with tape, and it folds into a pair of hinged boxes with open tops.
To fold the box from the pattern, cut it out and follow these steps:
- fold along the centered dotted lines to make a "valley" (3rd image above); this will make the center wall in the box, and is the hinge between both sides of the inser
- fold all the outer walls up; fold the tabs around each corner, and secure it with a bit of tape (4th image). I fold the tabs on the outside of the insert walls and put the tape there.
- Hide the tabs on the center fold underneath the valley fold (5th image), making the insert clean without any edges for things to catch on.
- Fold the box down to make two adjacent open boxes, and secure it with a bit of tape on the side where the walls meet.
Pop it into the box!
Attachments

Step 3: Prepare the Art


Once I have a piece of character art from the player, I import it into the template I have for the three pieces I put in the kit: the initiative tent, the round token, and the pawn token.
I do most of this in Illustrator, but you can do it in any drawing or paint program you are comfortable with. I put the art piece behind the template for each of the pieces. Then when I print the page, I can see the boundaries of each piece (black lines from the templates) and can cut along them.
Print out the template once it is ready, and cut out each of the pieces of art.
I've attached below the Illustrator files of my templates, as well as a PDF export.

Step 4: Token & Pawn Assembly


Tokens are pawns are useful if you play on large maps or battlemats. In our games we switch between vertical pawn tokens (sometimes called "paper minis"), round flat tokens, and sometimes just token stones. It all depends on the map we are using and how crowded it feels when things are on the table!
This step and the next are how I make simple and durable pawns for table-top map use; you can find other examples of clever ways to do this here on Instructables (search on paper miniatures and scan down the list).
I print the prepared art template from the previous step out on white cardstock, and cut out the round token portrait (a 1-inch diameter circle) and the vertical pawn image (a 1-inch x 2-inch rectangle). To make the tokens easy to pick up and move, but heavy enough to stay put with all the activity around the table, I make matching sized underlayers out of heavy cardboard -- I stockpile the backs of old notepads and notebooks, as I think they are ideal weight for this kind of application.
I use a gluestick to glue the art onto the cardboard. We usually don't have "backside" art for the vertical pawns, so we usually leave the back blank so we know which way the character is facing on the map!
Step 5: Pawn Stand


You can get commercial pawn stands -- plastic bases that you can insert paper or cardboard pawns into. We've discovered a much more economical solution at our table: 3/4-inch binder clips! You can buy these in bulk in the office supply section of your local department store, and can get them in assorted colors, which is useful at the table.
To turn a binder clip into a pawn base, put the clip over the bottom of the pawn.
Next, on the front size of the pawn, pinch the "handle" of the binder clip near where it is attached, as shown in the second image above -- the end of the clip should come out of the binder clip, allowing you to remove it.
Since we don't have art on the back of our pawns, we usually leave the other handle on, and simply fold it up behind the pawn, though you can also remove it.
This provides a nice stable base for your pawn! I keep the handle you removed, and put it in the kit for the player; they will need it if they want to remove the pawn from the base or change out the pawn.
Step 6: Initiative Tent


I have simple initiative tents I use to hang over the top of my DM screen, which I can swap around to correspond to initiative order or marching order. On the player side is a banner with their name, and a character portrait. On my side is critical information I need for the game. You can buy fancy dry-erase initiative cards, but these I can customize and print, and then make them "dry-erase" for our game needs.
I designed these based on ones I had seen (search the web for "character trackers" or "initiative tents" and you'll find lots of exmples). They work well for how we play at my table; you may find you need less or more information, so experiment and try designing your own!
If you printed off the artwork prepared in Step 3 above, all that should be left is the Initiative Tent, with the artwork on one end and some blank spaces for game information on the other end. Cut out the intitative tent, and fold it along the center line.
To make it "dry-erase" I cover the side facing the DM with a piece of Moving & Storage tape -- this is transparent, very durable, and dry-erase markers rub off of it great, perfect for game play.
- The tape is almost exactly the width of the initiative tents (on purpose). Cut a length of tape as long as the tent, and lay it on the table sticky side up.
- Take the initiative tent, and put it face down on the sticky side of the tape, lining up the long edge on the tape edge (3rd image above)
- Fold the tape ends over the initiative tent; this will protect it and make it a bit more durable.
- Crease the tent on the center dotted line; I usually add extra pressure with a pen or the edge of my ruler to make the crease hold. The tape doesn't always like to hold the fold, so sometime I have to score it with an exacto knife so it hangs on my DM screen correctly.
We really like this dry-erase solution -- it works very well and is easy to erase, and the tents are easy to replace if they are damaged or lost.
I print blank initiative tents for encounters with the heroes, usually on ordinary paper, preparing the ones I need before each session or on the fly if needed. I could make robust ones like I do for the players and recycle them, particularly for common creatures. Below I attach two files for blank initiative tents of different profiles.
Step 7: Box Assembly


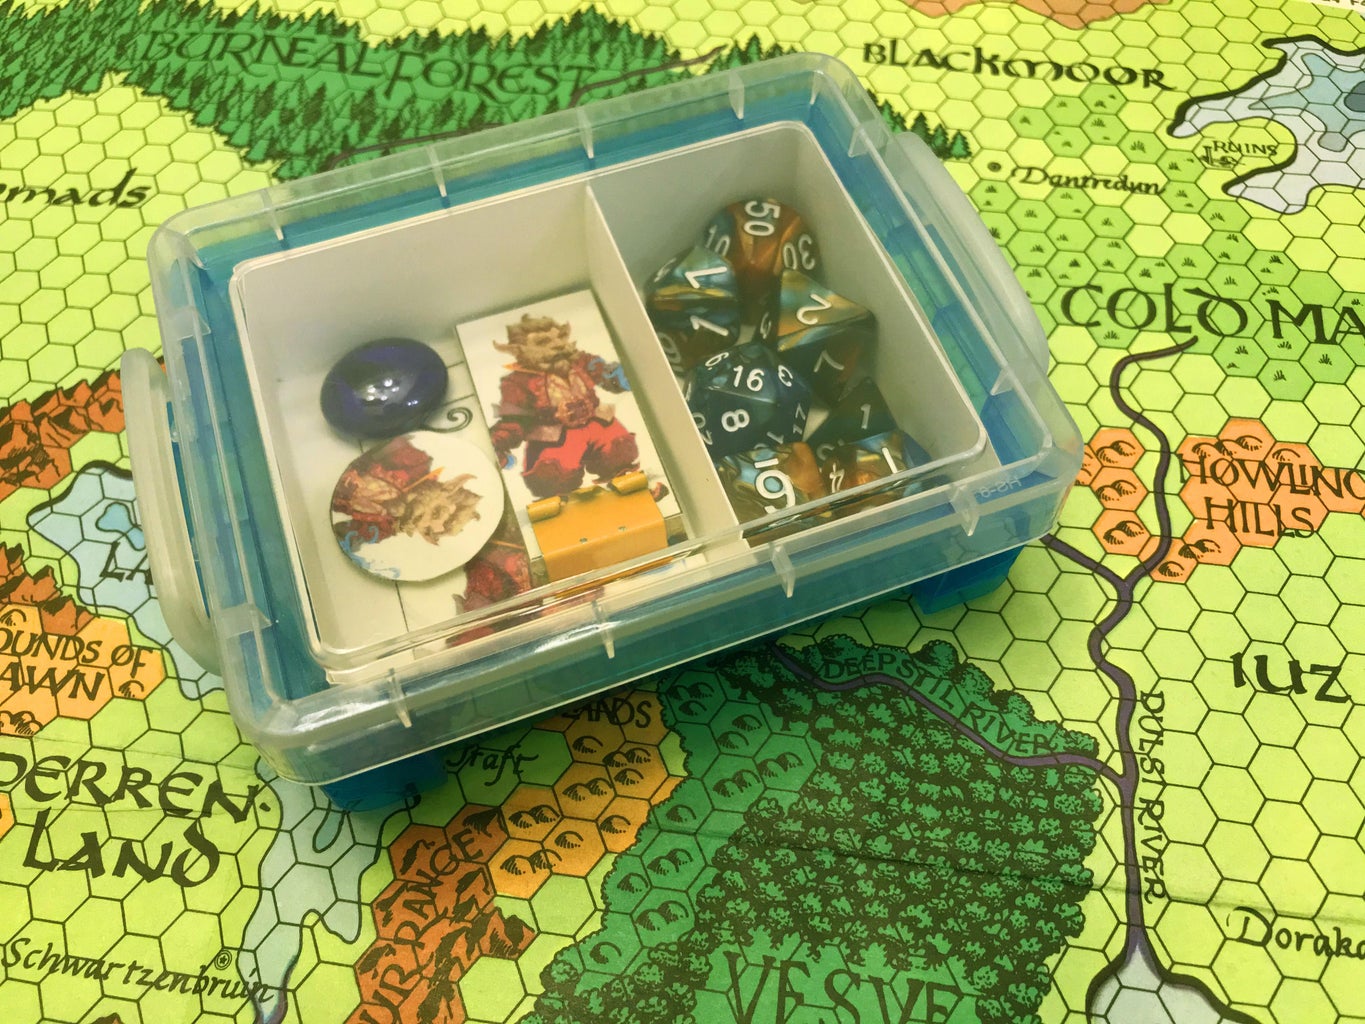
That's the entire kit. I put the new set of dice on the small side of the storage box, and the tokens, pawn, binder clip, and initiative tent on the wide side. The box is a nice, pocket sized kit that is easy to carry around.
Step 8: At the Table


Here you can see how the initiative tents and pawns work on our table.
If you've never used initiative tents before, the only thing to remember is that if you have the initiative order running from left to right on the player side (natural reading direction for those of us who have languages based on Latin alphabets), then on the DM side the initiative order is from right to left!
For experienced players, who already have their favorite dice and system for organizing their game gear, I usually only make their individualized pawns and initiative tents. It has worked great at our table, and I hope provides some inspiration for you to help bring new players into the game and your group.
Happy adventuring!
Participated in the
Role Playing Game Challenge


