

Introduction: Parametric RGB Glass Planter Stand


We have a habit of decorating our home with plants and greenery. Many of the plants are placed across the room in recycled glass planters such as bottles and mason jars. For all those who do the same, we have the perfect project for you to take your glass planters to the next level. For those who don't have plants and greenery scattered across your room, we would strongly recommend you to start; it gives a fresh new look to the room and it has been proven to improve mental health and productivity.
Follow on to create your own RGB Glass Planter Stand and do drop us a favorite and a follow if you enjoyed this project and decide to build your own version. We would love to see your own versions so do post your creations using the "I made it" section.
Step 1: Materials Needed


Here is the list of all the parts and tools required to make your very own Planter Stands. All parts should be commonly available in local hardware stores or online.
Materials and Tools:
- Glass bottle or jar
- LED strip
- Female header pins
- Male jumper wires
- Wire
- M3 bolts
- White PLA filament
- 3D printer
- Soldering iron and solder
- Wire strippers
Excluding the tools and 3D printer, the cost of this project is roughly 5$.
Step 2: Modifying the Design Parameters


Planters need not be of the same size, so we have created a parametric model of the stand such that it can be easily modified to hold planters of various shapes and sizes. Begin by measuring the diameter of your planter towards the base. Make a note of this value. Next, download the model attached below.
Note that the model was created in Fusion360 and you need Fusion360 to modify the design.
Once you have downloaded the design file, open Fusion360 and click on the "File" button on the top left-hand corner. From the drop-down list select "Open" and click on the "Open from my computer" button. Navigate to the location you saved the design file you just downloaded, select it, and click the "Open" button. The design should now load onto the 3D viewport.
Once the design is loaded, click on the "Modify" menu, and from the drop-down list click the "Change parameters" button. Change the user parameter called "dia" to the diameter you measured earlier by modifying the "Expression" tab. The default is 65mm. (Note that this value is in mm). Once you have changed the value, click "Ok" and the design should have changed to the new diameter.
Note: For those that do not have access to Fusion360, we have attached a zipped folder with some common sizes of glass planters.
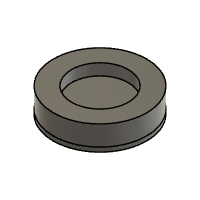

Step 3: Digitally Fabricated Parts


Once you have modified the diameter, right-click on the two bodies under the bodies drop-down list called "Holder" and "Base". Click on the "Save As STL" button and save it to a location on your computer.
Open the STL files on your preferred slicing software. The prints that we made were using a 0.4mm nozzle, 0.1mm layer height, 4 walls, and 20% infill on both parts. Enable the supports option as well since the parts have some overhanging regions.
Once the prints are completed, remove the unwanted supports.
Note: the two pieces will be referred to as "holder" and "base" from this point.
Step 4: Preparing and Attaching the LED Strips


Begin by cutting the LED strip to length, make sure that it can wrap along the outer perimeter of the stand. The cuts need to be made at specific locations so we recommend you to keep extra rather than cutting short.
Solder female header pins on the two extremities of the strip that you just cut. The stand has a slot into which you can push the two extremities with the female headers. Make sure to push the header pins from the inside. Finally, use the adhesive on the back of the LED strip to stick the LED strip along the outer edge of the planter from the inside.
We recommend you test the LED strip by connecting it to the controller before moving to the next step.
Step 5: Completing the Assembly


Once the LED strips are attached, you can complete the assembly by attaching the base piece to the holder piece using 3 x M3 bolts. Make sure to orient the base piece such that the face with the countersinks for the bolt heads are facing out. Align the two pieces so that the holes line up and bolt the pieces together.
Prepare the planter by cleaning it with soap. Cleaning the glass planter is crucial since the light from the LEDs will make any blemishes or smudges on the glass stand out. Fill the planter with fresh water and put your water plant into the planter. Before placing the planter on the stand, connect the LED controller to the stand using male jumper wires and test to check the connections. Once you are confident that the connections are good, place the planter onto the stand.
The planter stand has been designed in a way that you can daisy chain multiple stands using male jumper wires. Connect one end of the wire to one stand and the other end to the next stand. In this way, you can link as many stands as you want and add multiple planters of different shapes.
Step 6: Final Results


Now that you know how to build one stand, you can make one for each of your planters and connect them together. We made our stands and used them for the two planters that were placed on our desks. The RGB lighting is perfect to set the mood, and the light illuminates the water in the planter creating a beautiful pattern from the various reflections and refractions. The light also illuminates the plant giving it a completely new look when it's dark. We thoroughly enjoyed the process of making the modular stands and we eventually plan on making one for every planter in our home.
We hope you enjoyed this Instructable and it has inspired you to build your own RGB Glass Planter Stand. We would love to see your very own versions of this project so do post them using the "I made it" section. Apart from that, feedback, questions, comments, concerns can be addressed in the comment section below.
If you liked the project do support it by dropping a favorite and following our page for many more similar projects.
Happy Making!

Runner Up in the
Gardening Challenge


![Tim's Mechanical Spider Leg [LU9685-20CU]](https://content.instructables.com/FFB/5R4I/LVKZ6G6R/FFB5R4ILVKZ6G6R.png?auto=webp&crop=1.2%3A1&frame=1&width=306)


