

Introduction: Photo and Video Mosaic


A photo mosaic is an image composed of many tiled photos. This Instructable is about making photo and video mosaics. The focus is mainly about the combination of technology and creativity. It demonstrates the possibilities of combining different programs, to create photo and video mosaics. There is a brief introduction about the software used, but this Instructable doesn't replace the manuals.
Making a mosaic requires many images. The images used in this Instructable are made by means of Python scripts or have been downloaded from the internet. This requires some programming and web-scraping technique. I've included this part in this Instructable. For example: The robot's mosaic has been made from downloaded "Featured Instructables" images.
This Instructable contains several parts, in a total of 29 steps:
- Introduction to AndreaMosaic.
- Mosaics made from simple dots.
- Gathering Instructables images and creating the Instructables robot mosaic.
- Other download sources: IMDB and the United States Department of Agriculture.
- Usage of Python to create images and videos.
- Extracting images and video clips from videos using AndreaMosaic.
- Using videos to create a mosaic from an image.
The final step demonstrates how to create an 8K video mosaic, from an existing Youtube video.
Some parts of this Instructable are somehow technical. You can skip these sections, unless you want to try certain parts yourself. The Python scripts used are short, but become more difficult during the Instructable. Programming is not required, the output of most Python scripts can be downloaded.
Step 1: Software


The main software used in this Instructable are AndreaMosaic, FFmpeg and Python.
AndreaMosaic is software to create photographic mosaics using other pictures. The software is free for personal and commercial use. The software is easy to install and there is a manual availabe in six languages (English, Français, Italiano, Magyar, Español and Deutsch).
There are 3 versions available. The Standard (free) version includes all required features to create mosaics, up to 30,000 images. The "Bonus pack" ($10) adds some features, and allows for more images in the library. And the professional edition ($35) makes it possible to create very large mosaics, up to 500,000 images.
FFmpeg is a program to record, convert and stream audio and video. It is a command line tool, which can be used inside Python scripts.
Python is a programming language and is available for many operating systems. The software is open source, making it free to use. There is a lot of documentation available for non-programmers and programmers.
Step 2: First Mosaic


This step explains the basics of the AndreaMosaic software. It shows how easy it is to create a mosaic.
Requirements:
- Main image. This image will be converted.
- Photo library. These images will be used when converting the main image.
- AndreaMosaic software.
Select the tile type after opening the AndreaMosaic software. Possible choises are square tiles, DSLR tiles, Rectangele tiles and movie tiles. After choosing the tile size there are only 3 steps left to create a mosaic:
(1) Drag the main image into the main window . It is posible to drag multiple images into this window providing batch processing.
(2) Create or select an image library. Select one or more folders with many photos.
(3) Alter the settings and press the mosaic button to create the mosaic. The program will create a mosaic as close as possible to the main image. This process can take a few seconds to a few hour. This depends on the choosen number of tiles and the size of the image library.
The AndreaMosaic software has a good manual (pdf). These 3 steps describe only the most basic steps.
Step 3: Dots


The AndreaMosaic Software is made to process images. And this is not limited to photos. In this step the pictures are replaced by dots. The Instructables robot has been altered using an image library, containing only images with dots.
The first image was created by combining multiple mosaics into an animated gif. The number of images used has been increased, for each step. Starting with 100 pixels and ending with 3600 pixels. This animated image clearly shows the effect of increasing the number of tiles.
Experiment with the number of tiles. Sometimes less is better.
A possible improvement would be to replace the white/yellow dots by a blank image. And this has been done in some next steps.
The first image was created with a library of 15,500 images. Only a single image has been created, and this has been altered by means of a script. The next step describes a method to create images using a script.
Step 4: Custom Bitmap Files


There are several ways to create many images with different colors. I'll describe the use of a Python script in a next step. This step describes how to alter the colors inside a bitmap file using a bash-script. This is not the most efficient way to create many images, but it requires little programming experience to understand this process.
Bitmap image
I've created a bitmap image (dot.bmp) of 128x128 pixels with only 2 colors. The first color has a RGB value of 133,22,111 and the second color has a RGB value of 77,144,188. These are not completely random values! These color values are choosen because they can be replaced by other color values inside the bitmap file. Without changing any other information in the bitmap. And particular in the header of the file:
       00 01 02 03 04 05 06 07 08 09 0A 0B 0C 0D 0E 0F
------ -- -- -- -- -- -- -- -- -- -- -- -- -- -- -- --
0000h: 42 4D 36 C0 00 00 00 00 00 00 36 00 00 00 28 00
0010h: 00 00 80 00 00 00 80 00 00 00 01 00 18 00 00 00
0020h: 00 00 00 00 00 00 00 00 00 00 00 00 00 00 00 00
0030h: 00 00 00 00 00 00 6F 16 85 6F 16 85 6F 16 85 6F
0040h: 16 85 6F 16 85 6F 16 85 6F 16 85 6F 16 85 6F 16
This header of a bitmap file contains all file information about the bitmap. The first to bytes (42hex and 4Dhex) are hexadecimal values for the characters 'B' and 'M', identifying this file as a bitmap file. The next 4 bytes represent the size of the image (0000C036hex= 49,206 bytes). The 11th until 14th byte determine the start point of the bitmap image data. This bitmap data starts at 00000036hex with the values of 6Fhex, 16hex and 85hex.
The second part of the bitmap contains the bitmap information header. This header contains information about the bitmap. Most important values are the size of the bitmap (80hex = 128 pixels) and the number of bits per pixel (18h = 24, equals 3 bytes per pixel). As mentioned before, the values used for the colors aren't used in the file header:
 77 = hex 4D
144 = hex 90
188 = hex BC

133 = hex 85
 22 = hex 16
111 = hex 6F
This means we can safely alter these values: Altering 85hex to 33hex, 22hex to 00hex and 6Fhex to FFhex changes the second color to bright blue.
Color change script
Changing bytes in a file can easilly be done by any programming language. There are 6 bytes to be altered, resulting in 6 different for-loops:
VR="50"; VG="90"; VB="BC"
WR="85"; WG="16"; WB="6F"
colorlist="00 40 80 A0 FF"
for XR in ${colorlist}; do
  for XG in ${colorlist}; do
    for XB in ${colorlist}; do
      for YR in ${colorlist}; do
        for YG in ${colorlist}; do
          for YB in ${colorlist}; do
            if [ ${XR}${XG}${XB} != ${YR}${YG}${YB} ]
            then
              file="dot_"${XR}${XG}${XB}"_"${YR}${YG}${YB}".bmp"
              cat dot.bmp | sed "s/\x${VR}/\x${XR}/g;
                                 s/\x${VG}/\x${XG}/g;
                                 s/\x${VB}/\x${XB}/g;
                                 s/\x${WR}/\x${YR}/g;
                                 s/\x${WG}/\x${YG}/g;
                                 s/\x${WB}/\x${YB}/g;" > ${file}
            fi
          done
        done
      done
    done
  done
done
This bash-script replaces the hexadecimal values of V(RGB) and W(RGB) by all possible combinations in the array named colorlist. And the colors aren't replaced when both replaced color values are equal to each other.
The number of files depend on the number of colors in the array (colorlist). An array with 3 values gives:
3^6 = 729 possible combinations.
3^3 = 27 equal colors.
729 - 27 = 703 files.
And an array with 5 values gives:
5^6 = 15,625 possible combinations.
5^3 = 125 equal colors.
15,625 - 125 = 15,500 files.
The method in this step isn't limited to dots. You can use any shape you want. Just make sure the used RGB values aren't part of the image header.
Image conversion
I've choosen to alter the colors of bmp-files because they are easy to understand. But AndreaMosaic requires jpg-images instead of bmp-files. Fortunately there are several programs to convert bmp images into jpg images.
One of them is Imagemagick. Use 'sudo apt-get install imagemagick' to install this softwaren on a Raspberry Pi.
The following bash-statements coverts all bitmap files in a directory to the jpg-image format:
for i in *.bmp
do
  convert ${i} ${i%%.bmp}.jpg
done
The Imagemagick software can also be used to create animated gifs:
convert -delay 100 image5.gif image4.gif image3.gif image2.gif image1.gif -loop 0 animation.gif
Note: The AndreaMosaic software is Windows only.
Step 5: Instructable Images


Making a photo mosaic requires many different images. And each image should differ in color composition. The more different images, the better the result. And what's a better place to find images than on Instructables.com? There are a lot of very different images with different subjects.
The easyest way to find Instructable Images is by use of Google Image Search. A search for all RECTANGLE1 images on cdn.instructables.com gives lots of images.
It's even possible to add a color or subject to the search term (eg "cdn.instructables.com RECTANGLE1 yellow", "cdn.instructables.com RECTANGLE1 robot").
For this mosaic I've used images from featured instructables only. These instructables have an image of good quality (At least thats a requirement to become a featured Instructable).
After opening the Instructables page it automaticly shows the "Featured" feed. And there is an page selector on the bottom of the page to navigate to older Instructables. It will take some time to manually browse all pages. There are over 4000 pages in this feed! But notice the change in the address bar in the browser after selecting the next page. This changes from:
"https://www.instructables.com/tag/type-id/?sort=FEATURED"
to:
"https://www.instructables.com/tag/type-id/?sort=FEATURED&offset=60"
The offset is increased by 60 for each next page (this value equals to the items per page). The number in the page selector multiplied by 60 equals this value in the address bar. With this knowledge it's possible to jump to any page in the featured feed.
Each image on Instructables.com can be downloaded using the browser. Select the image and using "save as" makes it possible to save the image to another location. The only disadvantage is the number of images to be saved (4,000 x 60 = 240,000 images).
Selecting the image download address reveals some interesting facts. Images are stored on a content delivery network (CDN). The filename and location are some kind of random string. Making them unique across the entire system:
"https://cdn.instructables.com/FTG/I8FV/IYNLNLTL/FTGI8FVIYNLNLTL.RECTANGLE1.jpg"
"https://cdn.instructables.com/FLM/683R/IWMQZHMJ/FLM683RIWMQZHMJ.RECTANGLE1.jpg"
The only part of the name which is readable is about the shape of the image: RECTANGLE1.
All images in the CDN are stored multiple times in different sizes. The images on the front page have a size of 306 x 255 pixels. Opening the Instructable shows an image with a width of 620 pixels. All these images have the same name, except for the last part which indicates the size of the image.
With this information we can now locate every main image for all Instructables on Instructables.com.
Step 6: Instructables Image Library


Every Instructables user has it's own image library. This can be found under "your library" at https://www.instructables.com/upload.
As mentioned in the previous step, each uploaded image is stored in multiple sizes. And uploading a large image results in the following sizes:
Name       |   X  |   Y  | Kbyte|
-----------+------+------+-------
ORIGINAL   | 4350 | 3625 | 1282 |
TINY       |   48 |   48 |    5 |
SQUARE     |   75 |   75 |    6 |
SQUARE2    |  130 |  130 |   10 |
SQUARE3    |  320 |  320 |   29 |
THUMB      |  100 |   83 |    7 |
SMALL      |  320 |  267 |   24 |
RECTANGLE1 |  306 |  255 |   22 |
MEDIUM     |  620 |  517 |   61 |
LARGE      | 1024 |  853 |  132 |
RECT2100   | 2100 | 1750 |  414 |
RECT1350   | 1350 | 1125 |  205 |
RECT840    |  840 |  700 |   97 |
RECT600    |  600 |  500 |   58 |
RECT390    |  390 |  325 |   31 |
RECT270    |  270 |  225 |   19 |
Only the first 10 image sizes are created imediately after uploading the file. The other 6 image sizes are created at a later moment (The stored images sizes change over the years). All these image sizes are stored inside the content management system. The reason for storing these different formats is to speed up the website and lower the required internet bandwith.
The RECTANGLE1 size (306 x 255) pixels is used on the frontpage. This image in my example is only 22 Kbyte instead of 1282 Kbyte for the original image (4320 x 3625 pixels). Replacing the RECTANGLE1 string in the following url
"https://cdn.instructables.com/FLM/683R/IWMQZHMJ/FLM683RIWMQZHMJ.RECTANGLE1.jpg"
into
"https://cdn.instructables.com/FLM/683R/IWMQZHMJ/FLM683RIWMQZHMJ.LARGE.jpg"
returns the LARGE image (1024 x 853 pixels).
The only exception is the original image url. This image is stored on a different directory on the content management system:
"https://cdn.instructables.com/ORIG/FTG/I8FV/IYNLNLTL/FTGI8FVIYNLNLTL.jpg"
The information from the previous step combined with the different image files makes it posible to download all required images for a photo mosaic.
Every image on Instructables can be 'opened'. Click on an image and the LARGE image is shown. Click again to enter the image library for the selected image. This new window shows al available image formats.
Note: This step is about the Instructables image library. Not about the AndreaMosaic image library used to create the photo mosaics.
Step 7: Featured Images


There is no need to dowload all image sizes to create a mosaic. The best way is to choose a size which needs little resizing. This saves a lot of time downloading all images, and processing time with the AndreaMosaic software. Downloading all large images results in 250,000 x 61 Kbyte = 15,250,000 Kbyte (15 Gbyte). While downloading these images at small format takes one thirth of this size (about 5 Gbyte). There is also no need for downloading 250,000 files. AndreaMosaic only uses the first 50,000 images (free version). This reduces the download size even further. And 10,000 to 20,000 images are sufficient to create a photo mosaic.
Downloading the images requires two steps. First obtain all image names by 'browsing' all Instructable pages. All image names are located in the HTML code. The code of these pages need to be saved in a folder. The images aren't saved in this step.
Secondly, extract all image names from the HTML files and download the images at the desired size (MEDIUM instead of RECTANGLE1).
Browsing and downloading over 1000 HTML pages will take some time, when using an internet browser. Unix based system have a tool called "wget". This retrieves a HTML page from the web (there is a Windows version available). All it requires is an URL to download the page to the local filesystem.
It is possible to use this wget program in a loop. The pseudocode for such a program might look like:
int x = 0
while x < 20000
loop
   wget "https://www.instructables.com/tag/type-id/?sort=FEATURED&offset="$(x) > $(x).html
   let x = x + 60
end loop
It's even possible to build a script using Excel:
"https://www.instructables.com/tag/type-id/?sort=FEATURED&offset=0"
"https://www.instructables.com/tag/type-id/?sort=FEATURED&offset=60"
"https://www.instructables.com/tag/type-id/?sort=FEATURED&offset=120"
...
"https://www.instructables.com/tag/type-id/?sort=FEATURED&offset=19860"
"https://www.instructables.com/tag/type-id/?sort=FEATURED&offset=19920"
"https://www.instructables.com/tag/type-id/?sort=FEATURED&offset=19980"
Save this file as a text file and use this as an input file for wget (wget --input-file=Featured.txt). This will download all instructables pages, without the images, to your computer. Each file is about 125 Kbyte!
Next step is to extract all image names from the HTML pages. There is a single line with 60 references to cdn.instructables.com in each HTML page.
"<li><div class="explore-cover-item cover-item"><a title="Simple Origami Dragon" class="cover-image" href="/id/Simple-Origami-Dragon/"><img src="https://cdn.instructables.com/FED/CE5U/J1MESY6J/FEDCE5UJ1MESY6J.RECTANGLE1.jpg" alt="Simple Origami Dragon" /></a><div ... </div></li>"
Extract these lines and find all tags (src=) which reference to the images. Alter the RECTANGLE1 to MEDIUM to adjust the image size. Finally there will be a large file with a list of all images:
"https://cdn.instructables.com/F00/0LL4/ISCBJROA/F000LL4ISCBJROA.MEDIUM.jpg"
"https://cdn.instructables.com/F00/0QP1/HAQ36ZEU/F000QP1HAQ36ZEU.MEDIUM.jpg"
"https://cdn.instructables.com/F00/0TXK/IQB50VRI/F000TXKIQB50VRI.MEDIUM.jpg"
...
"https://cdn.instructables.com/F00/176E/HVKUH5I5/F00176EHVKUH5I5.MEDIUM.jpg"
"https://cdn.instructables.com/F00/1JJV/IWMQS7FU/F001JJVIWMQS7FU.MEDIUM.jpg"
"https://cdn.instructables.com/F00/1VW6/HH11O19C/F001VW6HH11O19C.MEDIUM.jpg"
These images can be downloaded with wget. This time with a delay of 0.5 seconds between each image:
wget --wait=0.5 --input-file=imagelist.txt
Step 8: Instructables Robot


The Instructables Robot is a perfect victim for a mosaic. The original image is only 621 x 729 pixels, but there is an eps (Encapsulated PostScript) version available. From which I've made a hight resolution image.
This image is processed using the Instructables image library.
The files used for this mosaic are also available on Google Drive (40,000 images, about 900 MByte).
Attachments

Step 9: IMDB.com


The Instructable mosaic robot from the previous steps, required downloading images from the Instructables website. That required a script to scrape the entire website. Websites, like Instructables, are being constantly scraped by different webcrawlers. And one of them is Google.
In fact Google can be used instead of writing your own script. The images from the Instructables website can be found on Google Images by searching for "cdn.instructables.com RECTANGLE1". The only downside is the size of the images. But there is no need for large images when using AndreaMosaic.
Additional search terms can be used for searching for specific images. The search term "site:instructables.com RECTANGLE1 robot" shows all robot images. Specific colors (red, orange, yellow, green, teal, blue, purple, pink, white, gray, black and brown) can be selected while searching for images. Add the term "color:yellow" and only yellow robots are found. All images are stored in the browser cache (244x204 pixels).
Clear the (image) cache before searching for images (Chrome: Show advanced settings, clear browsing data, Cached images and files).
This image search can be used for many websites with images. E.g.: The following URLs can be used to search for images on the IMDB webpage:
"https://www.google.nl/search?q=site:imdb.com&newwindow=1&tbas=0&tbs=ic:specific,isc:red,isz:ex,iszw:630,iszh:1200,itp:photo&tbm=isch"
"https://www.google.nl/search?q=site:imdb.com&newwindow=1&tbas=0&tbs=ic:specific,isc:orange,isz:ex,iszw:630,iszh:1200,itp:photo&tbm=isch"
"https://www.google.nl/search?q=site:imdb.com&newwindow=1&tbas=0&tbs=ic:specific,isc:yellow,isz:ex,iszw:630,iszh:1200,itp:photo&tbm=isch"
"https://www.google.nl/search?q=site:imdb.com&newwindow=1&tbas=0&tbs=ic:specific,isc:green,isz:ex,iszw:630,iszh:1200,itp:photo&tbm=isch"
"https://www.google.nl/search?q=site:imdb.com&newwindow=1&tbas=0&tbs=ic:specific,isc:teal,isz:ex,iszw:630,iszh:1200,itp:photo&tbm=isch"
"https://www.google.nl/search?q=site:imdb.com&newwindow=1&tbas=0&tbs=ic:specific,isc:blue,isz:ex,iszw:630,iszh:1200,itp:photo&tbm=isch"
"https://www.google.nl/search?q=site:imdb.com&newwindow=1&tbas=0&tbs=ic:specific,isc:purple,isz:ex,iszw:630,iszh:1200,itp:photo&tbm=isch"
"https://www.google.nl/search?q=site:imdb.com&newwindow=1&tbas=0&tbs=ic:specific,isc:pink,isz:ex,iszw:630,iszh:1200,itp:photo&tbm=isch"
"https://www.google.nl/search?q=site:imdb.com&newwindow=1&tbas=0&tbs=ic:specific,isc:white,isz:ex,iszw:630,iszh:1200,itp:photo&tbm=isch"
"https://www.google.nl/search?q=site:imdb.com&newwindow=1&tbas=0&tbs=ic:specific,isc:gray,isz:ex,iszw:630,iszh:1200,itp:photo&tbm=isch"
"https://www.google.nl/search?q=site:imdb.com&newwindow=1&tbas=0&tbs=ic:specific,isc:black,isz:ex,iszw:630,iszh:1200,itp:photo&tbm=isch"
"https://www.google.nl/search?q=site:imdb.com&newwindow=1&tbas=0&tbs=ic:specific,isc:brown,isz:ex,iszw:630,iszh:1200,itp:photo&tbm=isch"
The first URL opens Google image seach and displays all red images found on the IMDB website.
All image thumbnails are placed in your browsers cache directory. For Microsoft Edge: Open the explorer and browse to "c:\users". Search for "Microsoft.MicrosoftEdge". Open the Packages directory and search for ".jpg". This shows all images in your browser cache. Look for the required images and open the file location. Finally copy the images to another directory in your Documents folder.
The result is a folder with about 10,000 IMDB images which can be used by AndreaMosaic.
Step 10: Details


The images used for a photo mosaic shouldn't have too much details. Most details will disappear in the final mosaic. This depends on the number of images in the library, but 10,000 IMDB images aren't enough to keep all details.
A Star Wars image has been used to create a mosaic containing the IMDB images. This image is processed with 50 and 100 tiles per row. And, as expected, there is a great difference in detail in between the mosaics.
The mosaic with 50 images per row doesn't show any details. The mosaic with 100 tiles per row has the most detail. But the large number of tiles makes the mosaic effect disappear.
Step 11: Install Python


Installing Python is very easy. I've choosen the custom installation to install the software in the 'C:\Python36'-directory.
The scripts used to create the images require some aditional Python packages. These can be installed by using PIP from the command line (cmd):
PATH=c:\python36;c:\python36\scripts;c:\ffmpeg\bin;%PATH%
pip install image
pip install moviepy
pip install vpython
I've installed ffmpeg in the 'c:\ffmpeg'-directory. This program is included in the previous used %PATH%-variable.
Step 12: Create Images With Python

Python is a widely used high-level programming language for general-purpose programming. I haven't programmed much with python. Occasionally a small program on a Raspberry Pi. But making small programs in Python is rather easy.
The first example creates an yellow image of 255 by 255 pixels (second argument) and displays this image on the sceen. The third argument for the new image defines the RGB-value for the entire image. I've used the RGB-value, but it's also possible to use the name of the color ("yellow"). Start the script (saved as example1.py) using the command prompt with "python example1.py".
# example1.py
from PIL import Image
img = Image.new('RGB', (255,255), (255,255,0))
img.show()
To use Python for creating images requires some more actions: Altering and saving the image. The second example introduces both. It also introduces the for loop and using whitespace indentation to delimit code blocks (source).
# example2.py
from PIL import Image
img = Image.new('RGB', (255,255), (255,255,255))
pixels = img.load()
for x in range(img.size[0]):
   for y in range(img.size[1]):
      pixels[x,y] = (x, y, 100)
img.save("example.png")
The following example combines both previous examples. It creates and saves 125 images within seconds. There are 5 colors defined in a "List" with the name colors. The 3 for loops use this list resulting in 5 x 5 x 5 created images.
Beware of the indentation of the last line. This must be the same as the previous line.
# example3.py
from PIL import Image
colors = [0,64,128,192,255]
for r in colors:
   for g in colors:
      for b in colors:
         img = Image.new('RGB', (255,255), (r,g,b))
         img.save(hex(r)+hex(g)+hex(b)+".png")
The final example of this step creates images to be used with the dot-mosaic. The first part of the code equals the previous example. This creates 125 images with a different background color.
The second part of the code draws an ellipse inside this image. This is repeated 125 times (for each background color) because this code part is inside 3 for loops (x, y and z).
# example4.py
from PIL import Image, ImageDraw
colors = [0,64,128,192,255]
for r in colors:
   for g in colors:
      for b in colors:
         img = Image.new('RGB', (255,255), (r,g,b))
         for x in colors:
            for y in colors:
               for z in colors:
                  draw = ImageDraw.Draw(img)
                  draw.ellipse((20, 20, 235, 235), fill = (x,y,z), outline = (x,y,z))
                  if hex(r)+hex(g)+hex(b) != hex(x)+hex(y)+hex(z):
                     img.save(hex(r)+hex(g)+hex(b)+hex(x)+hex(y)+hex(z)+".png")
This script creates 15500 images in only a minute.
Attachments
Step 13: Black and White Dots


The image in this step is made of dots in 3 sizes (large, medium and small). The 19765 images are made using a Python script (including one white image). Each image has 600x600 pixels and only 3 colors are used (white, grey and black).
There are images with one, four and nine dots. The code for the single dot images is somehow similar to the code of example 4. The code for the image with four dots contains 4 loops. One loop for each individual dot's color.
# example5.py
from PIL import Image, ImageDraw
xcolors = [255]
ycolors = [0,128,255]
# four circles
for x1 in xcolors:
   img = Image.new('RGB', (600,600), (x1,x1,x1))
   for y1 in ycolors:
      for y2 in ycolors:
         for y3 in ycolors:
            for y4 in ycolors:
               if not (x1==y1 and x1==y2 and x1==y3 and x1==y4):
                  draw = ImageDraw.Draw(img)
                  draw.ellipse(( 20, 20, 280, 280), fill = (y1,y1,y1), outline = (y1,y1,y1))
                  draw.ellipse((320, 20, 580, 280), fill = (y2,y2,y2), outline = (y2,y2,y2))
                  draw.ellipse(( 20,320, 280, 580), fill = (y3,y3,y3), outline = (y3,y3,y3))
                  draw.ellipse((320,320, 580, 580), fill = (y4,y4,y4), outline = (y4,y4,y4))
                  img.save(hex(x1)+hex(y1)+hex(y2)+hex(y3)+hex(y4)+".png")
The code for the nine-dots images is included in example 6.
Open the image to be processed. And create a new tile images list. Add the folder with the images and upload all images. Don't forget to add an empty image.
Experiment with different setting for an optimal result.
Attachments
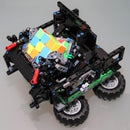
Step 14: LEGO Mosaic


Some of my previous Instructables contained LEGO bricks. This part explains how to create an Instructables robot mosaic from LEGOs. You can use any image as long as it doesn't contain too much detail.
The mehod to create a building patern is the same as a regular mosaic. I've used the 'LEGO moulding colour pallette 2016' to create an image library. Only colors which are available at the the LEGO shop (pick a brick) are used:
 24 Bright Yellow
106 Bright Orange
 21 Bright Red
 23 Bright Blue
119 Bright Yellowish Green
192 Reddish Brown
  1 White
222 Light Purple
324 Medium Lavender
102 Medium Blue
322 Medium Azur
  5 Brick Yellow
124 Bright Reddish Violet
151 Sand Green
194 Medium Stone Grey
268 Medium Lilac
 28 Dark Green
312 Medium Nougat
199 Dark Stone Grey
 26 Black
The following colors from the color chart 2016 are available at bricklink.com:
326 Yellowish Green
325 Lavender
135 Sand Blue
330 Olive Green
 38 Dark Orange
154 New Dark Red
There are more colors available at Bricklink. Check the availability of these colors! Some bricks are only available in low quantity.
The following settings are required to create a mosaic with a limited number of images in the library:
- Use same tile up to: unlimited times
- Duplicate spacing: unlimited
- Color Change: Original
- Tile size: 48 x tiles per row
- Tile variants: Original Tile
Enable the "Text Report & Mosaic Settings" in the Options window. This enables the creation of 2 additional files: A text file (containing the mosaic settings) and an Excel file (listing the images used).
The 48 tiles per row equals 48 x 8 mm = 38.4 cm. Resulting in a mosaic of 15 x 15 inch.
After creating the mosaic, the Excel file gives a list of all images used from the library. And this list equals the number of required bricks:
  11 x Black
  79 x Brick Yellow
 120 x Bright Orange
 361 x Bright Yellow
  19 x Bright Yellowish Green
   3 x Dark Green
  29 x Dark Stone Grey
  16 x Light Purple
  20 x Medium Lavender
  11 x Medium Lilac
  92 x Medium Nougat
  27 x Medium Stone Grey
 109 x Reddish Brown
  18 x Sand Green
1389 x White
The total number of bricks is 2304 bricks (48 x 48). The number of bricks can be lowered by using larger bricks (2 x 2 studs, or 2 x 4 studs).
Building a mosaic with 20 colors requires an image with little detail. And lowering the number of colors in the input image gives a better result (E.g. Pop Art images).
Enabling the half and quarter tile option doubles the resolution. This gives 3 different types of lego blocks: 2x2, 2x1 and 1x1 studs.
Step 15: Transparent Images


The AndreaMosaic software can handle files with a transparency layer. The transparent areas aren't filled with tiles when converting the image.
The third image was created after processing the second image into a 20 x 20 photo mosaic. The transparent parts from the original are left blank. But the tiles at the border are given a black background while processing.
To achieve the results from the first picture, the transparent layer is added again after processing with AndreaMosaic.
Step 16: Plant Pictures


Another database with images can be found on the USDA (United States Department of Agriculture) website. Their PLANTS Database provides standardized information about the vascular plants, mosses, liverworts, hornworts, and lichens. And there are a lot (50,000+) images available.
The "Advanced Search Download" makes it possible to select all plants with images ("Only with images, photos or drawings). Use the "Accepted Names Only" option to avoid duplicates. Depending on usage select "Non-Copyrighted Images".
Press "Display Results" to open a new page with the results. The download button (upper right) gives a list with all plant names. This list can be saved as DownloadData.txt (over 10,000 lines) and contains the following information:
"Accepted Symbol","Synonym Symbol","Scientific Name"
"ABGR4","","Abelia ×grandiflora"
"ABES","","Abelmoschus esculentus"
"ABMO","","Abelmoschus moschatus"
...
"ZUBRP","","Zuckia brandegeei var. plummeri"
"ZYCO","","Zygodon conoideus"
"ZYVI2","","Zygodon viridissimus"
Selecting the first url-link of the results opens a page with the following link:
"https://plants.usda.gov/core/profile?symbol=ABGR4"
Notice the "ABGR4" at the end of this URL. This corresponds to the first value (Accepted Symbol) from the text file. Replace this value with values from the downloaded file gives a list of possible URLs:
"https://plants.usda.gov/core/profile?symbol=ABGR4"
"https://plants.usda.gov/core/profile?symbol=ABES"
"https://plants.usda.gov/core/profile?symbol=ABMO"
...
"https://plants.usda.gov/core/profile?symbol=ZUBRP"
"https://plants.usda.gov/core/profile?symbol=ZYCO"
"https://plants.usda.gov/core/profile?symbol=ZYVI2"
The images are placed on the second tab (image) on these web pages. This part of the page contains one or more pictures. These pages must be opened to determine which pictures can be downloaded.
The following python code opens and saves a single page from the USDA website:
import urllib.request

htmlpage = urllib.request.urlopen("https://plants.usda.gov/core/profile?symbol=ABES")
htmlsource = htmlpage.read()
htmlpage.close

htmlstr = htmlsource.decode("utf-8")
print(htmlstr)

textfile = open ("html.txt", "w")
textfile.write(htmlstr)
textfile.close()
This page contains all information about this plant (Abelmoschus esculentus) including the links to the images:
<div u="image">
	<a target="_blank" title="click to view a large image"
		href="/java/largeImage?imageID=abes_001_ahp.tif">
		<img
		alt="no standard photo"
		style="position: absolute; left: 123px; top: 55px; width:330px; height:220px"
		src="/gallery/standard/abes_001_shp.jpg" onerror="this.src='/gallery/standard/abes_001_ahp.tif'"/>
	</a>
</div>
Notice the line below the "click to view a large image". This line has two important parts which can be used to identify the image names: The "largeImage" and the "abes" plant reference.
These can be used to search for images inside the HTML code:
import urllib.request

htmlpage = urllib.request.urlopen("https://plants.usda.gov/core/profile?symbol=ABES")
htmlsource = htmlpage.read()
htmlpage.close

htmlstr = htmlsource.decode("utf-8")

for line in htmlstr.splitlines(True):
    if "largeImage" in line:
        line = line.strip()
        print(line)
The result of this code is a list of images from this single web page:
href="/java/largeImage?imageID=abes_001_ahp.tif">
href="/java/largeImage?imageID=abes_002_ahp.tif">
href="/java/largeImage?imageID=abes_003_ahp.tif">
href="/java/largeImage?imageID=hies_001_ahp.tif">
href="/java/largeImage?imageID=hies_002_avp.tif">
href="/java/largeImage?imageID=hies_003_avp.tif">
href="/java/largeImage?imageID=hies_004_ahp.tif">
These are not the actual image-URLs. The URL "https://plants.usda.gov/java/largeImage?imageID=hies_002_avp.tif" shows a page with the actual download link: "https://plants.usda.gov/gallery/pubs/hies_002_pvp.jpg".
Changing the previous list gives a list of downloadable images:
"https://plants.usda.gov/gallery/pubs/abes_001_php.jpg"
"https://plants.usda.gov/gallery/pubs/abes_002_php.jpg"
"https://plants.usda.gov/gallery/pubs/abes_003_php.jpg"
"https://plants.usda.gov/gallery/pubs/hies_001_php.jpg"
"https://plants.usda.gov/gallery/pubs/hies_002_pvp.jpg"
"https://plants.usda.gov/gallery/pubs/hies_003_pvp.jpg"
"https://plants.usda.gov/gallery/pubs/hies_004_php.jpg"
To download all images, from all plants, requires processing all 10,000+ accepted symbols from the downloaded text file. And transforming the largeImage-URL to a downloadable format. This can easilly be done with Python. The following code shows the image-URLs found in the HTML-code:
import urllib.request

with open("downloadData.txt") as readline:
	for line in readline:
		url = "https://plants.usda.gov/core/profile?symbol=" + line
		url = url.strip ("\n")
		htmlpage = urllib.request.urlopen(url)
		htmlsource = htmlpage.read()
		htmlpage.close
		htmlstr = htmlsource.decode("utf-8")
		for line in htmlstr.splitlines(True):
		    if "largeImage" in line:
		        line = line.strip()
		        print(line)
This code still needs some editing to download the actual images. The next step is to convert the previous output into a downloadable URL. And finally a wget call to download the image. This can be done in Python or Bash.
The USDA-website isn't very fast and it takes some time to collect all URLs. The images on the USDA-website vary in size and usability. Some of their pictures are used in the next steps to create photo and video mosaics.
Step 17: Image Library Size


The first mosaic image in this step has been made with a library of 5,000 images. The second image has been made with a library of 15,000 images. With equal settings, the difference is clearly visible.
A library should start with about 10,000 images, depending of the main image.
Step 18: Movies


Another way to get many images is extracting them from a movie. This requires some aditional codecs to be installed. Download the K-Lite_Codec_Pack_1310_Mega software. Start the installer and use the Advanced installation mode to install the software. Keep all options to default and decline the Additional Software Offers (Browser Security). Press the install button and reboot the computer after installation.
The first step is to find a movie and convert it to a readable file format. The AVI-file format can be used to extract images. I've converted the source video to the following format using ffmpeg ("ffmpeg -i inputfile.type -vcodec mjpeg -pix_fmt yuvj420p -q:v 0 -an output.avi"):
Format                      : AVI
Format                      : JPEG
Codec ID                    : MJPG
Color space                 : YUV
Open the "Tile Images" screen and select "Extract Tiles from Video". This shows a dialog box to extract the images from the video. Adjust the settings and press the "Extract" button. The extracted images will be placed in the same directory as the movie file (2000 files per subdirectory). These extracted images can be used to create a new Image Library.
One disadvantage of using a movie as image source is that a lot of images look the same.
Step 19: Irregular Mosaic


In the previous steps all photo mosaics are made of square tiles. This is the easyest way to get results: Select a main image and an image library. Choose the number of tiles and the software creates a mosaic.
But it's also possible to create irregular mosaics using a maskfile. A maskfile is a image where each colored area represents a single tile. The first image in this step has been created using the Instructable robot image, an Instructable image library and a maskfile (third image, included with the AndreaMosaic software).
The output file has the same size as the maskfile. The professional version also allows for a larger output file (1x, 2x, 4x or 6x of Input Image Size).
Step 20: Custom Maskfile


There are several maskfiles included with the AndreaMosaic software. But it's easy to create your own maskfile, or alter an existing one. The image used to create the first image in this step has been used as input file and as a template for the maskfile.
The circular part in the maskfile covers the entire flower. And each part of this circle is replaced by a different image by the software. The image library contains the images from the USDA website.
The last image of this step is an animated GIF. It combines multiple processed images to one video.
Step 21: Video Mosaic

There are two ways of creating video with AndreaMosaic. The first method is converting a picture into a mosaic using videos. The image library is replaced by a video library. Only one image is used to create this kind of mosaic. And each tile of this mosaic contains a video. This way of creating videos is explained at the end (page 40) of the English manual.
The second method is not mentioned in the manual and it requires some additional software. It involves converting the individual frames of a video to mosaic images. And combining these images into a new video.
The output of both methods are very different. The first one is a still image with video tiles. And the second one is a video from many photo mosaics.
The next steps are about creating video mosaics. This requires the video codecs to be installed.
Step 22: Processing AVI Files

Extracting video clips from a video file is almost the same as extracting images from a video file. Open the "Tile Images" screen and select "Extract Tiles from Video". Choose the AVI file format to extract video clips. It is even posible to choose more than one output format (e.g. AVI and GIF).
Adjust the settings and press the "Extract" button. The extraction process creates one videoclip (AVI-format) for each scene in the video. The new files are placed in a subfolder and can be used to create a video library.
Extracting video clips is optionally, it can be skipped if you already have plenty of small videos.
The video library (used to process the main image) has to be created in the "Tiles Images screen". Adjust the folder type from "Include images/folders" to "Video folders". Add the extracted videos or other short videos to the library and save the list.
Step 23: Movie Library With Python

As mentioned, the first method requires videos to be used as tiles. This first video example is almost the same as the first dots-example. Only this example uses small video files as an image library.
All the videos used in this example are created by a Python script:
import os
from PIL import Image, ImageDraw
from subprocess import call

colors = [0,64,128,192,255]

def filename(num):
    name = "00000" + str(num)
    name = "image-"+name[-5:]+".png"
    return name

def ffmpeg(num):
    call('ffmpeg -loglevel panic -hide_banner -r 10 -i image-%5d.png -vcodec mjpeg -vf format=yuv420p -y dot'+ str(num)+'.avi')

for file in os.listdir():
    if file.endswith(".png"):
        os.remove(file)

num = 0
r,g,b = (255,255,255)
for x in colors:
    for y in colors:
        for z in colors:
            img = Image.new('RGB', (400,400), (r,g,b))
            draw = ImageDraw.Draw(img)
            draw.ellipse((20, 20, 380, 380), fill = (x,y,z), outline = (x,y,z))
            if hex(r)+hex(g)+hex(b) != hex(x)+hex(y)+hex(z):
                num += 1
                print (filename(num))
                img.save(filename(num))

ffmpeg (1)
for j in range (2, num+1):
    os.rename (filename(1), filename(99999))
    for i in range (2, num+1):
        fromname = filename (i)
        toname   = filename (i-1)
        os.rename (fromname, toname)
    os.rename (filename(99999), filename(num))
    ffmpeg (j)
The first part creates png-files for each color in the list "colors". These images are converted to video files by ffmpeg (make sure the location of this program is in your PATH-variable). The total of 125 AVI video files can be used as tiles in a mosaic.
To create a video with AndreaMosiac requires altering the output file format (more options screen). I've used the VideoMosaic Uncompressed AVI file format.
To make a videomosaic from an image is the same as creating a photomosaic from an image. The only difference is using a video library, and the output file format.
Attachments
Step 24: Movie Clips


To create a video mosaic from movies takes a lot of time. The first step is to convert the DVD to AVI files with a low resolution. I've created a backup from some DVDs and transcoded the output to a 426 x 240 pixel AVI file.
These files are processed into small videos with AndreaMosaic. These files were used to create a new library. With a video library containing 8000 files as a result.
This video library has been used to process a photo from the Disneyland Paris castle.
There is no need to create an image library with a higher resolution. A Full HD video (1920 x 1080) using 30 tiles requires only 64 x 36 pixel videos.
Step 25: Rotating Squares


The previous Python example used simple color changing dots. Python makes it easy to make other patterns. The folowing script creates 125 avi files (5^3), each containing 300 frames.
import os

from PIL import Image, ImageDraw
from subprocess import call

colors = [0,64,128,192,255]

def filename(num):
    name = "00000" + str(num)
    name = "square-"+name[-5:]+".png"
    return name

def ffmpeg(num):
    call('ffmpeg -loglevel panic -hide_banner -r 30 -i square-%5d.png -vcodec mjpeg -vf format=yuv420p -y square'+str(num)+'.avi')
    print ('square'+ str(num)+'.avi')

def delpng():
    for file in os.listdir():
        if file.endswith(".png"):
            os.remove(file)

delpng

bg     = (255,255,255)
size   = 300
num    = 0
colors = [0,64,128,192,255]

for r in colors:
    for g in colors:
        for b in colors:
            for i in range (1, size):
                p1 = (i, 1)
                p2 = (size - 1, i)
                p3 = (size - i, size - 1)
                p4 = (1, size - i)
                img = Image.new('RGB', (size,size), bg)
                draw = ImageDraw.Draw(img)
                draw.polygon((p1, p2, p3, p4), fill = (r,g,b), outline = (r,g,b))
                img.save(filename(i))
            num += 1
            ffmpeg(num)
            delpng
The 125 images are used as a video library in AdreaMosiac.
Attachments
Step 26: Time Lapse Photo Mosaic

The second method to create a video uses only images. These images are combined into a video, just like the time lapse video used in this step. The first step is to convert the Youtube video to a readable format:
ffmpeg -i input.mov -vcodec mjpeg -pix_fmt yuvj420p -q:v 0 -an output.avi
This file is opened in the "Tile Images" window in AndreaMosaic. And all tiles are extracted from this video. Normally these tiles would be added to an image library. But I've used some of them as input images for AndreaMosaic.
The downloaded images from the USDA website are used as image library. The plants and flowers from this source are used to create a mosaic from the flowers in the original video
Processing images for a video takes a long time. I've created some test mosaics first with different settings. The 20 and 15 tiles/row combined with half and quarter tiles gave a good result. And at this point I've added completely black images to the image library. The original images have a complete black background. Adding these black tiles improves the end result.
There are more than 4000 frames in the original video, and processing time for each image is about 20 seconds. I haven't used all images from the video. And I've used different settings for each flower, just to show the possibilities.
The AndreaMosaic software lacks a batch mode. But it is possible to open more than one image at a time (or drag and drop multiple files). And it is not possible to select the AVI output to create a single video from multiple images. Selecting the AVI output results in multiple AVI files with a single frame.
Use ffmpeg to create a video from the processed images. All images must be numbered continuously, starting with 000001. The following command creates an AVI file with 15 frames per second:
PATH=c:\ffmpeg\bin;%PATH%
ffmpeg -r 15 -i FR%6d.jpg -vcodec mjpeg -vf format=yuv420p -y mosaic.avi
The %6d in the filename is replaced by all files numbered with 6 decimal characters (FR000001.jpg).
It's possible to use the maskfile feature while processing multiple images. Adjust the size of the maskfile to 1920 x 1080 pixels before processing the images.
Step 27: UltraHD Video


The AndreaMosaic software (free and bonus edition) supports up to 5K video output. Creating a regular UHD video requires the professional edition. But the 200 megapixel output for photo-mosaics is more than enough to create an UHD or 8K video when using photos.
In the previous videos the output images had same size as the input images (1920 x 1080 pixels). With Full HD video output as a result. Increasing the size of the output images to 3840 x 2160 pixels results in images with a higher resolution. This can be done by setting the output mosaics size to 3840 pixels. The height is then automaticly adjusted to 2160 pixels.
The only disadvantage is the time it takes to render all images. It takes about 9 hour to process 1,000 images (i7 Laptop with SSD). After processing and renaming/sorting all images, ffmpeg can be used to create an Ultra HD video:
ffmpeg -hide_banner -r 24 -i FR%4d.jpg -c:v libx264 output.mkv
This command line statement converts al files with the name FR0001.jpg to FR9999.jpg (or the maximum file number) to a MKV video file. The output file can be uploaded to Youtube. The 360 and 720p version will show up first. And it takes some time before the 4K version becomes visible.
Step 28: Failures


No Instructable without any failures.
The first image uses a maskfile I've made from a map. There are 3 errors in this mosaic. The two most visible are: Duplicate and rotated images. The third one is less visible: The islands which belong to a state are given different tiles.
The second image failed because I wanted to use each photo, from the library, only once. But there weren't enough distinct images (20,000) to create the mosiac. This explains the black spots, this are places without any 'matching' images. This can be resolved by increasing the image library or allowing duplicate images in the mosiac.
And for the last image in this step: I don't have a clue what happened here:)
Step 29: 8K Video


The final example is an 8K video from the Instructables website. It is an promo video from Eric J. Wilhelm. Athough the video link is broken, there is still a reference in the HTML code. This video is downloaded to the local harddrive and the 1855 images are extracted using AndreaMosaic.
8K video resolution equals 7680 x 4320 pixels. And the Instructable images in the image library have a size of 320 x 320 pixels. Using the full image size results in a minimal tile size of 24 x 13,5 tiles. Usage of 3/4 image size (240 x 240 pixels) results in 32 x 18 tiles. And this values has been used to process all images (32 tiles x row). Processing an image at this resolution takes about 45 seconds. And it takes about 24 hour to process all 1855 images.
The new video needs to have the same length as the original video. This is required to sync the original audio. There is an ffprobe program in the same directory as the ffmpeg program. This program can be used to show all information about the downloaded Youtube video (ffprobe Instructables.mp4):
Input #0, mov,mp4,m4a,3gp,3g2,mj2, from 'Instructables.mp4':<br>  Metadata:
    major_brand     : mp42
    minor_version   : 0
    compatible_brands: isommp42
    creation_time   : 2016-08-25T18:03:50.000000Z
  Duration: 00:01:01.90, start: 0.000000, bitrate: 1124 kb/s
    Stream #0:0(und): Video: h264 (Main) (avc1 / 0x31637661), yuv420p, 1280x720 [SAR 1:1 DAR 16:9], 994 kb/s, 29.97 fps, 29.97 tbr, 90k tbn, 59.94 tbc (default)
    Metadata:
      creation_time   : 2016-08-25T18:03:50.000000Z
      handler_name    : ISO Media file produced by Google Inc.
    Stream #0:1(und): Audio: aac (LC) (mp4a / 0x6134706D), 44100 Hz, stereo, fltp, 125 kb/s (default)
    Metadata:
      creation_time   : 2016-08-25T18:03:50.000000Z
      handler_name    : ISO Media file produced by Google Inc.
The original video has a framerate of 29.97 fps.
The video can be created after processing and renaming all images (windows move):
ffmpeg -hide_banner -r 30 -i FR%4d.jpg -c:v libx264 Instructables8Knoaudio.mkv
The next step is to extract the audio from the original video. This can be done with different programs, but it's easy to use the Youtube downloader for a second time, to extract the audio.
The following command creates a video from the jpg files including audio. The two inputstreams (jpg and mp3) are combined into a single mkv-video.
ffmpeg -hide_banner -r 30 -i FR%4d.jpg -i audio.mp3 -c:v libx264 Instructables8K.mkv
The ffmpeg output file is an 8K video which can be uploaded to Youtube. And after some time (a few hours) the following video formats are available for this video:
4320p    7680×4320    8K
2160p    3840×2160    4K, Ultra HD
1440p    2560×1440    Quad HD
1080p    1920×1080    Full HD
 720p     1280×720    HD
 480p      854×480    VGA
 360p      640×360    HVGA
 240p      426×240    QVGA
I've created two different versions of this video. The first video contains only whole tiles. The second also contans half and quarter of tiles.
The goal of this instructable was to demonstrate different photo and video mosaics techniques. It is now a great time to collect all the photos you have taken. First to make a good backup. And secondly to get started with this software.
GosseAdema

Third Prize in the
Photography Contest 2017


