

Introduction: Pi Approximation With Raspberry Pi (Monte Carlo Method)


We all know pi as the mathematical constant, defined as "the ratio of a circle's circumference to its diameter" (~ 3.14159).
Perhaps not everybody is aware that 'pi' can be approximated using a Raspberry Pi, employing a statistical method and an interesting graphical animation.
Here, I propose a device that combines educational elements with graphical animation. While not the most efficient method for calculating pi, it serves as a valuable tool for comprehending the Monte Carlo method.
This device essentially consists of a Raspberry Pi 4b with a 7-inch touchscreen display enclosed in a 3D-printed box. Python is used for the code.
The main goal of this project is to show how we can use the Monte Carlo method to estimate the value of pi.
Also, working on this project allowed me to bring together some things I really enjoy: I like the Monte Carlo method, I find pi really interesting, and I love playing around with Raspberry Pi computers.
The following steps show the process of building this standalone demonstrator and briefly discuss the Monte Carlo method.
Supplies
1 x Raspberry Pi 4b
1 x Raspberry Pi power supply (15W)
1 x MicroSD
1x Touchscreen 7" (below the link to the shop I've used, as reference)
2x HDMI 90deg adaptors
Optional: 1 x Panel Mount Type-C USB-C Male To Female Extension Cable 0.2m. This allows battery operation and easy detachment of the power supply cable. (below the link to the shop I've used, as reference)
Panel Mount Type-C USB-C Male To Female Extension Cable: https://www.aliexpress.com/item/1005003311183241.html?spm=a2g0o.productlist.main.1.4ad3c8WTc8WTma&algo_pvid=a3dedfe1-ca87-49fd-a086-d380b37663f2&algo_exp_id=a3dedfe1-ca87-49fd-a086-d380b37663f2-0&pdp_npi=4%40dis%21EUR%212.87%212.87%21%21%213.01%213.01%21%40211b600d17148410018833133ea3cf%2112000026774425260%21sea%21NL%21768246036%21&curPageLogUid=XzzZhWgdyiyb&utparam-url=scene%3Asearch%7Cquery_from%3A
Step 1: 3D Print the Box
There are three parts needed, to realize the box.
To use the Panel Mount Type-C USB-C Male To Female Extension Cable 0.2m, print Box2 and Cover (no Bracket).
To connect the power supply directly to the Raspberry Pi print Box1, Braket and Cover.
In case you'd like to edit the box's design, you can refer to the step file at the repo: https://github.com/AndreaFavero71/pi_monte_carlo/tree/main


Step 2: Assembly


Assembly is straitforward:
4 x M2.5 x 10mm to secure the Raspberry Pi to the box.
Option 1: 2 x M4 x 12mm to secure the power supply cord to the box, via the printed Bracket.
Option 2: 2 x M3 to secure the Panel Mount Type-C USB-C to the box (screws included with the extension cable).
4 x M4 x 12mm to secure the box cover to the box
Connect the power supply, Raspberry Pi and the screen.
A couple of tire wraps to keep the wiring in good order
Step 3: Box Info


In this step, the reason for the three little holes on the box's top side is explained.
The purchased touchscreen (for reference https://www.amazon.nl/Capacitive-1024x600-Display-Monitor-Raspberry/dp/B07YJDSCKR?source=ps-sl-shoppingads-lpcontext&ref_=fplfs&psc=1&smid=A5BN6RQOA0WX3) comes with 3 small push buttons, regulating the screen backlight (on/off, decrease, increase).
Through the three holes, it is possible to operate these buttons, with a (tipless) toothstick, as shown by the pictures.
While this may not be an essential feature, why not include it if the touchscreen already has those buttons?
It's easy to create a pocket with some tape to store the toothpick directly on the box.
Step 4: Setting Up the Raspberry Pi


1) Flash the Raspberry Pi OS (64-bit) Bookworm.
2) Insert the microSD to the Raspberry Pi, and power it on. Wait until the green led stop flashing.
3) At the terminal, or via SSH, type the below comands:
git clone https://github.com/AndreaFavero71/pi_monte_carlo.git
cd pi_monte_carlo
chmod +x install/setup.sh
sudo ./install/setup.sh
4) Raspberry Pi will be updated and ugraded.
5) Files will be downloaded to the Raspberry Pi, at the right location.
6) The necessary environment will be set.
7) If no errors, in a 5~10 minutes a request to reboot (y/n) appears to the screen. Confirm the Reboot.
8) To set the touchscreen listed at Supplies, type below commands:
sudo rm -rf LCD-show
git clone https://github.com/goodtft/LCD-show.git
chmod -R 755 LCD-show
cd LCD-show/
sudo ./LCD7C-show
Now the Raspberry Pi is ready, double click the pi icon at the Desktop, and the GUI opens.
For more details: https://github.com/AndreaFavero71/pi_monte_carlo/blob/main/README.md
As reference, or for manual setups, all the steps are listed at ïnstallation_steps.txt".
Attachments

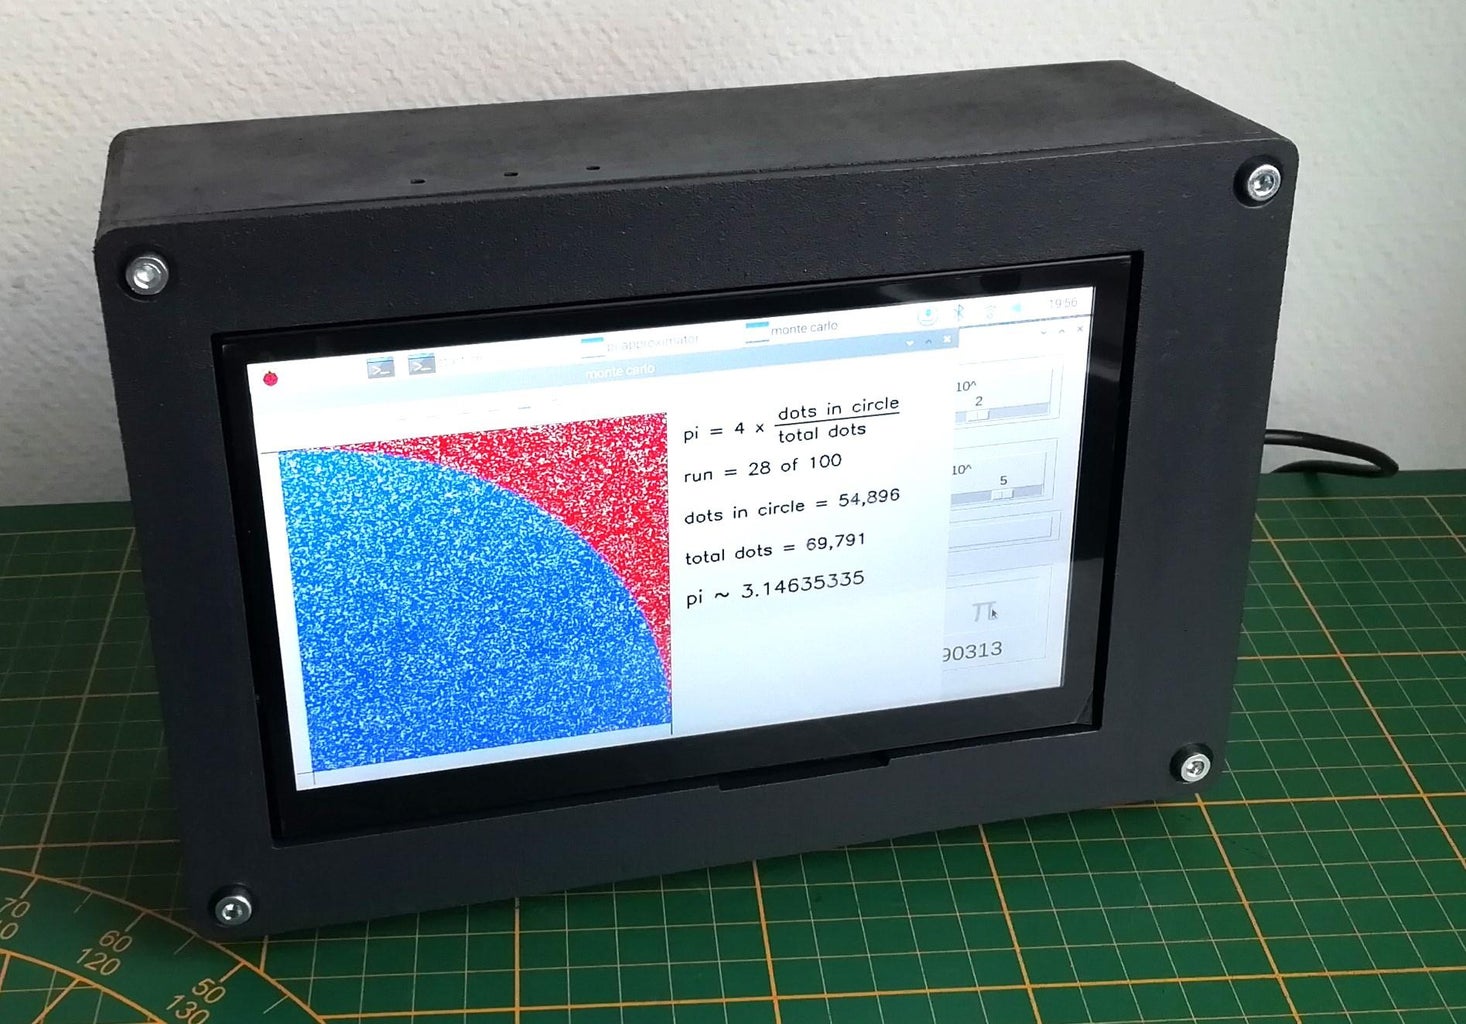
Step 5: GUI: How It Work


Main elements of the Graphical User Interface (GUI) are:
- This device can be operated via the touchscreen (no keyboard or mouse are required, nor a connection with a PC).
- On the GUI there are some sliders to set the number of repetitions (RUNS) and the number of observations (DOTS). The RUNS range from 1 unit to 900 thousand, while the DOTS range from 1'000 to 9 millions.
- The number of observations (DOTS) will be generated for each run of the total RUNS.
- Both the RUNS and the DOTS are defined by Scientific notations, to make possible a large variation range in a simple way.
- The SAVE SETTINGS button saves the current settings for future use. (Settings are saved on a JSON file).
- The INFO button opens a scrollable set of slides summarizing the method used. (See images in the next step).
- There are three levels of animations, ranging from 'max' to 'min'. This decreases entertainment and increases speed.
- The pi button begins the calculation.
- A progress bar is incremented when multiple RUNS.
- An estimation of the remaining time manages expectation.
After completing all the runs:
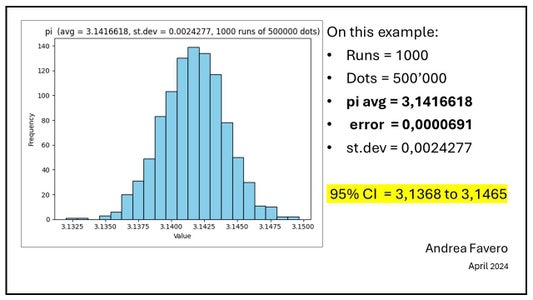
1) if at least 50 runs were made, the GUI will display a histogram (with a short summary of data in the chart title). The histogram window includes buttons to access two additional charts:
- Error plot versus runs.
- Standard deviation plot versus runs.
2) some files are saved locally:
- A text file log.tx with the estimate pi values (one per each run of the RUNS).
- A histogram image.
- A chart of the error vs versus runs (this chart will be saved upon accessing its window).
- A chart of the standard deviation versus runs (this chart will also be saved upon accessing its window).
The aforementioned files are also saved in case the process is interrupted before completion, provided that at least 50 RUNS have been completed.
Some references about timing, :
- 100 RUNS of 10'000 DOTS takes approximately 30 seconds (animation set to 'min').
- 100 RUNS of 10'000 DOTS takes approximately 3 minutes 40 seconds (animation set to 'max').
- 1000 RUNS of 100'000 DOTS takes approximately 15 minutes (animation set to 'min').
- 1000 RUNS of 1 million DOTS takes almost 3 hours (animation set to 'min').
- When the animation is set to 'min', as rule of thumb the Raspberry Pi 4b takes ca 9 microseconds per DOT.
Side info:
The animation is based on openCV, and the GUI is based on tkinter: These are operated on different threads.
Step 6: Monte Carlo Method


Monte Carlo is a method that enables a statistical approach for complex problems, in which the output will be approximated to the possible true value.
It requires a large amount of random input data, that has to follow the correct type of distribution (i.e. Uniform, Normal, etc) for each specific input.
The output typically consists of an equation based on the input data, which progressively approaches the true value.
For the pi approximation, random and uniformly distributed data is used as input data: A set of X and Y coordinates are generated, in the range from 0 to r (r = the radius of the circle).
A point is associated to every couple of X and Y coordinates, and it falls either within the circle of radius r or outside the circle but within the square of side r.
By counting the points within the circle relative to the total points, pi value can be approximated.
The essence of the concept is that the positioning of these points, distributed randomly and uniformly, within or outside the circle is dictated by the ratio of the circle's area to that of the square – in other words, the value of pi.
Refer to the accompanying 9 images for a simple and visual explanation (these slides can be shown on the device sscreen, by selecting the INFO button).
At the wikipedia EN website (https://en.wikipedia.org/wiki/Monte_Carlo_method) in addition to explaining the Monte Carlo method, there also is an animation for the pi approximation ... the same animation that can be realized with this project.
Step 7: Interpreting the Output


After completing all the RUNS, if at least 50 were made, the GUI shows:
- A histogram is plot on screen, making visible the output of the different RUNS.
- From the histogram windows, there are buttons to open other two charts:
- error plot vs runs. It's noticeable the approximated pi error reduces by increassing the number of runs.
- standard deviation plot, vs runs. This response saturates to a value that depends from both the RUNS and the DOTS quantity (the largers these inputs, the smaller the standard deviations)
The Monte Carlo method is a statistical approach and does not yield the true value of pi.
The pi approximation method produces a set of output values that follow the Normal distribution function and are centered on the value of pi.
Based on the standard deviation of multiple calculated pi values, the Confidence Interval (CI) can be obtained. A widely used approach is to consider a CI of 95%, meaning average ± 2 standard deviation.
If we refer to the attached chart (1'000 RUNS by 9'000'000 DOTS):
- the approximated pi is 3.1415848, so the errors from pi is -0.0000075
- we can be 95% confident that the value of pi falls between 3.1404and 3.1427.
The pi approximation error reduces by increasing number of RUNS, yet its ending value is strongly dependent by the number of DOTS.
Be noted that limited DOTS quantity has a large effect to the resolution too: One single dot, dropping within or outside the circle, is already affecting the pi calculation by 0.004 when a total of 10'000 dots are used.
Step 8: Legitimate Question

Why use repetitions (RUNS) instead of increasing the number of observations (DOTS) ?
There are several reasons I’ve considered, which support the proposed implementation:
Computation Time:
- Increasing the number of observations requires more data handling, resulting in a slower and less pleasant experience.
- Both the Raspberry Pi 4b and my PC can handle up to 9,000,000 data points, but beyond that, computation time increases exponentially (as shown in the image).
Randomness:
- What we consider randomly generated values aren’t entirely random. Computers generate these values using algorithms, starting from a well-defined initial value called a seed.
- Interestingly, each time a random series is generated, the seed value changes (unless explicitly forced to be the same), reducing the non-randomness effect.
Central Limit Theorem (CLT):
- The CLT is a statistical theory that states as sample sizes get larger, the mean of all samples will be approximately equal to the mean of the population, and the distribution of means will approach normality (albeit in a simplified manner).
- We’ve already observed that the estimated value of π follows a normal distribution function. This allows us to assume that the average value estimated for π gets closer to the true value of π.
Considering the above factors, my preference has been to add the RUNS parameter. Doing so limits the negative effects of computation time and randomness while leveraging the benefits of the Central Limit Theorem
Step 9: Learn and Enjoy

I hope this device captures the interest of teachers and students, just as it did for me.
If you're eager to delve deeper into Monte Carlo methods, I highly recommend checking out a fantastic video on YouTube that I found enlightening: //youtu.be/7ESK5SaP-bc?si=4xGZ_1ykVqhE721Z
Step 10: Provide Feedback

If you've enjoyed the project and/or you've suggestions, please feedback

Runner Up in the
All Things Pi Contest

![Tim's Mechanical Spider Leg [LU9685-20CU]](https://content.instructables.com/FFB/5R4I/LVKZ6G6R/FFB5R4ILVKZ6G6R.png?auto=webp&crop=1.2%3A1&frame=1&width=306)


