

Introduction: Render Models in Fusion 360


Rendering Models in Fusion 360 is pretty straight-forward. I'll take you through the steps of cranking out a basic, solid render and then let you play with all the fun tools that make them sweet!
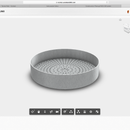
This will be a render of an example project for First Build's "Roast Coffee in Your Home Oven" design challenge. If you want to learn how to create this model in Fusion 360, head over to this Instructable. And if you want to learn hot get something like this from your model, check out this Instructable.
If you don't have Fusion 360 (or don't know much about it) you can find more on it here (and download it for free), but basically it's a product design modeler that lets you model, prototype, visualize, and analyze anything from jewelry to robotics to furniture. And even thought it's professional-grade, it's a pretty popular tool for a lot of amateurs and explorers as well.
Anyways, let's make this bad boy photo-realistic, shall we?
Quick note: all of the steps have an animated .gif - if they're not moving, or you having trouble seeing them, you might have to look at them in a full browser on a computer). I'm not totally certain where they work and where they don't.
Step 1: Navigate to the Render Design Space

In the top-left of the design window, you'll find the workspaces button. Click it, and choose the "Render" environment.
You'll notice the toolbars change icons, perspective will be turned on by default (if it wasn't already), and the quality of your model will change.
Step 2: Work Left-To-Right

The toolbar at the top has two menus, one for setup, and one for rendering. Start from the left and work your way over.
First up is appearances. Click the colored ball at the left of the toolbar, or open the Setup menu and choose "appearances."
It's important to note that "appearances" are different from "physical materials". Physical materials are used to do describe what it's made of - these materials have material properties, like density and strength. Appearances just have visual properties, and there are a lot more choices in the appearances library.
Step 3: Add Appearance

You can apply appearances to an entire body, or individual faces.
Start by selecting a materials folder - in this case, we want a brushed aluminum, so we'll click on the "metals" folder.
Scroll down to find the material you want wishing the folder. Then, click and drag it to the corresponding part of the model.
You'll notice the the material show up now as a swatch in the "In this Design" box at the top of the appearance panel. If you want two parts to always be the same material, drag that material from the swatch to the parts, rather than from the materials library. That way, editing a swatch (coming up next) will change every part that it is assigned to.
Step 4: Edit Swatch & Exit Appearance Panel

If you want to edit an appearance in your design, just double-click on it in the "In this Design" panel.
You can edit the scale, rotation and roughness of the material, or you can click "advanced" for a whole new world of customization (including uploading your own image for the pattern) - but I'll let you play with that if you're so inclined.
Click the "close" button in the appearance panel to leave the tool.
Step 5: Setup the Scene


Work your way right on the tool bar - click the lamp button, "Scene Settings."
This will let you setup the environment you'll be rendering in.
First, scroll through and explore Fusion's preset environment - they're all very different and are great for different use cases. My go-to reliably-good-looking choice is "Soft Light."
You can change where the light is coming from, how bright the model is, what the ground is like (reflection or no?), or what the background color is.
And be sure to check out the camera tools, you can change the perspective, and even pick a focal point for some nice depth-of-field rendering.
When you're ready, click "close" in the Scene Settings panel.
Step 6: Stick on a Decal & Control Texture Mapping

I'll spare you the steps, but the next two buttons are to add decals and control texture mapping.
Decals are basically stickers - slap your logo on the side of the model, or pop in an Illustrator mock-up of a touch-screen interface.
And the texture mapping controls how textures wrap around your object. Imagine wrapping cloth around a couch cushion - where does it stretch out? How is it oriented? How does it change when you wrap it around a corner? AND WHAT ABOUT HOSPITAL CORNERS?!
Anyways, great tools, but not necessary to whip out a quick and dirty render.
Moving on!
Step 7: RAY TRACE!

We've made it! Just push that tea kettle button and watch the model come to life!
Keep in mind that there are three settings for ray-tracing:
QUICK: shows you where shadows will cast and how light will bounce.
NORMAL: smooths out shadows and provides richer textures.
ADVANCED: works out the deep stuff: ambient occlusion, light bouncing in crazy ways, and detailed shadows.
Step 8: Save an Image

The Ray Tracing panel will show you the number of iterations the image has gone through, as well as the number of seconds. Once you're happy with the quality, just click the Save button on the toolbar!
Once you're done, just click "disable" on the panel, and then close.
Keep in mind that making any changes to the model (like rotating it) will restart the process of ray-tracing, so if you've been waiting a while for it to process, make sure you drag your mouse across it accidentally!
Step 9: BONUS POINTS: Ship That Sucker to the Cloud.


One of the great things about Fusion 360 is that some of its heavier processing can be sent to the cloud, freeing up your computer for other things.
As you're ray-tracing you might have realized that you can't do anything else in Fusion while this is going on. That's because Fusion 360 is using your graphics card in full-force to render exactly what's on your screen. It's powerful, but it ties up pretty much all of Fusion's local resources.
SO, alternatively, you can do the same process we went through to setup the render, but instead of clicking on the tea pot icon, click on the teapot + cloud icon. Pick your settings, and click submit!
It's important to note, that any cloud render costs Autodesk Cloud Credits. Depending on what type of license you have, this might also cost money. Educational licenses, for instance, have unlimited cloud credits, so it's always free to render. Other types of commercial licenses (like the one in the gif) might have a finite number of credits to use before you have to start paying for them. So just make sure you check A) how many credits the render will require, and B) how many you have left. These are both available before you click "submit."
Once you click submit, a thumbnail will show up in the Rendering Gallery (which you can access in the bottom left of the window), with a progress bar and all previous renders. Clicking on a finished thumbnail will let you view, download, or re-render the image.
Step 10: EXTRA BONUS POINTS: Build a Set

Feel free to go the distance and model a few extra things around the design in order to make it seem more at-home. For instance, in this render, I just extruded a few rectangular prisms to make countertops and threw in countertop appliance concept I had made a few months prior. This just gives it a little more context and character.
In conclusion, let's not kid ourselves. Rendering is the absolute best part of modeling. It's when the product really springs to life, and that's just fun. So have fun with it!


![Tim's Mechanical Spider Leg [LU9685-20CU]](https://content.instructables.com/FFB/5R4I/LVKZ6G6R/FFB5R4ILVKZ6G6R.png?auto=webp&crop=1.2%3A1&frame=1&width=306)


