

Introduction: Ruler to Caliper (0.1mm Resolution!) - 3D Printed (Left Handed Version Included!)


I recently ordered a digital caliper from China. Spent 20$ on it, and it's completely worthless - totally unreliable. After I was done mourning over my 20$, I decided to make my own. For those of you who are unfamiliar with what a caliper is, it's a tool that is most often used to measure out/inner diameters of objects, and there are more than a few instructables on how to use them.
I figured that if I base my caliper on a ruler, which is super cheap and 100% reliable, I could end up with a very reliable caliper. Also, by using adding a Vernier scale I could reach a resolution of 0.1mm. Plus, I figured that if I made a CAD model I could make a left-handed version too! You guys are always forgotten, but not anymore!
In this instructable I'll show you how to turn a ruler into a caliper. I used my 3D printer to make it, but if people are interested I might make one out of stuff everyone can find. If you're new to 3D printing, this is a great first project for you! The prints are fairly simple and you'll end up having a caliper, which is often used when you want to design your own models.
Let me just add that making a reliable caliper was my #1 priority, so while making the tool I'll also show you how to overcome the accuracy limitations posed by your 3D & regular printers too, which will allow you to achieve good results. It's also possible to make a caliper without attaching an actual ruler, but I figure an actual ruler would be more robust & reliable (see the step about attaching a ruler to the caliper for details).
Hope you find this instructable useful!
Highlights:
Turn a ruler (1mm resolution) into a caliper (with 0.1mm resolution).
Right-hand / left-handed versions available.
STL's, Tinkercad & more - all included here.
Super cheap print (~30grams of PLA) + super cheap ruler = high accuracy.
Simple design - very reproducible!
Supplies
You'll need a cheap metal ruler, instant glue, access to a 3D printer & and to an ordinary printer.
Step 1: 3D Print - Full Version (Measures Inner & Outer Diameters)

First, you'll need to 3D print the base of the caliper, to which you'll later mount a ruler. You'll also need to print the part that slides across it.
I've included the STL files and a link to a Tinkercad page which you can use (other formats are available by request).
The parts are suited for a ~170x20mm ruler and about 0.5mm thick. For other rulers you'll need to make slight modifications so that the ruler has room within the base. It's possible to do that in Tinkercad - all you need to do is stretch\shrink the model so that it fits your ruler. I can help with that if necessary - comment below.
Note that you want the moving part of the caliper to slide back & forth, but you don't want it too tight so it's too hard to move it (see GIF in the next step for what it should be like). The attached design should capture that, but it might depend on the printer / material you're using, so again you might have to make tiny modifications on my design.


Step 2: 3D Print - Simple Version (Measures Outer Diameter Only)


I figured some people might want a simpler version, without the part that measures inner diameters, so I've attached a version without that part. The benefit of making this type of a caliper is that is has no sharp edges, so it's more suitable for kids.


Step 3: Glue a Ruler


3D printed items are great, and if you calibrate your printer they can be pretty accurate too. Still, a ruler is more reliable & durable, and so instead 3D printing a scale on my caliper I decided that it's best to just attach a real one.
To do that, apply instant-glue (or other strong adhesive) to the caliper's ruler-slot (see image) and glue the ruler to it. Make sure it's parallel to the caliper's long axis.
** If you don't want to use an actual ruler, you can print one using an ordinary printer, but you'll need to calibrate your prints first (see the section about adding a Vernier scale). It's a good solution, but if you can, I think using an actual ruler would be better.
Step 4: Add a Vernier Scale (To Achieve 0.1mm Resolution!)


To reach resolution of higher than 1mm (the scale on ordinary rulers), we need to add a way to read in between two ticks. To do that, we will use a Vernier scale.
I won't go into detail about how Vernier interpolation works, but the working principal is that we align a 2nd ruler next to the main one, who's scale is a tiny bit different than the original scale (for example, ticks on the Vernier scale could be 0.9mm apart, instead of 1mm). The fact that the Vernier scale makes a fraction of the main scale means that only one of the ticks on the Vernier scale will align with the ticks on the main scale for each distance, allowing you to reach resolutions better than 1mm. Usually, mechanical calipers reach 0.1mm, which is what we'll reach here. In my case, I used a Vernier scale which has 10 ticks with a diatance of 3.9mm between each one, instead of 4. This brings our measurements to a resolution of 0.1mm with uncertainty of ~1/40mm (it's actually lower).
We're going to print out a Vernier scale. To do that, we need to make sure that our Vernier scale is accurate! That is - it's dimensions are exactly what we want them to be. But ordinary printers are not designed to be so accurately calibrated, so how we do that that??
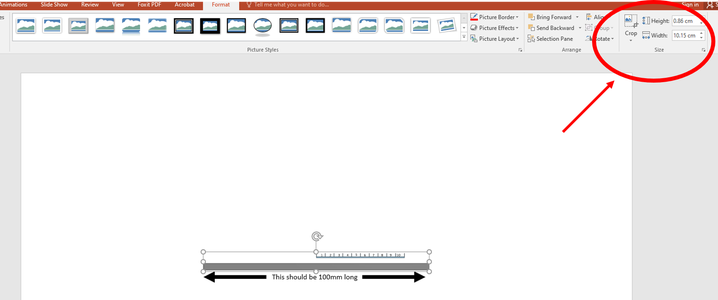
Attached is a PowerPoint file with 2 objects. Their dimensions were set so that if you print the template on an A4 printer paper (landscape), they print out to real size. There are two objects in the file, one is the Vernier scale, and it should measure 39mm long. The other is a long rectangle who's width is 100mm (see first image).
To make sure that your Vernier scale printed correctly first print the page as is. Next, measure the rectangle's length. It's probably going to be slightly different than 100mm, so you'll need to correct for that to get the Vernier scale just right. What you want to do is print the scale again, but this time ask the printer to print it so that the final print is in the correct scale (I'll show you how to do that in a second). First, note that the rectangle's new size should be:
100mm X (100mm / actual printed size)
For example, I printed my first version and measured the rectangle's width as 98.5mm instead of the requested 100mm. This means that I should ask the printer to print larger objects if I want them to be of real size. In my case, I should set the length of the rectangle to be 100*(100/98.5) = 101.5mm (see second image). This way, when I re-print the paper, it will be of the correct size. To change it's size, double-click the rectangle in PowerPoint and change it's width (see 3rd image). It worked perfectly in my case! (see 4th image). If you still have questions on how this is done, or if you need a different file format to work with, let me know!
Finally, cut out the Vernier scale and glue it on to the moving part of the caliper (see pictures 5 & 6). To glue it correctly, make sure that the caliper is closed tightly and that the Vernier scale is as parallel to the rule as you can get it to be. The first tick on the Vernier scale should match the first tick on your ruler (0 should face 0).
This step is crucial! Make sure you take your time and get it as accurate as you can, because this is what gets you to 0.1mm resolution!
** Tip - if you're using a dark color for your 3D prints, you can invert / edit the color of the template I attached so that the colors match!
Attachments

Step 5: You're Done!!


That's it! If you followed along, you should now have a perfectly working caliber! Enjoy! :)
If you liked my instructable feel free to visit my instructables page! If you have any requests or questions feel free to ask!
Step 6: BONUS - Left Handed Version
Here's a left-handed version of the caliper, so that the left-handed people here can finally have a tool made just for them :)
If you want to support my projects, you can buy me a (cheap) coffee :)
100% of all proceedings will go into future projects! Thanks!!


Judges Prize in the
Plastic Contest


