

Introduction: Simple Welded Steel Stools


Learning to weld is super fun, and once you get the basics down it's downright addictive.
This project will have you practicing cutting, welding, grinding and finishing metal with lots of tips that can make a furniture project like this one go quickly.
This project is a perfect capstone after following along with my Welding Class!
Step 1: Parts and Plans

This project was designed in Fusion 360 , a 3D design tool that is free for fabrication enthusiasts. If you want to look at parts more closely, I have attached the .f3d archive file to this step.


The stool I designed is 23" high, and 14" on each side. Each leg is a length of 1" square tube cut down to 22". To complete one of these stools/end tables you will need the following lengths of steel:
- 4x 22" lengths of 1" 16 ga. cold rolled mild steel square tube, for the legs
- 3x 12" lengths of 1" 16 ga. cold rolled mild steel square tube, for the cross beams
- 4x 14" 45 degree mitered lengths of 1" 16 ga. cold rolled mild steel s quare tube, for the cross beams
- 4x 8.5" 45 degree mitered lengths of 2" x 1/8" hot r olled flat bar steel, for supporting the wooden top
For finishing one stool/end table you will need:
- 2x 12" x 12" birch plywood squares
- 2x Spray paint enamel with primer and color
- 2x Spray clear coat enamel, I like matte finish, but look at your options
- 4x Plastic endcaps for 1" square tube
There are a few recommended tools for this project:
- A way to make mitered cuts. Be it a horizontal band saw , or a handheld portable band saw, a metal chop saw, or an angle grinder in a miter cutting stand, precise cuts make life so much simpler. We will join the top of the stool with 45-degree mitered frame made from the square tube. Making straight mitered cuts with a handheld angle grinder is not advised, and will lead to imprecise parts tolerances that are tricky to compensate for.
- A mix of welding magnets (at least 4) and clamps.
- Marking tools like a center punch or a fine tipped permanent marker
- And if you are a super perfectionist, a bull-nosed radial flap wheel, for more control over your grinding wheels abrasion area, and making sloppy fillet welds look fantastic.

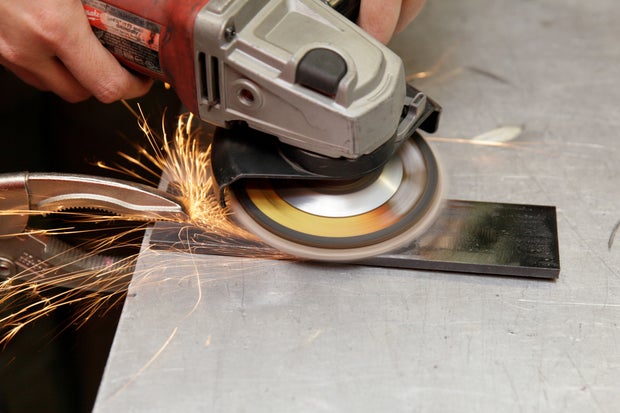
Be sure to clean and prep all of your parts for welding. You will need to wipe down all the cold rolled steel, and grind down the mill scale finish of the flat bar with an angle grinder and flap wheel.

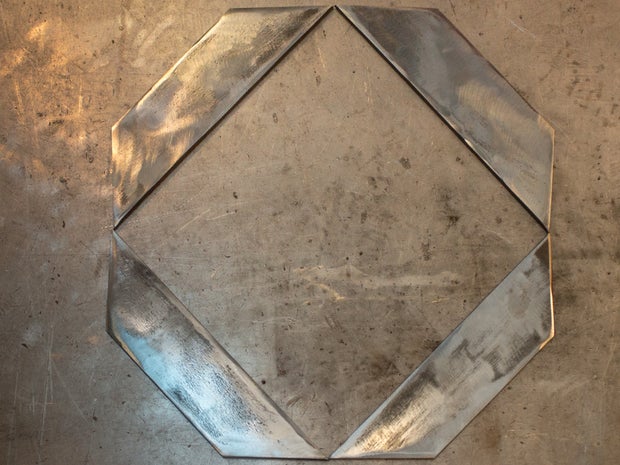
Step 2: Squaring, Tacking, and Welding the Top

Gather your mitred lengths of square tube and begin to seat them together with welding clamps or magnets.


Check the sqaure-ness of your top with a steel square, as well as with a measuring tape. You know you have nested your parts perfectly square when each of your diagonals of measure out to the same value. Make sure that your parts are aligning on the same planes as well, welding uneven material can be a pain once you get to grinding.


Once you have made certain that your parts are seated properly and are square AND flush, fire up your welder with the right settings for 16 ga. material place a tack weld in the top outer corners. Carefully flip your work over and tack the inside corners, flip again to get the inside corners of the other side, and one last time to tack the outer corners. We work this way so we can minimize heat distortion before we start forming weld beads around our cuts.

Once you have tacked your piece sufficiently, you can begin running weld beads along the top, bottom, and outside edge. There isn't really a need to try and jam your welding torch into that last inside edge to try and fillet weld the tube shut, unless you want this stool to go outside. The top is pretty much structurally strong once they are welded on just one side, but we weld 3 sides shut so that the surface will be smooth once we grind out our weld.


Tip: Welding thin-gauge square tube along the edges can lead to gaps and holes in your base material. If this occurs, it's a breeze to fix. With the tip of the torch move around the perimeter of you gap making small tack welds. This does mean that you have to spend more time grinding, so it pays to get your settings right the first time.


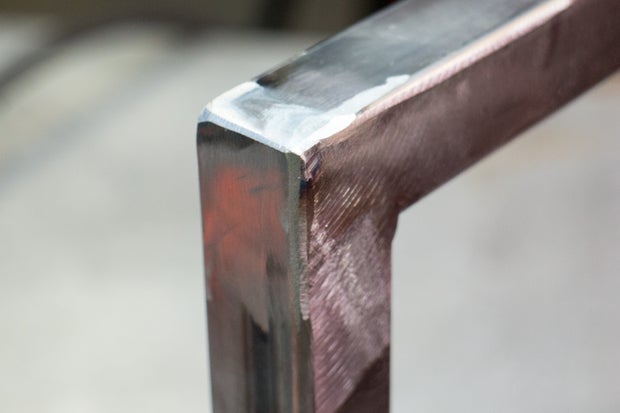
Grind out your welds, and make sure you don't have any holes in your weld before welding the outside edge shut. This edge will burn up quickly so consider lowering your voltage setting slightly. Smooth out all your welds with an angle grinder so that you have a continuous square-tube square-top :D.

Step 3: Building the Cross Supports

To build the cross supports, we will be welding up three 12" lengths of 1" square tube. My cuts were perfectly 12" long, thanks to the band saw, so I measure 5.5" in from each side and marked that spot with a center-punch.


Nest the perpendicular tube so that it is just covering the punch mark and secure with clamps and magnets, then check your square. Complete on both sides, making sure your material is both flush AND square.

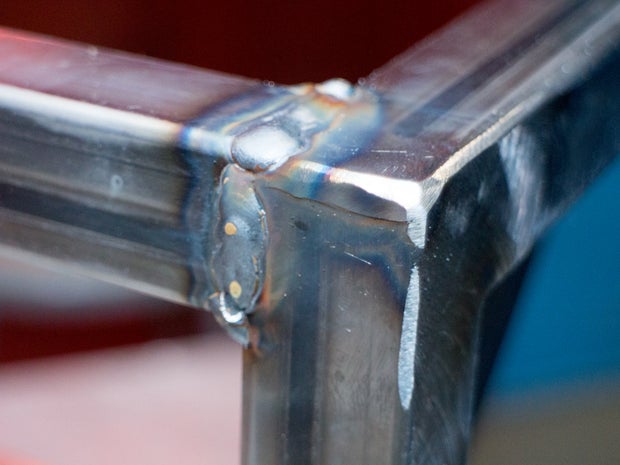
Tack the top of the jigged pieces in diagonal spots, flipping like we did when tacking the top of the stool to distribute heat evenly, and checking square as you tack.


Above, you can see the completed tacks as well as the heat affected zone of the tack welds. Be sure to take a steel wire brush to your material's surface before completing the weld beads.


For these welds, you do not need to weld all four sides of the tube. Since this is a piece of furniture that will never need to go outside, the tube doesn't need to be completely sealed. I chose to run weld beads on the sides I could easily grind out, and chose not to fillet the inside edges of the cross-support. If you want to practice your fillet welds, sealing thin stock like this is a great way to get your chops up.
Step 4: Get Dimensional

Once you completed building the top and the cross supports, you're ready to add the legs of the piece. This part of the build is the least amount of welding, but the most amount of measuring and squaring.


Begin by squaring, tacking, and welding the legs to the top. Be sure your welds are squared along the planes of each side, as well as the corner. You only need to perform two tacks and two weld beads along the outer edges for these pieces to be structurally sound. Any more welding at these joints will lead to unnecessary and timely grinding.


Once the legs are welded into place, weld the cross beams into place. I chose to weld the cross-beam 14 inches down from the base of the top, but feel free to modify the design in any way you see fit.
Step 5: Supports for Top

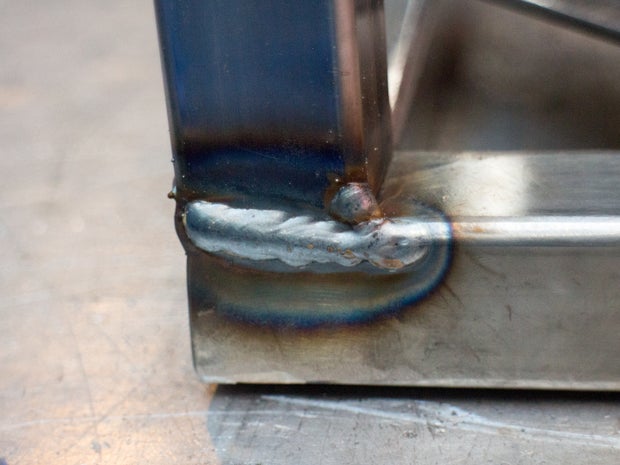
The last steps for welding and grinding this project is adding the supports that will hold the top. After milling the mill scale off of the mitered flat-bar, square fit it to the top of your project.

Set, tack, and run weld beads along the cut edge of your flat bar, securing it to the tube stock of the top.
If you need a refresher on how to execute a lap weld, check out the Welded Joints lesson. As you run the torch along the edge, you want to 'grab' the upper lip of the material with puddle, pulling it down towards the base material.


You want to set your welders' heat and feed settings for the thinnest material that you're working with. This means that even though we are working with a flat bar that is thicker than our tube-stock, we prevent burning out our tube stock by using settings suited for 16 gauge steel. I chose not to grind out these welds, because no one will ever see them. You will want to grind out all the remaining raised welds from previous steps, and potentially re-chamfer the edges along the corners of tube stock that have become sharp from grinding.
Step 6: Painting and Finishing

Now that your done with all that pesky grinding, you're ready for finishing! For this project. we are going to rely on the old standby of spray paint. In olden times, you would need to apply a primer first, but most colored spray paint available these days comes with primer in the formula already.


Spray paint (and really all enamels) adhere to metal when the base material has been coarsely sanded. This process gives the metal some 'tooth' for the spray paint particles to grab on to. I will use in succession 120 grit sandpaper, then 220 grit paper on the surface area of the project being painted. Then, using a lint free shop towel, I'll give the pieces one last solvent wipe down.


Best practices for spraypainting and enameling with a rattle can is to start outside of and end outside of your project. This way only paint molecules that are traveling at the right speed and the right shape, hit your project (no drippy globs this way!) Follow the coating instructions on the back of the rattle-can.
Step 7: Adding a Wood Top and Footies

This is the only non-metal related part of this project, but it's worth mentioning that once you start thinking in ways to introduce plastic and wood parts into your welding project's design, you've become an unstoppable maker, and there is nothing you cannot build ;)


These pre-cut panels are awesome for workshop projects like this one, but since it doesn't come in inch thick squares, I decided to make my own by gluing two squares together. For more guidance on how to glue wood panels, check out the Wood Glue lesson in the Glue Class.


Since these will be moved around a lot, I wanted to finish the legs with a material that wouldn't scratch my wood floors at home. These little end caps are designed to fit inside 1" square tube, and are made of tough, but flexible, plastic that won't damage sensitive surfaces. You can't push them in with just your hands so you'll have to use a hammer or a mallet to nest them in the tube.
Step 8: That's a Wrap!

Hopefully you'll make this project, or be inspired to design and share your own welded creation!


