

Introduction: Tissue Box Cover From Web App


In this lesson, we'll learn how to make a plywood tissue box cover using the Makercase web app. We'll learn how to use measurements and material thicknesses to generate a 3D object the easy way!
Laser cutters can engrave as well as cut, but for most makers, the ability to cut panels and assemble them into 3D objects is the most attractive feature of this machine. The Makercase web app will serve as a quick intro to this concept.
Step 1: Makercase Web App
First, open a browser and go to Makercase.com. Open a new tab and search for "tissue box dimensions". This quickly takes you to a page that's got all the info you need to get measurements for the box. I decided on a box that's 4 3/4" X 9 1/2" X 4 1/4". Of course, you could always buy a tissue box and measure it by hand.

Makercase web app

Web search for tissue box dimensions
Now that you know the dimensions, all you have to do is enter them into the width, height, and depth fields in the Makercase web app. Remember that most apps don't recognize fractions, so they need to be entered in decimal format: 4.75 deep X 9.5 wide X 4.25 high.

Set box dimensions
Choose 1/8" (.118")' for the Material Thickness. Note that the thickness isn't .125 because the actual dimensions of common off-the-shelf plywood are a bit smaller than 1/8". Regardless, you should measure your plywood to make sure the dimensions are correct. There's a "Custom" option in this drop-down menu. Since these are the overall dimensions of a tissue box, you need to click the Inside button to make them the inside dimensions of the plywood box.

Set material thickness
Choose "finger" for the Edge Joint type– this will make it much easier to assemble the box after it's cut. The box has a lot of tabs by default, so turn up the Tab Width using the slider.

Create finger joints
Next, click on the top of the box and click Round Holes in the menu that comes up. The default Hole Position is in the vertical and horizontal center of the top of the box, which is what you want since the opening for the tissues is centered on the tissue box top. I change the Hole Diameter to 2.75" and click Add. When you click Done, you've got a hole in the top of the box that will let you pull tissues out of the box.

Create hole in top of box
You can click and drag on the box to have a final look at it in 3D.

Click and drag to view box
When you click Generate Laser Cutter Case Plans, the app gives you a 2D layout of the parts that minimizes wasted space. The options here are Margins, Vector Cutting, Text Engraving, and Laser cutting Kerf.
The kerf is defined as the width of the cutting tool. With a table saw, for example, the kerf (blade width) is about 1/8" (3mm). With the Epilog laser cutter I'll be using, the kerf is .002" according to the company. Change the Laser Cutting Kerf to .002", or whatever kerf the manufacturer has listed in their product info and the app factors in this offset before finalizing the layout. If you're using Ponoko, you don't need to factor in the kerf.

Set laser kerf
Finally, click Download Plans and Makercase lets you download the layout in SVG (Scalable Vector Graphics) format, which is readable by Illustrator.
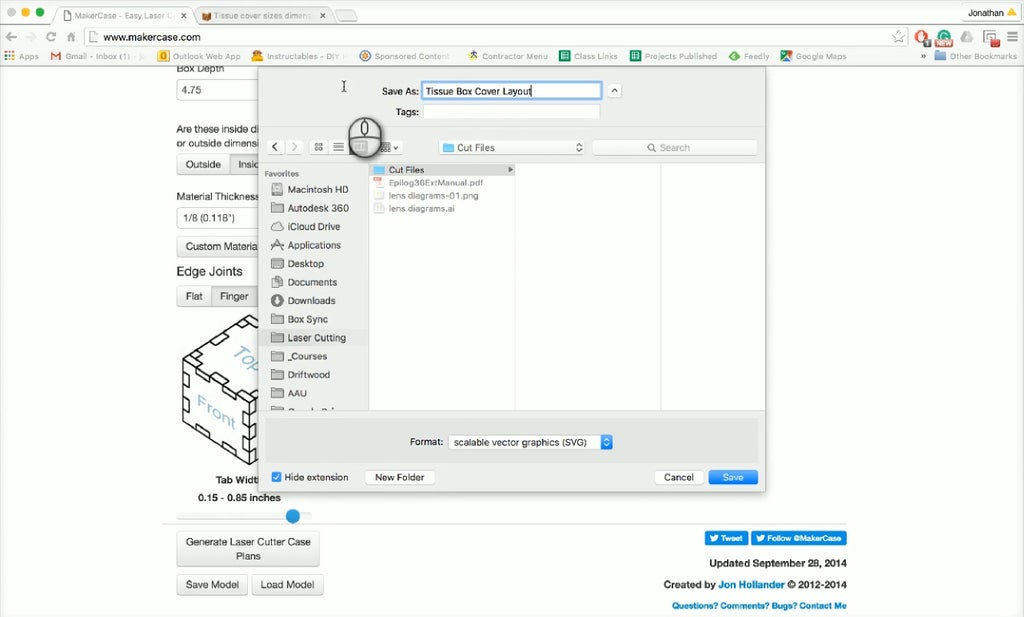
Download plans
Step 2: "Printing" From Adobe Illustrator
The box layout from MakerCase downloads in SVG format. This is a fairly universal file format that will open in Corel Draw, Autocad, and in our case, Adobe Illustrator.
I use Illustrator for projects like this because it's fast, easy to use, and it's so widely popular that you can get the answer to any question in no time with a Google or Youtube search. Programs like Corel Draw and Autocad will work with an Epilog laser cutter as well, but I find that the simplest and most ubiquitous go-between is Illustrator.
It's $20 / month, so it's not cheap, but I think it's worth the money. You can also cancel any time and sign up again when you need it.
Here are the steps for cutting the box from the MakerCase SVG file:
CHANGE STROKE WEIGHT
The laser cutter is just like a printer as far as the computer's concerned. It takes lines and graphics from the Illustrator file and translates them to cutting lines or etched graphics. In order for the driver to recognize the lines as "cut" lines, we have to change the stroke weight.
- Select all lines on the layout.
- Go to Window>Stroke to open the Stroke window.
- With all lines selected, change the Stroke Weight to .001. Depending on your default settings, the units for stroke weight can be PT (type point), IN (inches), or MM (mm). A stroke weight of .001 should be recognized as cut lines with any of these units.

Layout in Adobe Illustrator
Now that our lines have the proper stroke weight, we go to the Print dialog by going to File > Print in the menu (or CTRL+P / CMD+P).
- Set Printer to the address of the laser cutter. Your makerspace should have this set up already. In my case it's called "EARTH Laser".
- Set Media Size to ARCH D 24" X 36". This may vary depending on your computer / laser cutter settings.
- The size of my document is smaller than 24X36, so I need to place the layout on the media. Set Placement to the desired position. I always place my parts in the upper left corner of the bed, which from this view looks like the lower left- this is because the media is shown in portrait orientation.
- Click Setup... in the print dialog window. This will open the Epilog printing preferences where we will enter our cut settings.

Print Dialog
SETTINGS
Specific settings have to be entered for different materials. The Epilog Laser Settings PDF included in this lesson has a detailed list of recommended settings for different materials.
There is a list of "approved" and "forbidden" materials on page one. The "forbidden" materials are described as such because they either don't behave as desired when cutting / etching or they produce dangerous fumes. Don't give yourself cancer- use the "approved" materials!
The manufacturer has recommended settings for cutting and etching the materials listed in the PDF, but every laser behaves a little differently as a result of a variety of different factors. The User Tested Settings are the current settings that work on the Epilog in our shop, but I recommend starting with the manufacturer's settings.
Always decide on your material before you design anything, and make sure the material you want will work on the laser cutter. This will save you from using incorrect dimensions or planning for a material that will poison you while it's being cut.

PRINTING PREFERENCES
When you click Setup... in the print dialog, the Epilog Printing Preferences window should come up.
- With this project, we're only cutting, not etching. To cut, I set Job Type to Vector.
- Piece Size should be the size of my bed, which on this model is 36" Horizontal X 24" Vertical.
- Vector Setting will be unique for every material and thickness. I've tested 1/8" (3mm) plywood at Speed: 20%, Power: 90%, Frequency: 500.
Speed and power must always be balanced to create a full-depth cut without starting small fires. High-power / low-speed will tend to make the material flame up because the beam is lingering on the material for too long. Low-power / high-speed will prevent fires, but will not cut through the material completely. The settings used here seem to be the sweet spot for this material.
Frequency depends completely on the material used. Wood cuts at around 500Hz, acrylic cuts around 5,000Hz, and every other material will have a specific frequency that must be used for best results.

Epilog Laser Setup
Click OK in the Printing Preferences window, then click Print in the Print Dialog, and illustrator sends the cut file to the Epilog.
Attachments

Step 3: Cutting Time!
In the next lesson, we'll cover material prep and machine operation. What's your box going to be used for?
{
    "id": "quiz-1",
    "question": "Why is it important to know your material thickness before designing a box?",
    "answers": [
        {
            "title": "Because it's good to know what the box will look like.",
            "correct": false
        },
        {
            "title": "Because the finger joints will only fit if the thickness is correct.",
            "correct": true
        }
    ],
    "correctNotice": "That's right!",
    "incorrectNotice": "Though this is true, there's a more important reason."
}


