

Introduction: Understanding 3D Scanning


In basic terms, 3D scanning is a form of reality capture that allows you to recreate objects from the world around you in 3 dimensions in digital space. Different types of 3D scanning use different strategies to collect and process the data needed to translate the geometry of physical objects into 3D models. Some types of scanning create models that are purely geometric, and some also capture color data. Once you have a scan of an object in a 3D modeling program on your computer, there are all kinds of ways to use that model, from scientific research, to art, to industrial manufacturing.
The technology and processes that make 3D scanning possible are extremely complex, and I am not going to dive too deeply into them in this class. There are a few basic concepts about how 3D scanning works - and how 3D models are represented in digital space - that will help you get better results in your own reality capture adventures. In this lesson, I'll go over some of the basic types of 3D scanning and then talk more about the most easily accessible reality capture method called Photogrammetry. I'll also show you how to download and set up the 3D reconstruction software we'll be using.
Step 1: What 3D Scanning Is Used For

3D scanning or reality capture is a relatively new technology with a lot of exciting possibilities and diverse applications. Scanning gives you the ability to transform objects in the real world around you into 3D models in digital space. Once you have a digital representation of a physical object you can use it for anything from 3D printing to video game design and a million things in between.
In the product design world, going back and forth between physical prototypes and digital models with the help of 3D scanning can help streamline the design process, and create products that are ergonomic or designed to fit into unusual spaces.

Design by Alex Lobos, from the Remake Gallery

Design by Alex Lobos, from the Remake Gallery
Architects and contractors use large scale 3D scanning to map whole structures, rooms or landscapes, helping them measure areas and design site-specific buildings or other features.
 Model from the Remake Gallery by Chris Anderson
Game and VR designers use 3D scanning to capture elements of reality that can be incorporated into virtual worlds.
An increasing number of scientists, archeologists, and museum curators are using 3D scanning to capture and preserve natural and historical objects. Capturing 3D data about natural systems such as coral reefs allows biologists to observe changes that occur over time and study delicate ecosystems without damaging them.
 Model of an modern human skull from Kenya in the Remake Gallery
Creating digital models of historical artifacts also helps protect them from wear and tear as well as allowing them to be shared online and accessed by a much larger community. In recent years, several projects have even used 3D scanning to digitally recreate historical objects that have been destroyed by acts of war or terror. By collecting hundreds of photos taken by tourists and curators, and using a process called Photogrammetry (the 3D scanning method we will be using in this class), an object that no longer exists can effectively be given a new life, which I think is pretty magical. You can read more about historical artifact reconstruction in this Instructable by leFabShop.

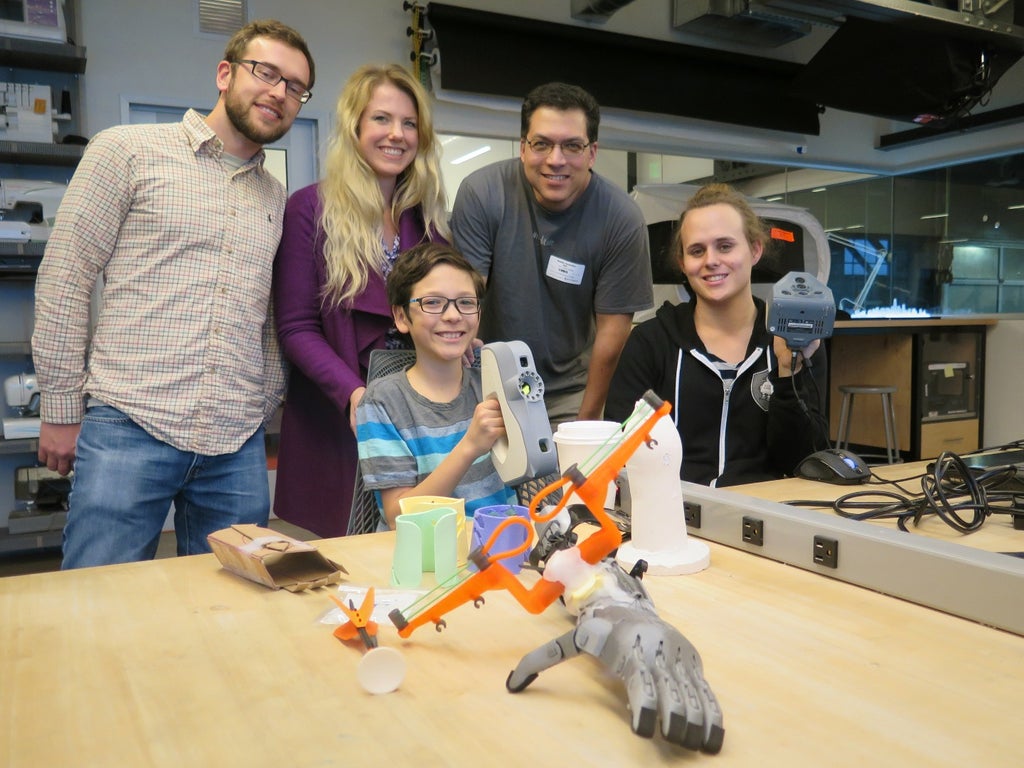
Another one of my favorite applications of 3D scanning involves creating 3D printed prosthetics for children with limb differences. Because kids grow so fast and limb differences come in many variations, having traditional prosthetics made for kids is often expensive and impractical. Groups like Enable are an international community of online makers who use 3D scanning, modeling and printing to create fun, inexpensive, customizable prosthetics for kids of all shapes and sizes! Check out this awesome Instructable by Amy Karl for more info about 3D Scanning for prosthetics.
When you are just starting out with 3D scanning, you might not be using this technology such complex applications, but there are a lot of other fun simple things you can do with scanning, like these Starfish Earrings I made with one of my scans. You can also check out the future projects collection at the bottom of the class page for some great examples of how other makers have gone wild with this technology.

Step 2: Types of 3D Scanning

Several different types of scanning technologies have been developed for translating the three dimensional real world into digital 3D models. Some methods are more accurate than others, some are better for different applications and others are simply hard to access outside of specific scientific and industrial contexts.
Photogrammetry: the most easily accessible form of 3D scanning, and the one we'll be using in this class, photogrammetry uses photos taken from multiple angles to reconstruct an approximate 3D model of an object. Because it is taking data from photos, this method can also recreate the color and texture of an object mapped onto the 3D surface. This makes it especially great for creating models that are going to be used in digital applications like gaming, VR, architecture, etc, but it can also be used to make models for 3D printing and other physical applications.
Structured Light Scanners: this type of scanner captures an object by projecting a pattern of light onto the surface while simultaneously photographing the object. Measuring how the light pattern distorts as it moves over the surface of the object allows the scanning software to recreate the object in 3 dimensions. These scanners can be very accurate once you know how to use them, but they can also be very fussy often take awhile to master. They are also expensive, and the software that accompanies them is usually clunky.
If you want to know more about the process of using a structured light scanner, check out this Instructable about the Autodesk Pier 9 scanners by gabrieltaft. The gif above shows the artist Amy Karl being scanned by one of the Pier 9 structured light scanners. You can check out more of Amy's amazing work here.
Laser Scanners: another relatively common 3D scanning technology, laser scanning maps an object by projecting a laser dot or line onto the surface and measuring the distance to the object at different points. By triangulating these points with the location of the scanner using photos taken at the same time, a 3D model can be constructed. These scanners can create extremely accurate models when used properly, but, like structured light scanners, professional versions are expensive.
If you want to know more about the process of using one kind of laser scanner, check out this Instructable by gabrieltaft about the Next Engine scanner we have at Pier 9.
Or, if you are up for a challenge and have access to a 3D printer, you can try following Instructables user Sardau's tutorial for creating this amazing open-source 3D laser scanner for around $30!
Step 3: How Photogrammetry Works

All you really need to create 3D models with photogrammetry is a camera and access to software that can perform the complicated algorithms required to magically turn a bunch of 2 dimensional images into something 3 dimensional. It can be a bit tricky to create perfectly accurate models with this method, but with a few tips and a little practice you can get incredible results without needing access to an expensive 3D scanner.
 Screencapture by Tatjana Dzambazova showing the positions of the photos taken to reconstruct this truck with photogrammetry
To photograph something for photogrammetric reconstruction, you need to take a series of overlapping photographs of an object from different angles. Photogrammetry software detects features on your object finding common points in overlapping pairs of photos which can be used to find the camera's placement in relation to the object for each photo. By solving for all of the common points simultaneously, the software builds a 3 dimensional representation of the object made up of individual points on the surface. This type of model is called a point cloud.

Point clouds are not quite true 3D models, but simply a set of points on a 3D coordinate system. They can be used for some applications like architecture and site scans that don't need to be edited. But for many workflows, point clouds need to be converted into a different kind of model in order to be useful. Most photogrammetry software does this automatically, connecting the dots of the point cloud and filling in the spaces to create a solid surface called a mesh.

Mesh models come in different kinds based on how the dots have been connected to form the surface of the model. Meshes can be made up of triangles or polygons, and different types of meshes are better for different purposes. ReCap Photo automatically creates triangle meshes which can be edited and sculpted in the Recap Photo editing environment and programs like Meshmixer. To export 3D files for more advanced modeling you will often need to convert them to another kind of model, like a quad polygon mesh. We'll talk more about these types of workflows in the last lesson.
Step 4: Choosing Objects to Scan


Because of the way photogrammetry works, some objects are easier to capture than others. The easiest scans are usually medium sized objects between about 8" and 36". Very small objects are also hard to scan accurately, as are objects that have a lot of crevices, or thin bits, like flowers or foliage. Very large objects also present problems because of the sheer number of photos required to photograph the entire object thoroughly, but with the right equipment, photogrammetry can even be used to capture rooms or landscapes, especially if you don't need an extremely detailed model as your final product.
Shiny, clear, or reflective subjects will be hard to capture because their surfaces look different from different angles which confuses the software. These kinds of objects can often still be scanned with some special preparation before they are photographed. Overly featureless subjects are also difficult because the photogrammetry software will not have enough reference points to reconstruct them.


Objects in motion are almost impossible to capture, which can make scanning the human body challenging, but definitely still possible. In the next lesson of this class I share a few tricks that will make capturing human subjects much easier.
With all this in mind, I'd suggest starting out with something medium sized, with a matte finish and some surface and color detail, but not too many complex cut-outs or delicate pieces. We'll talk more about how to deal with potentially tricky objects in the next lesson.
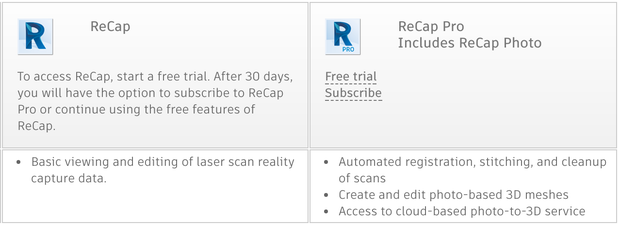
Step 5: Downloading and Setting Up ReCap Photo


If you've chosen to use ReCap Photo, you'll need to download and install it on your computer. Remember that it has a 30 day free trial, so if you want to be able to test its full capabilities before committing to pay for it, don't download it and then go on a month long vacation before you try 3D scanning anything. After the 30 days, you will only have access to the standard ReCap software, which does not include the photo to 3D mesh capabilities we will be using in this class.
ReCap Photo is a 'cloud enabled desktop app' so, while some of its functionality takes place online, you will mostly interface with it through your desktop. Go to the https://www.autodesk.com/products/recap/free-trial, click on the download for your operating system, and go through the install prices to add ReCap Pro to your desktop. In order for the program to run properly, you will need at least 4GB or more of RAM, and 10GB or more of free disk space on your computer and Windows 7 or later. You can read the System Requirements for more info.


If you are a student or an educator, you can also register for a free three year education license here.
To use ReCap, you will need to create a free Autodesk account. If you don't have one, you will be asked to create one when you download or you can Go to https://accounts.autodesk.com/register and create a username and password. With this account you will also get 5GB of free cloud storage space that you will need to store the photo sets you upload to create 3D models.

Once you have installed ReCap Pro on your computer, open ReCap Photo and check out the interface. If you want to follow along with this video, I'll give you a little tour. I created this video when the software was still called ReMake, but the interface is nearly identical.
On your desktop you will see a tab for your 'Dashboard' and 'Editor'. The Dashboard is where you will upload photos to be made into 3D models, and access the models you have already created.

The editor is where you will work on individual 3D files.

We'll talk more about navigating the desktop environments in future lessons, but for now, try exploring some of the features on the old ReMake site. I assume they will be migrating a lot of this content over to the new ReCap Pro site, but for now it still exists on the Remake site, and is still relavent. Check out this video for a tour of some of my favorite features of the site:
My favorite feature of the old ReMake site is the Gallery where you can browse thousands of scans that have been uploaded by users. It's a great place to get inspiration and even pick up tips.

Many of the models include data about how they were captured and users will often answer questions about how they created their models.

Another good section of the site to explore is the 'Learning' section. Here you'll find a PDF 'Getting Started Guide' and some videos that illustrate some of the fascinating ways remake is being used, as well as tutorial videos. I'll be covering all the basics of using ReCap Photo in this class, but if you come across something you can't figure out, you might find an answer here.

Step 6: In the Next Lesson...
Now that you have ReCap Photo set up and a basic understanding of how photogrammetry works, let's start scanning! In the next lesson we'll talk about different ways to light and capture and object to get the best quality scans in different situations.


