

Introduction: Useful Gestures - Sculpture Series


Useful gestures was inspired by the Marshall McLuhan quote, “We shape our tools and thereafter our tools shape us.” This series of sculptures explores human tool-making from the earliest, primitive material extensions of our bodies to the highly complex, computer-controlled data-verse we live in today. It is a journey from digits to the digital.
The project is also documented at http://xbremer.com/works/gestures.
This Instructable will cover the process of conceptual design, design refinement, software, and fabrication that led to the final series of sculptures. Rather than providing any specific instruction along the way, this documentation is more of a dive into the process that led to the final sculpture.
This includes:
- topic research - evolutionary biology, archeaology, art history, architecture, tool-making, psychomotor learning.
- hand-sketching
- 3D captures: 123D Catch, Meshmixer, Netfabb, MeshEnabler
- CAD/CAM: Inventor, HSM Works
- Haas VF-2 CNC mill
- DMS 5-axis CNC router
- Epilog laser cutter
- bronze sand-casting
- Bridgeport manual mill
- table saw, planer, joiner
- wood lathe
- hand-carving tools
- sanding
- finishing
Step 1: The Concept


The concept for this sculpture came during research I've been doing around psychomotor learning, creativity, and intelligence and their roots in our deep animal past. This has taken me through books and journals in archaeology, art history, architecture, evolutionary biology, and newer accounts of how our cultural evolution is affecting our minds, bodies, and relationships to the natural world.
The starting point was in the gesture of raising water with the hands, like what you would do at a clean, cold mountain stream in the middle of a hot hike to drink. So many of our creations over the past 100 millennia have moved us away from these basic gestures, adding intermediary tools and materials. Yet, everything we make relates to something we would do if lacked that special gene of invention that we think of as making us human.
I wanted to make hands become a bowl, obviating that tool-making instinct, and the relationship of the tools to the animal gesture.
I also wanted to use the DMS 5-Axis Router at Pier 9 Workshop to do machining using all 5 axes, so I immediately jumped into a 3D modelling workflow to cut my hands into wood. I was less concerned with the overall concept at this point, as learning a new tool.
Step 2: 3D Capture to Inventor


In order to get the shape of hands, I used Autodesk's 123D Catch software to capture the geometry. Even though there are more advanced scanning technologies at the Pier, this worked exceptionally well.
Once the raw data was on my computer, I began modifying it to prepare it for creating the critical spherical geometry and making CNC toolpaths, which I needed to do with Autodesk's engineering software, Inventor.
This turned out to be a kind of crazy hodge-podge workflow of strategies I cobbled together from around Pier 9 to turn my 123D mesh data into a solid model that I could edit in Inventor. That process is documented in a separate Instructable.
Step 3: Preparing for CNC Machining


The process of creating my part geometries and CNC toolpaths was a specific technical sequence of steps that I outlined in another Instructable which you can find here.
For me, this part is a kind of an agonizing removal from the physical world, exporting the thinking to a separate digital space where everything is premeditated. I don't enjoy it, but it allows me to quickly create shapes and geometries that would take far longer otherwise. I always leave room for my hands to do the final work to wrangle all the edges and surfaces just into place, and in iteration for me to have plenty of time with my hands on materials to think. So for now, it's just CAM CAM CAM.
Step 4: Machining Hands


The process of machining hands is a bit anal retentive, and always removes me pretty far from any creative process. It's a matter of being OCD that everything in the machine matches everything on your computer, and that the code between them agrees with that too. This part becomes pure precision execution, looking for ways to stable hold the work as it is machined, and how to orient it and locate it properly in the machine's X-Y coordinate system.
Once I did most of the rough cutting, I used the fourth and fifth axes on our DMS at Pier 9 to get into tough to reach contours of the model, which left less hand-work to do after the machining was done. You'll also see that to keep my model intact, I added tabs to hold the hands, so that as I machined my part wouldn't go flying when the machine reached the bottom of the model.
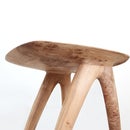
Step 5: Sand Casting Bowl


The concept I had in mind was to have a bowl hovering just above the hands I had carved, which would give a magical quality to the relationship of the two objects. That quality is exactly how magical I think what we can create from our hands is, so it felt like an appropriate way to make the sculpture. I designed a spherical extrusion into the model of my hands, and cut it in the DMS, as you saw in the previous step.
For the bowl, I matched the diameter of the sphere in the hands for the outer diameter of the bowl and chose a wall thickness of about 0.2" for the bowl, which allows for good flow of molten bronze in sand casting without much shrinkage. By matching the diameters, I would be able to build a small base under the bowl that would not be visible, since the curvature would block the view of it. That would make the bowl seem like it was magically hovering.
I used the Epilog laser cutter to take dimensions right out of CAD and cut them into templates that I could use to check my dimensions on the wood lathe as I turned the bowl for my sand casting pattern. I turned the bowl from a block of high density foam, checking against my templates for size.
Once the pattern was finished, I took it down to the foundry at Stanford's Product Realization Lab where I would cast it in bronze. This meant "ramming up" the pattern in a snap flask with oily sand packed around it that holds its shape once you compress it by pounding the sand around the pattern. Then, the pattern is removed, and gates, runners, and vents are cut to allow material to flow smoothly into the pattern and fill it entirely. Meanwhile, the furnace is heating bronze to well above it's melting point. You can see the temperature is at 2029*F at the last check before we "snatched" the crucible to set up for the pour. The pour is dangerous and not captured on film for your viewing pleasure, but that happened at around 1980*F.
After the pour, the parts are cleaned and the gates, runners and vents removed to prepare for finishing and post-machining.
Step 6: Parts Cleanup


With the bowl cast, I moved on to finishing the wood parts from the DMS.
This mostly meant removing the tabs left over from fixturing and smoothing them into the profile of the hands. I also used this point to make subtle changes to the shape that comes out of the machine. I believe very strongly in my hands intelligence, and love to work material to the point that it feels right... A piece of paper is only 0.003" thick, but you can feel a major difference if it is resting on a flat surface - all just to saw the fine shaping is something I only trust my hands to do. But a good model and solid machining gets me 99% of the way there.
This process went very quickly, first using saws, then chisels and gouges, and finally sandpaper to get the piece to a state I was happy with.
Finishing the bowl, on the other hand, takes way longer, since bronze is such a strong material. I used a hacksaw, the disc and belt sanders, a pneumatic grinder, and then the full spectrum of sandpaper, from 60 grit all the way to 2000 grit, to make a smooth, polished surface. Then I used the buffing wheel to polish it to a mirror finish, with the raw cast surface left untouched on the inside.
Linseed oil was used to finish both the wood and the metal. On the wood, it adds luster and a protective, natural sealant. On the metal, it does a little to prevent quick tarnishing, and acts as a buffer against fingerprints and the like.
Step 7: A Third Element


Once I had finished my hands and the bowl, I had mostly finished with what I set out to do... Namely learn 5-axis machining on the DMS.
But having taken a lot of time to get to this point, I felt I needed something more to get it to level I would be happy with for presentation. I wanted to hang the piece.
As I had been working, I had been feeling like a reference to the material world that the hands and then the bowl would contain was a critical component of the piece. I found a union between the need for a material element as well as a way to hang the piece.
I wanted to repeat the nesting shape to reinforce the power of the meaning of a bowl - one of holding, keeping and sharing - all magical things. So the three would be offset, with the bowl (as you can see in the images) containing all the complexity of the assembly, hung by clear wires from the ceiling.
Step 8: Completion and Reflection

Once I reached this point, I reflected on the work, and sought critique from my peers.
It felt a bit too literal in the relationships between the elements, yet at the same time unclear about how the sphere related. There was an idea in the solutions I had come up with, but I hadn't done the design work to flesh them out, since the early process was so driven by my desire to do 5-axis machining.
I was also unhappy with a number of things about the piece. Conceptually, it felt wrong to have the hands machined by CNC, and the abstract sphere form made by hand. I had something backwards. The string also felt unconsidered, as such an important element in the piece. The whole piece just felt a little bit literal as well, but was missing more of the gestural impact each of the elements that I wanted.
Once I realized this, I went to (not back to) the drawing board.
Step 9: Concept Development


Once I began rethinking the ideas behind the first version, I realized I wanted to expand the one sculpture into a small series, because I had too many ideas about different relationships between the materials to express in just one... And these different relationships spoke to different primitive tools that extend our reach into the material world as tools of fabrication, transportation, and community.
After developing the idea quite a bit, I settled on adding a hammer and a wheel to the bowl, and completing a simple trifecta and progression in form from cube to cylinder to bowl.
The bowl was representative of closeness created through giving, holding, and keeping - and I wanted to express materially the basis for the community it creates - all lifted off the ground. A tool that enables us to create community.
The wheel is a tool of transportation, which became about the precarious axial prospect of creating stable rotation, and making those gyroscopic, centripetal elements something linear, flat, and smooth. So should hang off-balance from the ceiling, with only the wood beneath the rim to keep it in a stable, perpendicular orientation, because the bronze throws off the center of mass. But that relationship to such a simple element - the linear - alludes to progress being a precarious balancing act with the appearance of straight forwardness.
The hammer is a tool of fabrication, focused on the looming weight of the cube hovering over the pyramid. I wanted to create a sense of the downwards force, weight, and gravity. The flat surface below the hammer is in relationship to a hammer's function - to pack or drive something flat and flush. I left the cube hovering to call out the force looming over and the potential energy of a hammer blow in a static object.
Step 10: Sketching to CAD


Once the concepts were pretty well nailed down, I refined the designs and dimensions around the fabrication process. I included marks of the machining, highlighting tool paths with mathematical stepovers to accentuate the artificiality, and emphasizing chamfers with a similar technique. Sketching is a very important tool for me in deciding on dimensions and fixturing, so I worked out these ideas before I dove into the CAD.
Step 11: CAD


Once a design mostly finished, CAD is my go-to tool for refining the itty-bitty details on certain key dimensions, integrating purchased components, and validating overall proportions. Sometimes I'll use CAD early to block out proportions and quickly see an idea, but usually most of the heavy lifting is done before I pull out the big guns... And a little bit of refinement happens at this stage.
The acrylic is all to be machined by CNC mill, the bronze is all sand cast, and the wood is all carved by hand from walnut.
Step 12: Ordering Materials

Once the design was done, I went to McMaster-Carr like a good boy and bought all the things I needed.
Step 13: CAM


Annnd, more technical nitty-gritty, preparing toolpaths fore the Haas CNC machine. Very similar process to the one outlined earlier so I won't go into more detail here. But not the pedal is to the metal and I'm cranking on getting these things built!
Each photo is of a different acrylic form to be CNC'ed.
Step 14: CNC Machining


This CNC sequence was mostly about figuring out a good order of operations for fixturing.
I chose to use 4x1" plates of clear, cast acrylic for the abstract forms in the sculptures. This was to add intentionally arbitrary complexity, which would require the use of extra fasteners (black oxide finish so they pop) and trickier fixturing operations.
Basically, I would mill to plates to be identical in width, and then clamp them together in the vise. Clamping two pieces is never a great idea unless you use strap clamps (vertical clamping pressure), but the first sequence of operations was basically just vertical milling (no shear loading on material) so there was less of a chance of one popping free. So by making them identical in size, the vise would grab both enough to drill and mill and tap holes and threads into the plates, allowing me to fasten them together.
Once two plates were fastened together, I could machine them as one integral component, since I worked out that the toolpaths and model geometry would leave the mill tools well clear of my fasteners during machining. Each form had its own set of fixturing challenges and solutions, which you can see somewhat in the later photos.
Perhaps even another Instructable is forthcoming on how I machined the cylinder and the sphere, which are especially tricky fixturing setups.
Step 15: Pattern Making - Hammer


I used the DMS router to make the pattern for my hammer. This piece needed to be quite tall, which made it a complicated pattern to make... With traditional methods. When making a pattern, the walls must be very smooth and their thickness needs to be change very gradually and consistently, so working by hand would have a slow process.
The DMS allowed me to work on my model in half. First I milled two identical blocks on the table saw, then used the DMS to machine half the pattern in each. Once the two sides were done, they just needed to be glued together.
Not pictured, I used a disc sander set to 10 degrees to add draft to the outside of the block and match the angles on the inner wall on the outer faces.
Step 16: Pattern Making - Wheel


The wheel was another tricky pattern, and could have been made on the DMS as well. I chose instead to turn half the pattern on the wood lathe. Which in retrospect was a mistake, but so it goes.
The pattern was turned from a block of high density foam, with a flange for a rim and a hub for post-machining a through-hole. The problem in casting came when it was time to work on the second side of the pattern - aligning after the flip was really tricky. I got incredibly close, but to do it again I'd make sure my parts were properly aligned by making both halves of the pattern.
Step 17: Sand Casting V2


This process was identical to the first round, except with different patterns to ram up.
At the end, you can see the parts are basically identical to the patterns once the gates, runners, and vents are removed. Just a LOT of sanding between there and the finish.
Step 18: Carving Wood

I don't have a ton of photos of the wood carving I did, but this gives you a quick sense.
I ended up using the table saw, band saw, and wood lathe to cut the rough profiles of the wood pieces I wanted to shape by hand. They all started from consecutive pieces of a walnut board. I left precise machine work on each of the wood pieces, but used gouges to remove material in a natural, hand-made way. This ended up being very responsive to the grain of the material, and became a rhythmic pattern of removing material, which left a very different surface then one would design in CAD.
These marks accentuate the difference between the precise machined finish on the top of the acrylic and the carved finish on the bottom of the wood. Each of the pieces in between is well finished, but still bears some of the natural marks of its fabrication.
Step 19: Sanding for Days


The title says it all. Bronze is hard.
I sanded using the disc sander and pnuematic grinder until the surfaces were smooth and regular, then used 80-2000 grit sand paper by hand and using sanding blocks to get the finish I wanted before going to the buffing wheel.
Step 20: Completion and Reflection


This project ended up very far from where it started.
There are many minor refinements and changes I would make, but this may become the basis for a larger sculpture or a scaling up in both size and complexity of these essential forms in order to better illustrate some of the themes it contains. I feel the contrast between the three pieces could be even stronger, with the progression between them made even more clear or stark.
Below I've copied some more writing about this series (from my website page), on the very off-chance that you want to read anymore blabber, having already made it this far...
Thanks for reading!
The Useful Gestures series explores the human instincts behind our use of the material world as an extension of the body, and how the things we create in turn shape us over time. The series includes three primitive types of tool making – tools for fabrication, tools for transportation, and tools for building community – represented by a hammer, wheel, and bowl.
Our immense tool-making capacity uniquely positions us to shape the natural world with ever more complex technology. What is the end-game of this innovation? Useful Gestures seeks to raise questions about the world we are creating for ourselves as we move further and further from our animal roots. The series employs hand-carved walnut and CNC-machined acrylic as conceptual bookends for the cast bronze objects in the center.
The wood pieces are hand-formed and represent a very intimate, gestural relationship with natural materials, and primitive shaping of them. The bronze pieces are the core of the sculptures – a mallet, a wheel, and a bowl – they are powerful, ancient tools that came as we moved beyond our basic animal interactions with the material world. With our large brains and opposable thumbs, these bronze tools are analogous to a spider’s web – a natural offshoot from our bodies into the material world. Creating such a durable object requires our intellect, skill, refinement, and craft – but it remains a part of the natural, material world as a re-meltable, re-alloyable piece. The acrylic pieces represent Platonic forms removed from the material world entirely, as our technology and precision machinery enables us to create highly technical machines and social tools. In the end, these are removing us from a direct engagement with the natural world, as we surround ourselves in layers of idea, artifact, and artifice.
The series plays with other artists’ use of raw material as an expressive medium. It borrows from Isamu Noguchi the raw power of materiality and material relationships that are seen in his carved stone sculptures. The pieces also look to Constantin Brancusi’s series of abstract bronze and wood sculptures, and their interplay of stacked geometric forms and materiality. Andy Goldsworthy’s natural work is an important inspiration as well – an icon of the impermanence of our creation, and the hubris of making something beautiful. It also draws on literature from evolutionary biology, archaeology, and psychomotor learning from authors such as Tim Ingold, Stewart Brand, Frank Wilson, André Leroi-Gourhan, and others.


![Tim's Mechanical Spider Leg [LU9685-20CU]](https://content.instructables.com/FFB/5R4I/LVKZ6G6R/FFB5R4ILVKZ6G6R.png?auto=webp&crop=1.2%3A1&frame=1&width=306)


