

Introduction: Using Fusion to Create Plug Molds


In this tutorial I'll be using Fusion 360 to create a plug mold for vacuum forming acrylic so that the end product resembles a blown-glass scale insect.
Materials used:
1/4 inch acrylic, clear and white
3/4 inch MDF, glued with wood glue for stock material
Krylon red spraypaint
iDye brand polymer dye
dust mask, latex gloves, wood glue, other consumables
Tools used for this project:
Epilog laser cutter
DMS 5 axis router
Vacuum former
chisel, mallet
drill press, drills
table saw, band saw
orbital sander, sand paper
air gun
pot and other equipment for dying
stovetop
Step 1: But It Looks Like A...
I'll be creating a mold for vacuum forming, called a plug. This project was a simple way for me to get the hang of using Fusion to model, modify and then make a plug mold using a 5 axis router, and how to make a plug for the vacuum former. I had a bigger project in mind when I started learning these tools, and I decided I would start with an easy model that I didn't care much about, so that I'd be more inclined to experiment and push the envelope rather than hanging back in the fear that I'd mess up a really beautiful sculptural piece. Think of it as a prototype. I believe that when learning a new process, material or technique, its important that we push ourselves as much as we can to think differently and explore the possibilities. So often folks around me become enamored with their very first experience and then spend the rest of their time working hard not to mess it up. As with any art, if it were easy to do the first time, everyone would do it. Instead, I set out to start my process with a piece I don't have too much emotional attachment to, so that in the end I'm happy with the learning rather than the artifacts I produce. Such is the case with this project.
I landed on this image of a scale insect, which I happen to know pretty intimately because they are bad bugs that get sprayed with pesticides, and sometimes those pesticides kill bees, which as you may know, I care a lot about. The form is organic, has multiple tiers, and gives me a chance to play around with the tools. As I was working with my model of a scale, it occurred to me, no doubt as it has occurred to you by now, that my scale sort of looks like...um, well...a turd. Believe it or not, having a model that looks like a turd helped my keep the focus on this as a learning experience, because if I got too picky or went too into the minutae of details, began to feel frustrated, or anything else that pulled me into an emotional space, I simply reminded myself that I shouldn't "Polish a Turd".
And so I won't mind in the least if you want to refer to this project by the title "Using Fusion to create plug molds orPolishing a Turd"
Step 2: Determine Your Form

So now that we're over the turd business, lets get serious about this project.
In the next steps I'll walk you through creating my model using Fusion 360 from development to fabrication.
First though, a few key points about vacuum molding for those interested.
Vacuum molding is a process where a sheet of material is heated to a temperature where it becomes flexible, then that material is sucked down over a form, giving it a shape. In the mold world this form is called a plug. Plugs have a few key aspects in order for them to work successfully. They must be made of a material that can stand the heat, they must be able to withstand the pressure put on them during the vacuum stage, and they must not have any undercuts which would trap the plug in the material. If your plug has a depression in it that you want visible in your material, it needs a hole through it so it to has a vacuum. And lastly, plugs work best if you allow holes in a few places so that if your material does get stuck, you can use an air gun to blow help release it.
I determined that the material I'd use for the scale insect would be a special type of acrylic that acts as a light diffuser when LEDs are directly in contact, called Endlighten. The thickness of the material determined that I'd need a vacuum machine that had quite a bit pf power, and that I wanted to exaggerate the height of each segment so that the details would still be visible through the thickness of the acrylic. The added height means that my plug has an easier time getting stuck in the material as it cools and shrinks, so the holes for the air gun are necessary.
I based my plug size on the available space in the vacuum former.
Step 3: Getting Started in Fusion


Now for a look at Fusion 360.
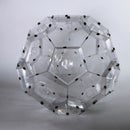
The first image shows the model when it was finished for your reference. The next set of four images shows how I created the first segment of my scale insect.
I started by toggling to the Sculpt mode by left clicking the 'Create Form' option on the drop down menu in the toolbar, then created a simple for.
In the Sculpt mode you have many different t-spline forms to choose from. From there I created a Quadball and then chose edit from the right-click options. I love this feature of Fusion because you can create endless organic forms just by pulling and pushing, rotating. Points, edges and faces are all fair game here. You can set the form to be a mirror image, so that whatever modification you make to one side are repeated on the opposite side. You can even increase the number of segments within a face for very fine details.
Step 4: Save Out Your Form and Repeat


Once I had my first quadball in the shape I wanted, I save it out by selecting 'Finish Form' in the toolbar. Selecting this takes me back to the main set of tools in Model mode and my timeline on the bottom of the screen. At any time, I can move my slider back and forrth along the timeline to open these forms and modify them as separate entities. This feature is one of my favorite in Fusion because it allows your models change in relation to all the different parts you created. Say at the end of modelling I want my first quadball to have a deeper indent- no problem, I just set the slider back to that action in my timeline and open that form, and I can edit it all over again. When I finish the form, my entire model will update to incorporate my changes.
Once my first quadball was created and edited, finished, I repeated those steps many times to create multiple tiers to my scale model. For the second tier I created a torus and then edited it before finishing the form. For each new tier I did the same step: creating a sculpture form; editing it by pushing and pulling on points and splines; rotating and pinching.
Step 5: Make Your Model Watertight


Once I had my tiers created and stacked, it was time to check the model for holes. Since I used a torus for most of my forms, there were holes in places and a depression in the bottom. Were I to pop this model into my CAM software, the program would try to send tools to cut out this bottom part and any interior cavities I may not see unless I'm looking for them. My model had some gaps, so I created a sphere to fill them, as I've shown in the second image. When all those tiers were closed up and ready to go, I joined them into one form.
Once my model had no secret gaps, I put a rectangular base on it so I could clamp the stock in the machine without tools hitting it. I did this by creating a box and then joining it with the first form. Then I pushed the bottom up to thin it, and my model was ready to go.
Step 6: Set Up Your Toolpath Using CAM


One of my other favorite features in Fusion 360 is that the CAM software is built in. From the dropdown menu in the toolbar, select 'CAM' and your model will open in the CAM program. Need to fix your model? Just toggle back to the 'Model' program and your model can be modified as you like. I love this!
The CAM interface looks much like the Model interface but with a different set of options in the toolbar. First you need to set up your model's parameters. Do this by selecting 'Setup' and you'll get a window with tabs. I've included a screenshot of each of the tabs so you can see the different options available in each.
In the Setup window you'll determine the size of your stock, where the starting and stopping points will be, and how your final model will be positioned withing the stock.
Step 7: Import Your Tool Library


Now I'm not going to lie, this part is still a bit of a mystery to me. At Autodesk we have awesome shop staff, and Dan is a rockstar. He created this tool library, and many other libraries for the other machines, and alls I had to do was to find it on our server, import it into Fusion using the window I have shown here, and *PRESTO* all the tools I could ever want or need are there in the toggle menu for me to use.
Here is the Instructable Dan has set up with all the tool libraries.
Step 8: Select Your Toolpath


Now its time to select one of those lovely tools and tell the machine what to do with it. Do this by toggling down from the 3D window in the menu. You'll see there are many toolpaths to choose from here, and when you hover your mouse over each it will give you a description on each. I found that the adaptive clearing tool was pretty amazing for my material and my form, since it first uses a roughing path to remove material and then takes a second pass to smooth.
In each toolpath, a window will open giving you tabbed menus. Most of my tools had all of these details already determined, thanks to Dan, but here is where you tell the machine how fast to turn the spindle, how far the tool should overlap on each pass, and where to start and stop the milling on the stock. You'll also select the type of cooling, and on our DMS machine we have this really cool vacuum hood for sucking up the dust, and the option for turning that on is found here.
Once you've made your selections, you can simulate the toolpath to check for possible errors or collisions. This feature makes it really easy to use Fusion for your first milling project.
Step 9: Post Process and Import Your G-Code to the Machine


Here is where it gets interesting. I could write an entire set of Instructables about how to use the DMS to mill your models, but luckily others have already done this. Click here. At the Pier 9 Workshop we have a great set of instructions that you can flip through step by step to help the process.
With any CNC mill is that workholding is the most important part of the workflow. More projects fail because halfway through the milling process their pieces start to wiggle, jiggle, or break free completely. Once this has happened, you're better off starting again from scratch, because trying to reposition a piece after milling has begun will use up as many hours as you lost originally, and no good can come from Polishing a Turd.
For this project I used MDF and woodglue do build my stock. You should use enough glue so that its dripping off the edges, that way it doesn't come unlaminated in the milling process.
Another thing to keep in mind is that you will most likely be at the machine for an extended period of time, so plan for it. Eat a meal, have a closed container of liquids at hand, and wear comfortable shoes. I found the boredom was eased by listening to an audiobook, and it helped me to keep my eyes on the prize and nto be distracted into conversations going on around me.
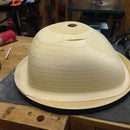
Step 10: Finishing the Plug


Depending on how well the milling went, you may have some more finishing work to do after your piece leaves the CNC. If you have thick material, you may not need to smooth out the tool marks from the milling. I made a few of these plugs, adjusting my settings and using different mill tools to see what worked best, and so some had to be hand sanded and others were just perfect as is. My first piece needed more of the base removed, so I ran it over a table saw multiple times and then chiseled off the bottom.
Don't forget that plug molds work best when you include a place for the air gun to blast. The hole on the surface of the plug can be tiny, but make the hole leading to it form the bottom larger so you can fit a nozzle in.
MDF is lovely, nasty gritty material that cuts like butter and makes dust that will kill you when you're old and feeble. Make sure to use a dust mask or respirator, and bonus for a dust collection device.
Step 11: Test Run and Final Forming


At the Pier 9 Workshop they have a small vacuum former that works for thin materials, so I used it to test my mold for undercuts and any unforeseen issues.
Then I laser etched my acrylic in the Epilog laser so the underside of the scale would have some tooth to it.
The real deal Vacuum former is housed at Techshop in the city on Howard street. It's a powerfull machine, and not too many people use it. Not all my plugs worked, as you can see from the images I've included. I made notes on the backs of the plugs that worked and the ones that didn't in order to inform my next process.
Step 12: Ok, So I'm Polishing Now...


Most of the plug molds came out great, and I found myself becoming fond of the little turds. So I found a way to continue their usefulness towards learning more about acrylic.
First, I kept the process going, learning how best to trim the edges to get an even base, so that on the next project I'll have a better sense of what to do to make two pieces fit together tightly. The acrylic cuts beautifully on the band saw, and an old recycled band of sandpaper from the belt sander adhered to plywood made nice work of leveling the bottom edges.
I decided to test out dying the acrylic with an ombre texture, and it worked out beautifully. I used iDye for polyester, and mixed it up in a very strong batch. The directions call for the object being dyed to sit in the pot while the dye boils, but that just isn't a good idea with the acrylic considering it was heat that made the shape in the first place, so I just let it boil and then soaked the pieces in an aluminum pan.
Step 13: Added Interest


I noticed that after I'd dyed my acrylic that it looked really good when I set it back on top of the red plug mold. I decided to paint a second set of red scales to live under the dyed acrylic, and was very happy with the outcome.
Perhaps these will some day shine in a spotlight of their own, but making these plug molds from scale insects was a great way to learn the process. This exercise allowed me to be more comfortable when I embarked on my next project to make a collaborative sculpture for my bees. See that project here.
Step 14:


