

Introduction: XBox EEPROM Reader/Writer (Alternate Version)


In this build we'll be using a few different tools than our last build and creating most of our solder points at the base of the serial port.
Tools You'll Need:
1. Wire Strippers
2. Soldering Iron (and Solder)
3. Glue Gun (and Glue Sticks)
4. Heat Gun (optional)
5. Grinding Wheel (not pictured)
Parts List:
1. A Case of some sort
2. Female Serial Connector
3. Heat Shrink Tubes (optional)
4. (2) 5volt 1W Zener Diodes
5. (2) 4.7k Ohm Resistors
6. Alligator Clip (optional)
7. Pin Header (optional)
8. Electrical Tape (not pictured)
9. Some Wire
10. Zip Ties (optional)
11. Razor Blade (optional)
Note that these resistors are stackable. What I mean is say you only have half of the required ohms, you may twist two together to get the desired amount. I believe you may use anywhere from 3.9k ohms to 4.7k. I myself have built one of these cables with four (2 twisted together separately) 2.2k ohn resistors without running into any problems. If unsure of the resistance, there's a free app on the Google Play Store called ElectroDroid that will assist you with the resistance according to colored bands for your convenience. The 4.7k ohn resistors I've used here consists of four bands; Yellow, Purple, Red & Gold.
Step 1: Serial Port Prepping


We start off here by slicing the wire from the serial port and grinding off the casing all the way to the metal pins. Note that we do not want to over do this, just until all pins are visible.
Step 2: The Resistors.


Pins 6 & 7, we'll want to make a solder bridge across the two and solder a resistor to it. Now solder the other resistor to our 4th pin and solder the other end of that resistor to the 8th pin.
Step 3: Diodes & Ground Wire.


Now twist the two diodes together on one end and solder that same end to the 5th pin. Note:the black lines should be facing upward away from the twisted portion. We then solder one of these diodes to the resistor joining pins 4 and 8 together and also solder the ground wire underneath the joined diodes on the 8th pin.
Step 4: Red Wire.

Now solder the red wire to the resistor with the diode attached to it (after the black line on the diode).
Step 5: Tidying Up.


Twist the remaining end of the diode to the other resistor, solder them together along with the third wire and cut off the excess length.
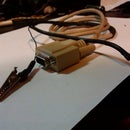
Step 6: Fitting the Case


Now to fit our creation to the case! Really not a lot to explain here other than making sure nothing touches before adding the hot glue.
Step 7: Final Steps.


Before going any further, this would be a good time to slide on the first heat shrink tube. Traditionally, I like to keep the wires red, green & black however during this build I was running short on supplies and had to suffice with a black wire on the red. Keep this in mind as not to mistake it for the ground wire. After soldering each wire together I recommend using just a little snippet of electrical tape to ensure there are no bridged connections.
Before attaching the alligator clip, slice a little piece of heat shrink tubing to slide over the end of it. Now we can take a razor blade and cut two pins from the pin header. Remove the pins and solder them individually. Do make sure not to use too much solder here or wrap a little bit of electric tape around one (or both).
Step 8: Lastly..

Lastly, put a heat shrink tube over the two wires and shrink it down with the heat gun. I recommend twisting the wires together to ensure it isn't more bulky in some areas. While testing I found the pins to push themselves out of their sleeves so I eventually added a zip tie directly after them. This also allowed me to visually identify which pin was which being that they were now covered. Now head on over to Lancos, download a copy of PonyProg and get reading/writing!
Step 9: Final Notes.


To set up PonyProg, choose 'Setup' at the top of the screen and 'Interface Setup...'. At this point, choose which COM port has your serial cable attached to it. If you're unsure, (on a Windows OS) right now press the Windows key + R and type devmgmt.msc. In the list should say "Ports (COM & LPT)", the underneath, "Communications Port (COM'#')". After verifying, hit 'ok' in PonyProg and 'Setup' again, "Calibrate" (if it doesn't automatically insist). Now you're ready for your first reading! The picture provided shows the SDA & SDL locations on the 1.6 LPC however I am unsure of the locations for other versions. To be safe, connect to the pins listed on the eeprom chip itself or do a quick search based on the version you're working with. Note the yellow marker in the picture is to verify where the dot on the eeprom chip is, use this as a guide for all other models.
How To:
Before taking a reading you'll first have to understand how to take a reading, of course. First disconnect the DVD-Rom & hard drive from the motherboard. Plug power cable as well as the video cable into the XBox (otherwise you'll be stuck with a solid yellow light). Now power it up and just wait for it to start flashing red. You may now take a reading. Place the prongs onto the pins of the eeprom and hold them there. While still holding them there hit the 'read' button located in the far-left corner of the PonyProg window. It will notify you of success and give a long, strange code of what seems like gibberish. Now file, save as.. Be sure to save it as a .bin then Google 'Liveinfo Beta 3' to read your eeprom easily. That's it! Now you may use this key to repair your XBox, softmod, upgrade to a bigger hard drive, etc.If you found this guide helpful, please leave a 'thanks' in the comment section. I hope this helped more than the other guides out there on the subject. I'm sure I'd have been more grateful to have this than what I found. Thanks for checking out my guide and if you've yet to try it, good luck! I hope this makes it seem less intimidating as well.

Participated in the
Fix & Repair Contest

Participated in the
Teach It! Contest Sponsored by Dremel

Participated in the
Tech Contest


