

Introduction: How to Fake Script Calligraphy!


How to Fake Script Calligraphy!
Scrolly, scripty, flowy, gorgeous penmanship is all the rage right now!
Calligraphy is beautiful, but requires some supplies...
hmm, I guess not the fabric crayons...
My mom taught me Itallic Calligraphy when I was in 6th grade.
I also learned Black letter and Uncial.
Here's the thing though...
The ink is hard to regulate...starts to bleed...and is so hard to fix any mistakes!
Which is why #1: it's a dying art
#2: not many people have time for that.
#3. I'll show you a better way!
Step 1: Supplies!

I prefer a fake approach.
I even used a fake approach on my wedding announcements. Whatever works!
I love to use a set of Micron pens.
I "borrowed" these from my daughter who got them for her birthday.
You can start with just a regular pencil and paper.
You can use sharpies, markers, gold pens, paint markers, etc.
Step 2: Scripting


Let's fake Calligraphy!
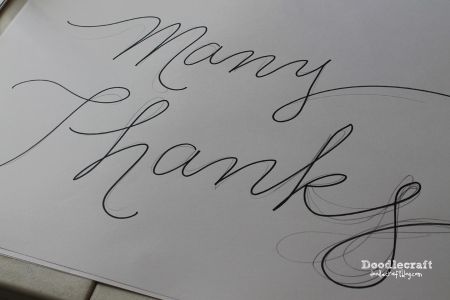
I started off by writing out the word
Congratulations
in a exaggerated drawn out cursive...remember cursive?
This is where 3rd grade pays off.
(doesn't look so great, right?)
~
Then take a smaller sized tip pen and draw lines
to add thick and thin brush strokes. This is the "fake" part.
I can even "fix" problem areas...like add a loop to the "r"...
and adjust the weird "u".
Essentially giving you tons of leeway!
~
Then get a bigger size tip and fill in the lines.
Looks great right?!
Here's some tips I had to force on myself:
Keep letters connected...like cursive...it's so hard for me!
Also...no bottom or top lines...it looks so much cooler when the letters rise up and down...
Next, add some curls, and over-exaggerated lines!
Step 3: Sharpies!


Here's how I did it with Sharpie Markers!
Pencil first.
Then I used a big sharpie and traced my letters...
Sharpie's tend to bleed a little on the paper too...depending
on how porous the paper fibers are.
Used an eraser to remove the pencil lines...
Next, pick up a smaller Sharpie...and
draw on the thicker lines!
Fill them in...and voila!
It looks so much better!
Step 4: Paint Time!


You can also use paint!
First pencil, then Sharpie the image you want.
Place your paper over the top...see how I can still see the lines from the marker?
Then use a paintbrush and some metallic paint and paint the calligraphy!
The flat paintbrush naturally mimics the blunt nib of a calligraphy pen.
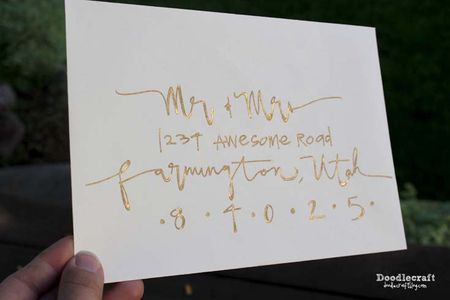
Step 5: Gold Pilot Marker!


My favorite option is a Gold Pilot Marker!
You can write on any color of paper and it pops right off the page!
I am practicing on my mini envelopes!
Create custom envelopes for Christmas cards, wedding invitations,
or just to say hi!
People love a handwritten card...it shows that you took time out of your day!
I just wrote 100 addresses for a lady getting married, in this exact style!
This is the icing on the wedding cake--beautifully scripted art!
Step 6: Handmade Admiration!
After doing 100 envelopes, I have one more trick:
Stretch the cursive text out as far as you can!
When addressing an envelope, you need to be sure the post office will be able to deliver it.
We opted for scripted names as well as city and state.
Then the street address is written as a simple font with a big stretched out zip code.
Check out my blog Doodlecraft for more daily awesome!
Please vote for me in the wedding contest too!

Participated in the
Wedding Contest


