

Introduction: How to Install a Linux OS in Your USB Flash Drive and Turn It Into a Portable App Suite

Do you want to add more functionality to your flash drive? Did you ever wish you could do more than just put in files for printing or copying? Did you know you can install a Linux operating system in your USB and bring it wherever you want? Also, did you know you can install "portable" editions of your favorite apps in your USB? So whenever you borrow someone's computer and they don't have your favorite browser installed, you can just plug in your flash drive and all your settings and preferences are automatically set just the way you want it! With this instructable, you can do just that!
Step 1: What We Will Need!
So these are the basic requirements for this tutorial:
1. A USB flash drive, at least 4GB in capacity. 8GB or greater is recommended though. The bigger, the better.
2. An internet connection.
3. A computer running Windows.
4. A resolve to continue knowing the risks involved, which aren't really that drastic as long as you follow the instructions.
Now once you've acquired the above, let's get started!
Step 2: Downloading the Ubuntu OS and the USB Installer


You've probably heard of the term Linux, it's a kind of operating system, similar to Windows. Linux comes in many different forms or flavors if you will, called distributions. The most common of which is Ubuntu. And Ubuntu is what we'll be installing in our flash drive.
Now head on down to the following link to download the OS: http://www.ubuntu.com/download/ubuntu/download
Click on the big orange "Start Download" button to, well, start the download. Depending on your internet connection, it may or may not be finished in a few minutes. If not, go and make yourself a cup of coffee or something then watch some TV. Once it's done, make sure of it's location in your computer. It's probably either in your "Downloads" folder or your Desktop.
Afterwards, click on this link to go to the download page of the USB Installer for Ubuntu, then click on the "Download" after scrolling down a bit: http://www.pendrivelinux.com/downloads/Universal-USB-Installer/
It would be best if you save it on the same location as the Ubuntu ISO, and even better if they're on the Desktop.
Step 3: Installing the OS Into Your USB


Now that we've prepared everything for the OS installation, it's a good time to plug in your flash drive. Before starting, make a backup of its contents to your computer just to be on the safe side. Take note of its drive letter, in our example, it's drive G:/, and its capacity is 8GB.
Now double-click on the USB Installer we downloaded in the previous step, click yes if the User Account Control prompts you to allow the program. Now, let's do this step-by-step:
1. On the first screen, click on "I Agree".
2. After that, it'll let you select a Linux distribution from a drop-down list, click on that and select "Ubuntu 11.04".
3. Disregard the "Download the iso" option as we have already done that.
4. Now click on the "Browse..." button and go to where you saved the Ubuntu ISO file then double-click it.
5. Next, and be careful on this step, because you may get confused if you have any other flash drives plugged in. Click on the drop-down list where you will select the drive letter of your flash drive. In this example, we will select G:/, but it may be different in your computer.
6. Take note of the "Format X:\ Drive" option(with X being the drive letter of your flash drive). It's NOT really necessary, but you may want to have a fresh look on your drive after installation, if yes, then select this option, it'll format it to FAT32, which is normal. You can copy everything from your backup afterwards.
7. After that, click "Create" to start the installation. A dialogue box will pop up, stating what it will do to your flash drive, this is normal, after reading it through, click "Yes".
8. Relax and let the installer do its thing. After it's done, click "Close". When you check your flash drive, it probably has less space remaining than before, obviously because we installed the OS, but don't fret, it's probably only 1.5-ishGB. Also, you may be surprised of the funky sounding files and folders inside, like "casper", "pool", and "md5sum", but it's all part of Ubuntu, so don't worry and don't delete anything.
Step 4: Testing Out Ubuntu


Now that we have Ubuntu installed in our flash drive, why don't we take it for a spin? Do know this part gets kinda tricky.
So, remove your flash drive and Shut Down your computer. When it's off, plug in your flash drive again then turn on your computer. As soon as you press the power-on button, keep pressing F10(or F12, it depends on your computer) to access the BIOS. The BIOS(or Basic Input Output System) may look rather strange because of all the text and complete lack of graphics, and the fact that you have to use your keyboard to navigate around the menus.
A WORD OF CAUTION, MESSING WITH THE WRONG SETTINGS IN THE BIOS CAN LEAD TO PROBLEMS. BE EXTRA CAREFUL IN THIS PART.
Let's do this step-by-step again.
1. Once you've gotten in, navigate to the "System Configuration" menu.
2. Look for the "Boot Options" or something similar to that. It'll take you to another menu.
3. Then go to "Boot Order" or "Boot Priority" (BIOS'es are all built different depending on your computer's motherboard).
4. Once you've found it, change the order of the system boot with "USB Flash Drive" or "USB Disk Key" or something similar on the very top of the list, meaning it should be the first in terms of boot priority. Check the BIOS's instructions on how to do so.
5. Afterwards, save your changes and restart your computer(take note some BIOS'es boot straight into Windows after exiting, but don't worry, you don't have to go through it again, just restart from Windows).
You will then be greeted by the Ubuntu Installer boot menu, wherein you should select the first option, "Run Ubuntu from this USB".
After a few loading screens(and some matrix-style messages popping up) you'll be greeted by the Ubuntu desktop, and voila, you have successfully installed and ran Ubuntu from your very very awesome flash drive. You may now pat yourself at the back and gain a few bragging rights.
Once you're done tripping around Ubuntu click the I/O button on the upper right corner to see a menu from which you can shut down the computer. Then remove your flash drive afterwards.
Now we're done with the first part of the tutorial! Congratulations! Now, on to the part where we install portable apps on your flash drive!
Note: The portable apps we're talking about here are different from the apps you may have seen in Ubuntu, meaning these portable apps are actually programs you run in Windows, not Ubuntu. So if you're thinking "Wait, so I gotta go through all that BIOS matrix stuff just so I can run a portable app?" think again. Ubuntu is just there for the purpose of say, your Windows OS borked on you and won't start. Using your flash drive, you can boot into Ubuntu instead of Windows and may have a chance to copy all your important files on a separate drive before completely re-installing Windows or still be able to catch the girl you like online on Facebook through the Firefox app within Ubuntu.
Step 5: Downloading and Installing the App Suite Pack


This part won't be as hard as the first one, you can probably tell because we're downloading and installing in the same step, so chill. Portable app suites, somewhat like Linux, come in different forms. But probably the most common and handiest one is from PortableApps.com.
So head on to the following link, scroll down a bit, and click on which suite edition you want (the "Suite Standard" is recommended): http://portableapps.com/suite
If you're worried about the amount of space you'll be sacrificing, you can pick the other editions which are more merciful in terms of install size. Also, if you think your flash drive looks cluttered from all the Ubuntu files, you can hide them by opening your flash drive, pressing CTRL+A on your keyboard, right-click any item then click on "Properties". Check the "Hidden" option near the bottom then click "Apply". All clean! Doing this won't affect Ubuntu.
Once the download is finished, double-click the installer. It's pretty straight-forward. But to be on the safe side, let's do it step-by-step:
1. On the first screen, click "Next".
2. On the second, click the "I accept...agreement" option to agree then "Next".
3. It get's a little teensy bit tricky here, but nothing to be worried about. Click on the "Browse" button and from the window that pops up, click on your flash drive(the flash drive's name itself, not the little arrow beside it), which is probably named "PENDRIVE" because of Ubuntu.
4. Click "OK" then "Install".
5. It might take a little while, so you can take a break in the meantime. If it looks like it stopped, it didn't, it's just extracting the apps from the installer.
Once it's finally done, click on "Finish" the portable app suite will start up for the first time. It looks very similar to the Windows Start Menu, so navigating shouldn't be so hard.
Step 6: Installing/Adding New Portable Apps


If you installed the "Suite Standard" edition, then you already have a plethora of apps to enjoy time with. But if you went "Gasp! My favorite browser of all time, Google Chrome, was not pre-installed! Oh woe is me! Fare thee well good internets..."
Do not fret Chrome user! Installing new portable apps is as easy as pie! Whatever that means. There are two possibilities in this situation, the portable app is available in the PortableApps.com site or the portable app is not available in the site but available elsewhere.
Situation 1: The site: http://portableapps.com/
1. Use the search bar on the upper right to look for the app you want.
2. Once you've found it, click the "Download <Version number>" button.
3. It'll save as a ".paf.exe" format. Double-click it to install.
4. Follow the very straight-forward instructions. It'll automatically detect your flash drive.
5. Done! Enjoy the beauty that is your new portable app!
Situation 2: Not available at the site...but available somewhere else. Make sure the app is in a portable form, usually just a single .exe file.
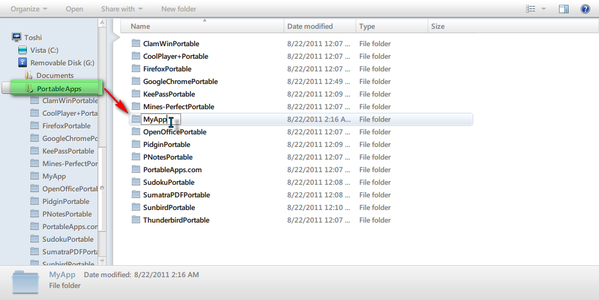
1. Download the portable app from wherever you got it.
2. Make a folder inside the "PortableApps" folder in your flash drive. For example let's say, "MyApp"
3. Copy the portable app you downloaded into the newly created folder.
4. Start the PortableApps launcher or click on the "Options" menu then "Refresh App Icons".
5. Voila! You've just manually installed your portable app which wasn't available at the site!
Well, that concludes our instructable on turning your ugly old flash drive into a feature-filled, ultra cool, very very handy peripheral that blow everyone's minds. Thanks for reading!


