

Introduction: Sewing a Jedi or Harry Potter Robe or Cloak


This instructable REQUIRES a Sewing Machine and the knowledge of using one. If you do not meet these requirements, best find someone who does.
History
Someone asked me to make a Harry Potter school robe. It was sized for a child. We could have just purchased one for $30 at a costume store but for $15, one can be made with fabrics ten time better quality. After I finished the project i realized I can scale the process for an adult size robe/cloak.
The following is the procedure to make your own Jedi / Harry Potter Robe or cloak.
This instructable is writen for the total sewing Noob, like myself.
Step 1: Materials
Tools:
Sewing machine
Fabric Scissors - Don't cut paper with your "good" scissors
Paper Scissors
Fabric marker/pencil
Pencil
Tape measure
Iron (optional)
Sewing needle (optional)
Materials
MINIMUM 4 yards of Fabric - I like woven fake suede, AKA microfiber. More fabric if you are taller or larger. I weigh150 pounds, so the 4 yards was enough for me. Add more yards and wider bolts of fabric if you are larger and/or taller.
1 spool of thread
25 sheets of printer paper 8.5"x 11" or legal size.
Paper glue - Elmers
Step 2: Fabric 101 - Buying Fabrics

For those new to sewing projects something about Fabrics.
When you go to a fabric store, you will find Fabrics in rolls. These rolls are called "Bolts".
Fabric has two sides, the "face" and the "back". The face is what's intended to be on the outside of the clothes. The back is inside - what you see when you wear your shirt inside-out.
The fabric is folded in half and then wrapped around the bolt. The Fabric is folded so that the Back is showing - it's inside out.
Buy 4 (or MORE) yards of your chosen material and color (twice as much if you are prone to mistakes). I chose a rich brown synthetic suede for my robe. When the store employee cuts your fabric for you do NOT unfold it. Keep it exactly how it is - folded in the middle length-wise, inside-out.
Let me state that again - DO NOT unfold the fabric.
Buy thread to match the color of your fabric.
Step 3: The Measure of a Man / Woman / Twi'lek


We need to draw out a pattern . but before we can do that we need to know your measurements.
Check out my supercool generic figure. Color Coded are the measurements we need:
Picture #1
Yellow: base of the neck to 1" past the shoulder joint
Purple: Shoulder joint to 2" past wrist
Brown: Armpit to 2" past the wrist
Green: Top of shoulder joint to 2" below Armpit
Red: Across thickest part of chest between shoulder joints; OR across the back of the neck from left to right shoulder joint - PLUS 4". Example: if you measure 18" make it 22"
Blue: Middle-top of the shoulder to the floor (stand straight!)
Picture #2:
Red: Hood > base of the neck over top of your head to the other side. PLUS 6 inches.
Light Blue: Armpit to floor MINUS 2"
Step 4: I Reveal to You "THE PATTERN"...


Now we use the measurements in step 3 to a make a pattern out of paper.
PRINT out the picture below. Notice the color code? Where did RED go?
Take your print out and write your measurements on the colored lines.
For RED (the Chest measurement) we need to do a little Math.
Take the Red measure and Divide by 2.
Take that number and Subtract yellow.
That is the Neck Hole size.
Example: I have a Chest of 22" / 2 = 11"
11" - 6" (yellow) = 5" for the neck hole.
Using the above measure, the pattern measure from Arm Hole to Center should be 11". Oh, the straight line connecting the neck hole to the bottom of the pattern is the Center of the body.
How about the other RED - the HOOD. take the Hood Measure and DIVIDE by 2. That is the Measure for the FRONT of the Hood.
PRINT out the picture and write in all you Measurements.
EDIT:
SECOND PATTERN pictured (black and white) is for NO Shoulder seam and will require a VERY LARGE piece of fabric. I did not provide measurement procedures for that one since that's not what this instructable is about but someone asked me for an alternative pattern to use.
Step 5: Making a Full Scale Pattern


In Step #2, I said we need paper scissors, glue and lots of paper.
Take you printer paper and glue them together so that you have a very large sheet. If you are lucky enough to have a large role of butcher paper of craft paper then that is even better. Newspaper works too. You want enough paper glued together that you can lay down on it and most of you will not touch the floor.
Take the Print out in Step #4 (See Picture #1).
Copy the pattern from the Printout onto the large sheet of paper using ACTUAL Dimensions. So if you wrote "55 inches" on the printout, then you DRAW a 55 inches line on the large sheet of paper.
After everything is drawn on the Large sheet of paper, Cut it out with paper scissors (See Picture #2). Why do I keep saying "paper scissors"? Cutting paper dulls a blade very quickly, because of that I have a pair of scissors dedicated to Fabric and another dedicated to Paper.
Picture #3 and #4:
If you are new to sewing just make the arm hole a Straight line. Notice my arm hole has a curve at the armpit, that is for a more fitted shape. To make it easier for noobs, just make a straight line. If you want to copy my pattern exactly, Pay Attention to Picture #4. if you do not, the Sleeve will not fit onto the Body.
NOT pictured is the Hood Pattern. The hood can be thought of as a rentangular piece of fabric.
Step 6: Transfer the Body Pattern to Fabric


OK, when you purchased your fabric it was folded in half length-wise with the "back" of the fabric on the outside. And remember I told you NOT to unfold it. To make the project easier you may even consider ironing the fold so it is even more creased and easier to see. That fold and keeping the long edge of the fabric alined is really important.
On a flat, hard surface lay out about 2-3 yards of your fabric. On the left side will be the center fold and the right side will be the edges. The fabric is folded inside out, so the back surface is showing and ready for us to mark on with our fabric marker. We do NOT want to make our mark on the "face" of the fabric. The face is the side of the fabric that is intended to be the outside.
Lay your body pattern on the fabric. I am using a dark brown which does not take pictures well so I am using Paper for illustration. See Picture #1
Picture #2 - Put your body pattern on the fabric with the center edge flush with Fold edge. Trace with your Fabric marker
Picture #3 - I made two(2) mistake on the Picture - (1)To Minimize waste material, the body pattern should be upside down. That is the neck hole should be near the bottom of the picture.
(2)Put the Center line of body pattern on the right edge but NOT flush. Back off from the edge 1-2 inches. Trace the pattern.
Picture #4 - Cut out the Fabric. Do NOT cut on the line. Cut 1 inch outside the line.
Step 7: The Sleeves and Hood


To minimize the amount of waste fabric we want to go ahead and unfold the fabric and fold it width-wise, again inside out so the back is the surface we are marking on. Fold just enough to make Sleeves See Picture #1
Lay your Sleeve Pattern so that the outside measure - the Purple Line - is Flush on the fold. Trace with fabric marker and cut out the fabric. See Picture #2.
Not Pictured - The Hood. The Hood is done in the similar fashion as the Sleeve. The TOP of HEAD is flush with the Fold. Make two just like the Sleeve. The second one will be the liner for the hood. Trace the pattern and cut out the fabric. Remeber to cut OUTSIDE the line.
Step 8: Get the Sewing Machine Out

I just wanted to have a picture of my sewing machine.
This is my Singer Featherweight 221 Vintage Sewing Machine. This wonderful piece of machinery was manufactured from 1933 to 1964. I saw one being sold at an antique store for $450. i'm quite fond of it.
OK, on to the actual sewing.
Step 9: The First Stitch - the Body


All the sewing is done on the inside (the back of the fabric) so the seams do not show. To help illustrate this I have colored the "fabric" (actually paper) purple on the Back and left it white on the Face.
The first pieces we stitch together is the three parts that make up the Body. This is fairly easy.
Lay the large body piece "face" up (our marking underneath). Lay the Front pieces on top "face" Down (our marking on top) on top of the larger body piece. Picture #1
Aline the stitch lines and stitch along the Shoulder seams (the Yellow line on our pattern). Sew right on the markings we made on the fabric. See Picture #2 and #3
Lay everything flat. chech your seam is strong. Picture #4
Flip the assembled Body piece flat so all the "faces" is up. See Picture #5
Time to sew on the sleeves.
Step 10: Our Robe Needs Arms


Before we attach the sleeves to the body we should clean up the cuff (the part over the wrist). Fold the Edge back once or twice and sew it down. Now the cuff will have a clean finish - i.e. Hem the sleaves..
With the body piece flat face up aline the arm hole of the sleeve with the arm hole of the body piece. An easy method for me is to match up the shoulder seam with the long fold (purple line) of the sleeve piece. See Picture #1 and #2. Tack it down with one or two stitches. Match up the Arm hole lines and sew it down.
Picture #3 is all the sewing we have done so far.
Step 11: Finish the Arms and Sew Up the Sides


Lay out the assembled pieces so it actually looks like a robe laying flat. Lay it out Inside-Out. Aline the seem lines Light-Blue and Brown from our pattern
We are going to sew the underneath part of the arms from Wrist to Armpit. Then continue that stitch all the way down the side of the Body. See Picture #2 and #3
Role the bottom of the body in 1 inch and sew it down for a clean edge. I.e. Hem the bottom.
At this point you can put your robe on. Next step is to attach the Hood.
Picture #5 - Another picture of my 90% finished robe, just so everyone knows I actually did this project in fabric, not paper.
Step 12: Attaching the Hood - Part 1

It seems like the hood should be the easy part. All it is is a bag that goes over your head, right? turns out it is the hardest part of this project.
The reason why I have not included any pictures of my Hood paper pattern is that I did not use one. I cut mine freehand. Not that the pattern i provided is unnecessary, I was just taking shortcuts.
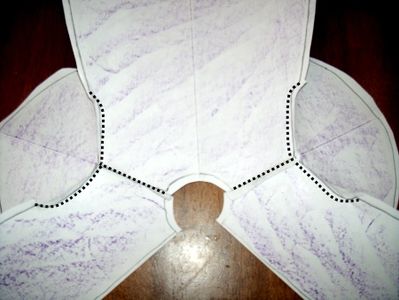
There are two possible patterns to make depending on what is being made: Star Wars or Harry Potter robe. See Picture Below.
The dotted line is where you will sew the seam of the back of the hood.
Now, if you had been paying attention to the measurements then you would notice that the neck hole of the BODY does not match to the neck hole of the HOOD. The Hood should have more Fabric than the neck hole of the assembled body. My pattern says 12 inches for the neck. If you are a large person, add another inch or two.
The RED line is the Hood measure you took in Step 3 divided by 2. Fold that part over and stitch it down for a finished edge. Take your time and be VERY careful with this edge as it will be the part of the hood framing your FACE.
Fold the hood in half inside-out and match up the NECK Edge. Sew on the Dotted Line I indicated in the picture below.
Step 13: Attaching the Hood - Part 2


Turn your hood right side out - The seam is now on the inside of the hood.
The large piece of the Body assembly should still have a crease where it was folded in half. Remember? See picture #1.
Match up the seam we just made on the hood with the fold on the large body piece. Tack it down with a stitch or two. This is similar to how the sleeve was done.
Now match up the right corner of hood neck opening with the right lapel. Tack it down with a stitch or two. Same for the left Hood opening and left lapel.
Aline the Neck hole stitch line of the body to the stitch line of the hood. Working from the LAPEL to the Fold in the BACK, "S" fold about 1 inch of the hood fabric and stitch it down to the body. Continue "S" folding the hood fabric until all the extra fabric has been tucked in and sewn to the body.
Perform the same steps to the other side of the hood. Try to make the same number of "S" folds. See picture 2"
Yes, I know, what i described sounds complicated. See the next step for actual pictures of the hood seam.
Step 14:


It's hard to take good pictures of the actual hood since the fabric does not photograph well.
Picture #1 shows the neck seam and the pleats I put on the hood where it attaches to the Robe.,
Picture #2 is the inside of hood seam. The red line is the s fold. My hood had three(3) pleats on each shoulder.
Picture #3 is another picture of the attachment of the hood to the neck hole.
Last step is to cover the inside seam. There are multiple methods to do this. I have not decided on the method I will use yet. The inside seam needs to be covered because it can be seen when the hood is not being used.
And that's it! All done!!!!
Last Picture of me with my new Jedi robe. Like my T-shirt?
Participated in the
DIY Halloween Contest


