

Introduction: 3D Printed Smart Phone Amp


This project is a great way to learn Tinkercad. I'll show you how to scale, rotate, move, create holes, group, and prepare a model for 3D printing.
You'll make a stand with a tube that will make the sound coming from your phone's speaker bounce off of it and direct it outward, all without any electronic parts.
You'll need a ruler with millimeters for this one.
You can follow along with this lesson by opening the Build a Mobile Amplifier project for a step-by-step guide in the TinkerCAD interface.
Step 1: Tinkercad
In this class, we'll be using TinkerCAD for all the 3D design work. It's free and browser based, so you can use it on any computer or tablet. It's an easy, fun, intuitive 3D modeling program that's great for designing objects for 3D printing.
Sign Up

Before you go any further, you should sign up (for free) for a TinkerCAD account. It just takes a minute or two.
Follow this link to the TinkerCAD page, then click on Sign Up if you don't already have a TinkerCAD account.
Then all you have to do is enter the country you live in and your date of birth, then move on to the next page to enter an email and password or sign up automatically through Facebook, and that's it! You're ready to start designing.


Look Around
Now that you have an account, take a minute to look around the interface. The Gallery tab is a great place to start- you can browse other users' designs and get a taste for all the awesome things you can create.

Step 2: Make a Cylinder
First, you're going to make the horn part of the amplifier. This will be a hollow acoustical cylinder that will make the sound waves bounce off of it on the inside, directing the sound and making it louder.

Drag and drop a cylinder onto the workplane.

Drag the handle on the workplane to make it 70mm X 70mm. TIP: You can constrain the scale by holding Shift while you drag the handle.

Drag the top handle to make the cylinder 110mm tall.
Step 3: Turn the Cylinder Into a Tube


Just like you did in the last step, place a cylinder on the workplane. This time, make it 60mm wide and 100mm tall.
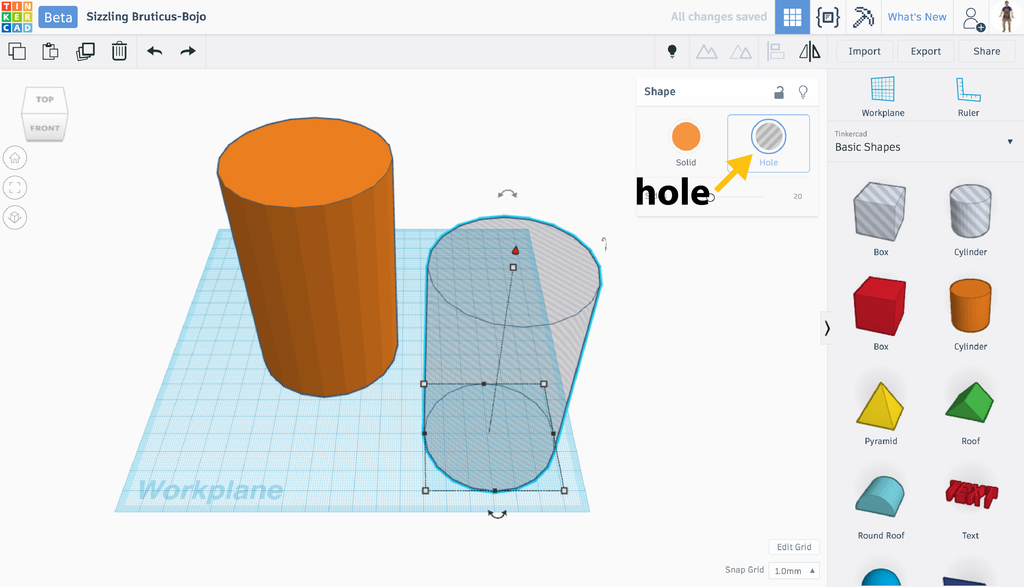
With the new cylinder selected, click the Hole button in the Inspector.

To make a tube, the hole and the solid cylinder will need to be aligned. With both cylinders selected, click the Align button in the Adjust menu. Click on the first cylinder to make it the dominant object, then click one of the center align handles on the workplane.

Click the other center align handle.

Click the top handle to align the cylinders to the top plane so that the tube will be open on the top.

With both objects selected, click the Group button to create the tube.
Step 4: Rotate the Tube and Create a Platform

Select the cylinder and use the side arrow to rotate the cylinder to a 45 degree angle.

Drag and drop a cube onto the workplane.

Use the scale handle to make it 80mm wide by 70mm deep. The shorter side should be the same side as the angle of the tube.

Move the box so that the tube rests on it.

There will be a part of the tube sticking out on the bottom of the box, so now you'll make a box shape to cut that part off, giving you a flat bottom for the amplifier.
Drag and drop a cube onto the workplane.

Drag the scale handle so that the box is 40mm X 80mm wide.

Click the Hole button in the Inspector- this will allow you to use the box shape to cut out the cylinder part on the bottom.

Move the box down, then move it over so that completely covers the tube part on the bottom.

Select all components and click Group to subtract the piece below the plane.
Step 5: Measure Your Phone
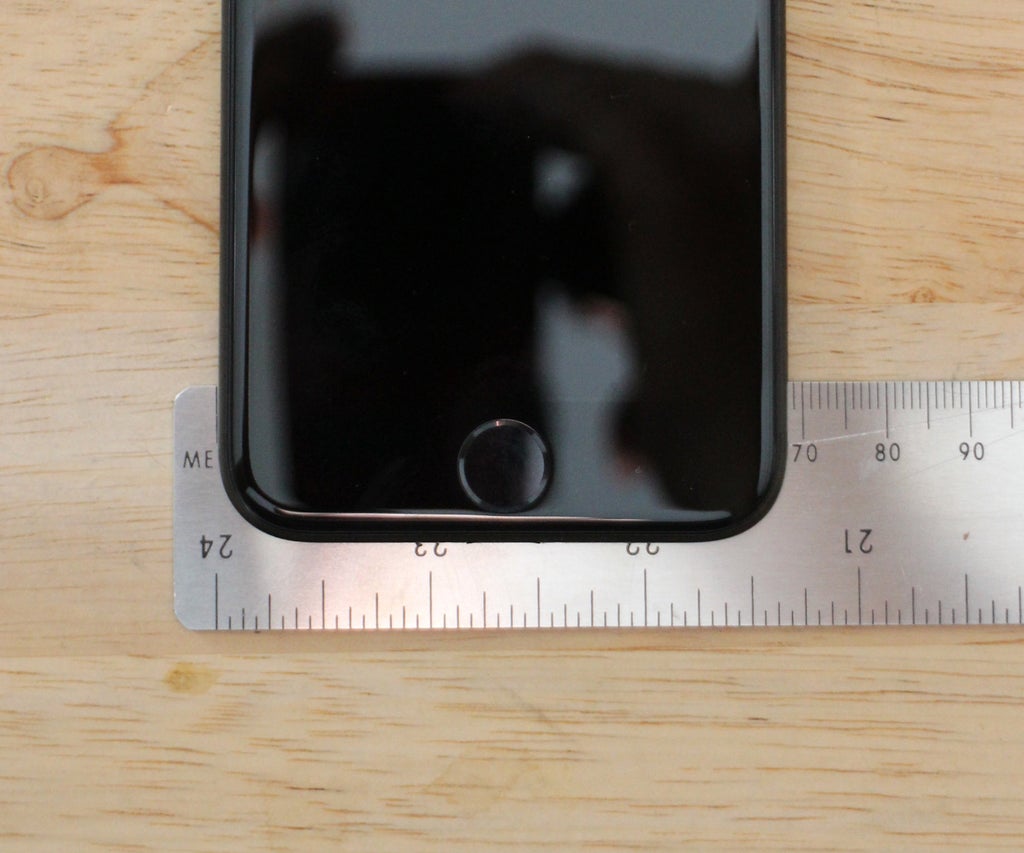
Around 68mm wide

Around 7 mm thick
The amplifier works by making the sound from your phone's speaker bounce off the sides of the tube. That means the tube will need a cutout at the back to fit the phone in so that its speaker is inside the tube.
To make sure the cutout will be the right size, use a metric ruler (millimeters) to measure the thickness and width of the phone.
Mine is about 68mm wide by 7mm thick.
TIP: You can also do a search for your phone model and "dimensions", and probably find the exact dimensions right away.
Step 6: Make the Cutout

Drag a box to the workplane, then scale it so that it has the same width and thickness as the device you measured. Make the thickness slightly more (maybe .25mm) than the actual thickness of the device to make sure it doesn't fit too tightly.

Rotate the box 45º so that the angle matches the tube.

Move the box so that it intersects the tube near the back of it. Make sure the the box is sticking out of the tube on 3 of its size as shown in the picture above.

With the box selected, click on the Hole button in the Inspector.

Group the amplifier and the hole to create the cutout. Congratulations, you've now got a working amplifier!
Step 7: Add Your Initials

Open the Letters pane, and drag your initials (my middle name is Edward) onto the workplane. If you need a refresher on how to get the best results using text, go back to the Keychain lesson .

Select all the letters and pull the scale handle. Hold Shift while scaling to make sure everything scales uniformly.

Copy and paste the letters so you can have matching text on both sides of the amplifier.
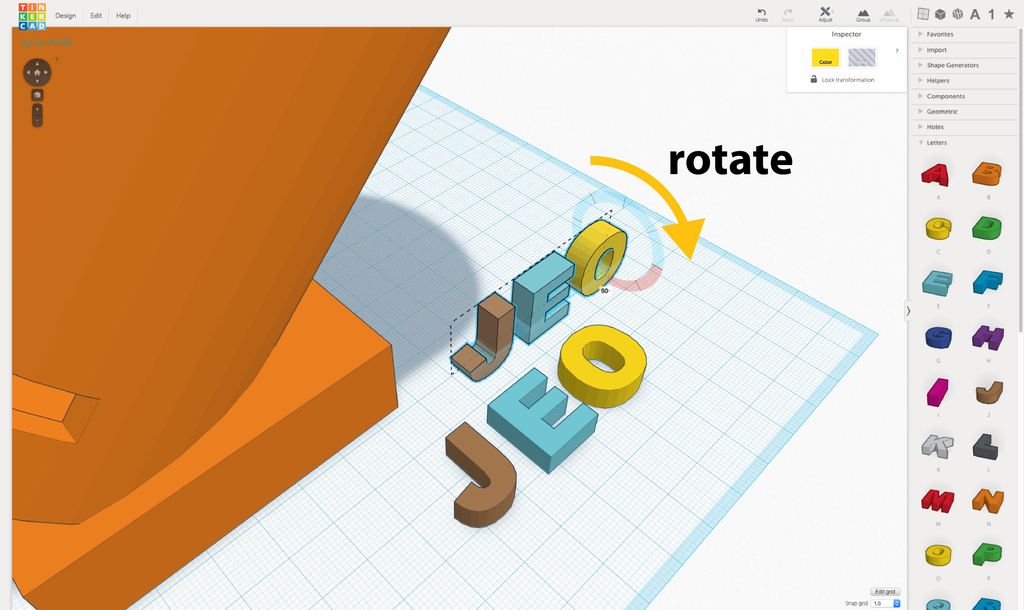
Rotate the two groups so that the face different directions.

Rotate both groups 45º to match the tilt of the amplifier tube.

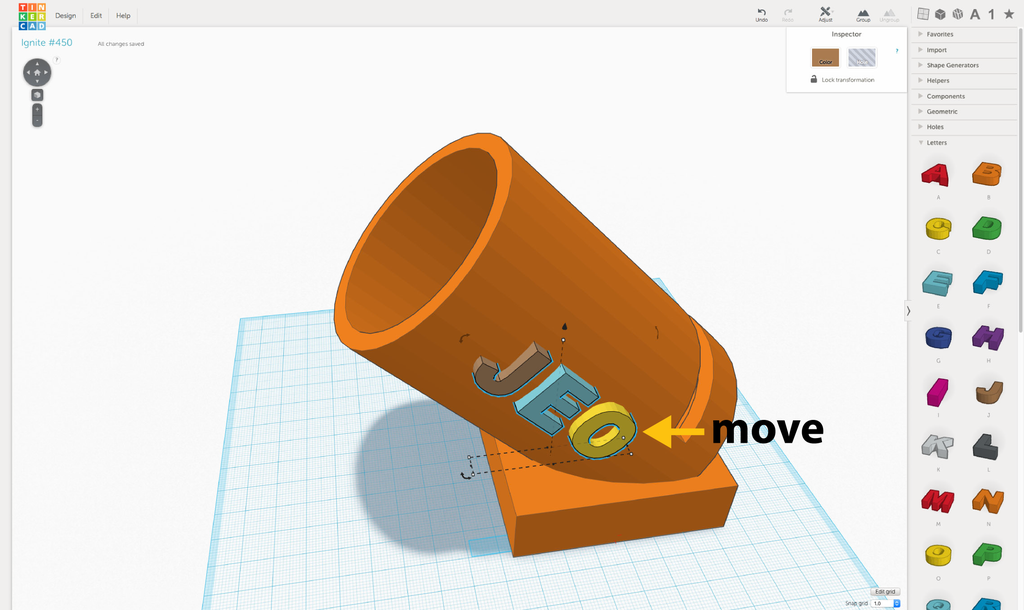
Move the letters so that they intersect the sides of the tube.
Step 8: Add Some Details

TinkerCAD has all kinds of shapes, symbols, and connectors that you can add to your design. I'm going to use the Torus shape to give my amp a vintage space-age look. If you want to make yours like mine, drag and drop a Torus shape from the Basic Shapes menu.
First, double-click the number for the Tube setting in the Shape window and change the number to "1", then press Enter. This will make your tube thickness smaller.

Next, drag the scale handle and make the torus 80 X 80.

Rotate the ring 45º as shown, then move it until it creates a ring around the top of the tube. The Align tool will be helpful here.

Duplicate the torus, then move it down and towards the back so that it creates a second ring next to the first one.
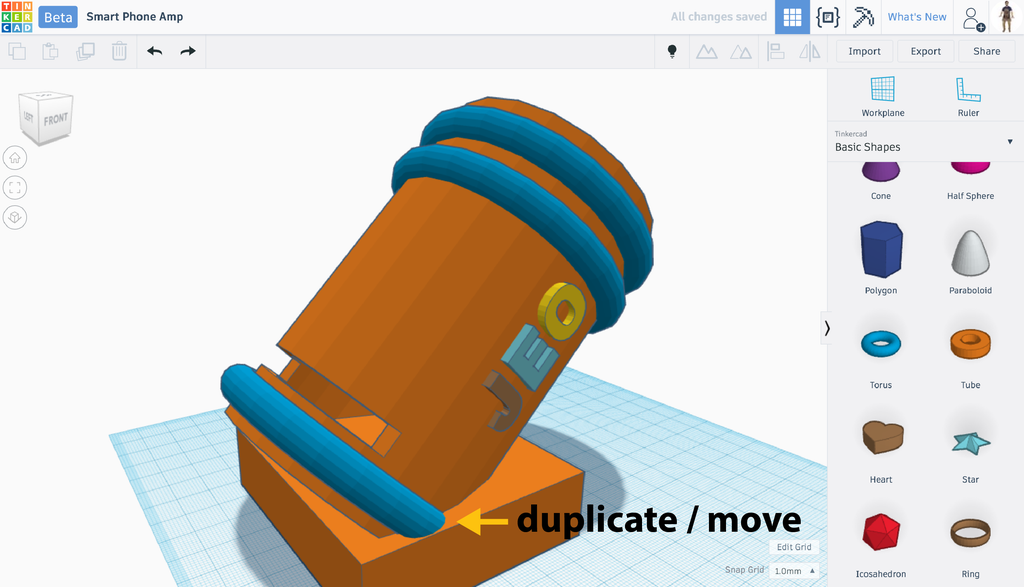
You can add a third one near the base to make it look a bit more balanced. NOTE: If you add the third ring, be sure to make a hole on the bottom to cut out the bottom of the torus. If you don't, you'll have a protruding piece that will keep the amp from sitting flat on a table!

Click the Group button to turn your amp into a single object that's ready for 3D printing.
Step 9: Export for 3D Printing

When you're satisfied with the look of your part, you can export it for 3D printing.

In the top menu, go to Design > Download for 3D Printing. In the dialog box that comes up, click on STL to download an STL file. This is the file you'll use to 3D print.
Step 10: Print Studio

Open Print Studio, then click Import. Select the STL file you just downloaded and it'll drop onto the bed.

Select the amp and you'll see some manipulator tools show up, just like in TinkerCAD.

Use the Rotate handle to rotate the amp 90º so that it's sitting flat on its base.

At the top of the screen, just follow the series of button to prepare it for printing. Click Repair, then make sure you see No Problems pop up in the window to the left. If you see errors, Print Studio will repair them for you before you go to the next step.

Next, click the Supports button, then click on Add Supports in the window on the left. Supports are like little trees whose branches hold up the overhanging parts of a model. Without them, you'll end up with a whole lot of plastic spaghetti!
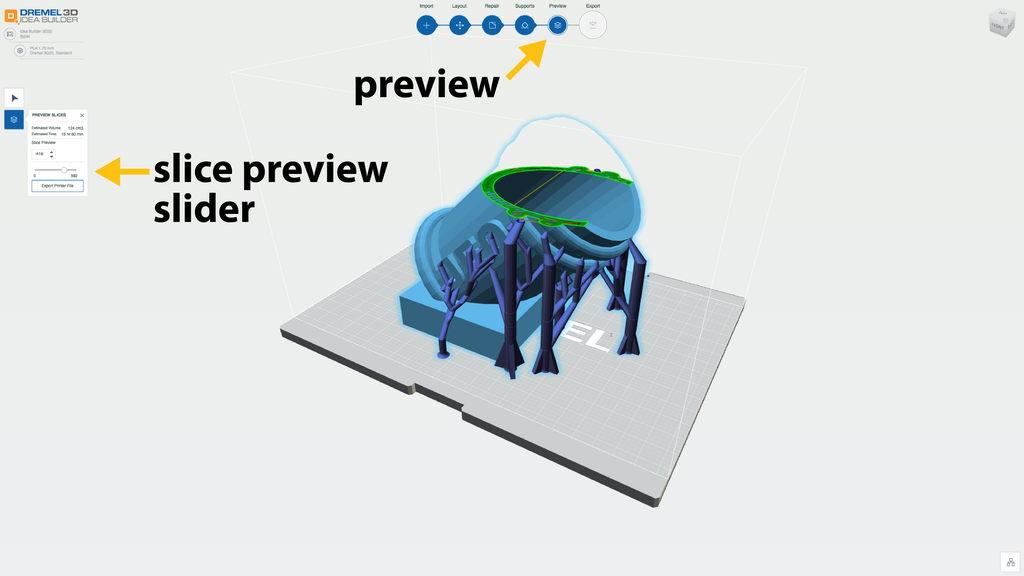
With your model repaired and supports added, you're ready for a preview. Click the Preview button, then move the Slice Preview slider in the window on the left to get a preview of how your printer is going to build the model.

When you're satisfied with the model, click the Export button on the top bar, and Print Studio will make a printing file for your 3D printer based on your settings.
Step 11: Print and Rock Out!

When your print file is ready, just follow the instructions in our free Easy 3D Printing Class, and you're done!


