Introduction: Phone Charger Mood Lamp
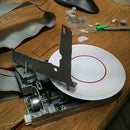
Use an old phone charger to power a nice looking led lamp. I made the patterns on the shade with an adapted bicycle . Also, check this instructable to make your own spinning wheel.
For inspiration, check out this gallery of completed lamps.
For inspiration, check out this gallery of completed lamps.
Step 1: What You Need
tools
* wire cutters/strippers or an old pair of scissors
* small flat head screw driver
parts
* an old phone charger
* a couple of 150ohm resistors
* a couple of LEDs
* a chocblock
* something to make the base with; we now use sections of old carpet tube but we've used cans and plastic bottles before.
* a 20cm length of stiff but bendable wire
* (optional) 3 shorter lengths of wire for making legs
* some sellotape
* some 200gsm paper for the shade, about 30x40cm is good, a little less than a3.
Step 2: (optional) Solder Leds Onto Resistors
If you already have the LEDs soldered onto resisters from one of our kits, you can skip this step.
Otherwise, you can work out what size resister to use with Ohm's law. V = IR. Let's work out what resistor size we need for an LED with a forward voltage of 2.5V and a current use of 20mA. The phone charger provides around 5V, but can vary so if you have a multimeter you can test it.
Subtract the forward voltage from the phone charger supply to get the voltage over the resistor = 2.5V. Then work out R = V/I = 2.5V / 20mA = 125Ohms.
Alternatively
It often works to just put the LEDs in series, so that the voltage is divided across them both. To do this, twist together the long leg of one LED with the short leg of the other, then test with the phone charger and check that they are not too bright or too dim.
For more info on serial vs parallel circuits, see the wikipedia page here.
Step 3: Connect the LEDs
strip the wires of the phone charger. Usually you'll have a black and a red wire but sometimes you have more. You need to find which is ground and which is positive.
Separate all the wires and strip back a small part of their insulation.
Plug in the phone charger and then test the LEDs on the different wires until you get the LED lighting up.
Cut off the unused wires (if any).
Then use a chocblock to screw the mobile phone charger wires and the LED legs together. You can use a couple of LEDs in parallel (see the photo) to make different colours.
This part can be quite fiddly as you need to make sure that the LED's legs don't cross over (which will cause a short circuit), and that the LED's legs are securely held in the chocblock (otherwise one or both LEDs won't light).
Step 4: Mounting the Chocblock
Thread the wire through the hole in the chocblock and then bend it over and round so that the chocblock is caught in the middle. Then bend the wire into a V shape with the chocblock at the sharp end of the V.
Use tape to secure the legs of the V onto the carpet tube or whatever you're using for the base.
Plug in the phone charger to check everything still works because after we put the shade on it will be harder to get access to.
Use tape to secure the legs of the V onto the carpet tube or whatever you're using for the base.
Plug in the phone charger to check everything still works because after we put the shade on it will be harder to get access to.
Step 5: (optional) Add the Legs
If you want to add some curly legs, then bend a little U shape in the end of the wire that you can squeeze into the cardboard tube. Then add some tape to hold them in place.
Finally, bend some nice curls in the ends.
Finally, bend some nice curls in the ends.
Step 6: Make the Shade
I use an adapted bicycle to make spirally shades. You can just splatter ink about, or even cut holes in the shade to make interesting shadows and silhouettes when the lamp is on.
See the gallery for inspiration
See the gallery for inspiration
Step 7: Form the Shade
Wrap the shade around the base and secure it with tape.


