

Introduction: Building a Walnut Office Desk & Pricing It


I recently built a Modern Walnut Office Desk for a client. In this video i walk you through the steps i took to build it and I also show how i price the piece. I get tons of questions about selling custom work, so I wanted to bring some insight on how I price my custom goods.
If you want to make more custom work, and make some more money selling your handmade goods, check out our pricing guide
Step 1: Breaking Down Base Material


Start off this project breaking down the rough stock for the base.
I use the planer , jointer, chop saw, and table saw. This is a standard and simple process that is applicable to almost any woodworking project.
Step 2: Dry Fitting the Base & Glue Up


- Cut al of the joinery, for this build I use dominoes, but you can use dowels, Lap joints, or hand cut joinery
- Dry fit the base and use the openings to measure for the drawer box openings. My reasoning for this is because there will be subtle variations in the wood sizing and it makes for easier fitting for the doors and drawers.
- Move on to gluing up the side carcass's. I suggest doing this with the parts while still flat, and not rushing to do the whole carcass at once. Clean up the panels while theyre flat and then glue up the carcass's
Step 3: Cutting the Back Curve


- The curved "bridge" part of the desk is the feature of this desk. For this i use my Axiom CNC to cut a template and the curve itself. This process can easily be done by hand with a jigsaw or a bandsaw.
- I fit all the joinery with the curve by hand, use a palm router and my hand tools to keep everything neat and tight.
- While the CNC is running i cut the panels for the desk as well
Step 4: Final Base Glue UP

- Using the parts, glue up the base and carcass. Clean up the glue squeeze out as you go. It is much easier to maneuver the base while it is still in small parts
Step 5: Break Down & Glue Up the Top


- Glue up your top using the best wood and grain patterns you can find.
- Finish the top sanding to 220, and using a card scraper to prep for finish.
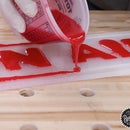
Step 6: Applying FInish & Assemble


- Pre finish all of the panels and parts before assembly. This will keep the wood movement issues at bay, and help speed up the process
Step 7: Build the Drawers

- For a project Like this i suggest to axtualy buy your drawers. Yes, buy them. But if you do choose to build them I highly recommend the Leigh RTJ400 Jig From Woodcraft
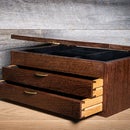
Step 8: Drawers and Pulls


- Fit the drawers using the slides you prefer, and then make your drawer pulls
- For this build I used aluminum bar stock and leather.
Step 9: Attach the Top


Attach the top to the base and thats a wrap. If you haven't, check out the full build video for this project. Where you can see how i priced this project as well!

Participated in the
Furniture Contest 2018


