

Introduction: Creating Android Apps – for Complete Beginners


If you own an AndroidTM phone or tablet and you’re the sort of person who likes doing things for him/herself (why else would you be looking at an Instructable?), you’ve probably thought about finding out how to develop your own apps one day. Perhaps you already have an idea for the next killer app, or just want to build a simple one for your own use to fulfil a very specific need.
The trouble is, finding basic instructions for what you need to do to turn your idea into an app is not that easy. All the acronyms (IDE, XML, JDKTM) and jargon (JavaTM, object oriented programming, code) just seem so confusing, and a lot of the websites that claim to offer beginner tutorials assume a certain basic level of knowledge which may be appropriate for tech-savvy teenagers but possibly not the rest of us.
Well read on. If you are genuine about learning, and prepared to put some time and effort into it, you could be writing simple Android apps of your own within a few weeks, or even days.
What you need
- Access to a reasonably up-to-date computer with several GB of space on its hard drive and an internet connection (but see Step 4 if you have an older machine or little spare drive space). Windows machines, Macs and those running Linux are all suitable.
- An Android device (preferably a smartphone or tablet) – but this isn’t essential.
- A USB lead that will connect the above two items together.
- Time – aim to spend at least 6-8 hours a week on this.
Step 1: The Basics – and Terminology

Android is an operating system (OS) for mobile devices. So it’s similar to iOS (the OS on which iPhones and other mobile Apple products run), and to Windows (Microsoft’s OS for PCs). It comes in different versions that have sequential API numbers - let’s not worry about what API means, just think of it as a version number - with sweet-treat names, each of which is more powerful and feature-laden than the last and starts with the next letter of the alphabet. The most recent are called Jelly Bean, KitKat, Lollipop and Marshmallow.
An app, or application, is a collection of files bundled together into a package that a device (an Android device, in this case) can understand. A key part of the app is a program, a set of instructions for the device to follow. If you’ve done any computer programming before, even a long time ago, app development will begin to look familiar. If not, don’t worry, it’s not a problem. Apps can make your phone or tablet do anything within its capability, the only limits are the imagination and skill of the programmer. For more depth on what goes into an Android app, have a look at the Android app fundamentals webpage.
Java is the main programming language that is understood by Android devices, so you’ll need to learn Java. Fortunately, there is lots of information freely available on the internet to help you do that.
The Java Development Kit (JDK) is needed to write Java code. It’s software that can be freely downloaded. New versions are released from time to time, the current one being JDK SE 8.
Code is what makes a program/app function. If the program is a book written in a particular language (Java), then the individual sentences, paragraphs and chapters of that book are the code.
XML (Extensible Mark-up Language) is the language that governs the user interface of an app, and how it shares data with internet resources, which means you’ll need to learn XML as well as Java. It’ll be easier and quicker than learning Java, especially if you’ve ever dabbled in HTML (hypertext mark-up language) to run a website – it’s very similar. (“User interface” means what appears on the screen of the device, how the app looks, how you input information to it and so on.)
An IDE is an integrated development environment. That’s a fancy name for the package required to write code (in this case, Java code) and XML, compile the code so it will run, and bundle it up with other resources (such as images and sound files) ready for downloading to a device. You’ll run the Android SDK tools and the JDK through the IDE, in a fairly seamless way. There are several well-respected, free Android or Java IDEs, with names such as Eclipse, BlueJ, IntelliJ IDEA and Android Studio (the official Android IDE). It’s possible to write Android apps without using an IDE, but a good IDE makes it a lot easier.
The Android SDK (software development kit) contains the tools needed to develop Android apps. Again, it’s a free download. It includes an emulator. A new version is released for each version of Android.
An Android emulator is a virtual Android device which runs on your computer. If you don’t have access to a real Android device, then an emulator will allow you to test your code and check that it runs and does what you expect. But it will probably run rather slowly, and will slow down everything else your computer is doing (including other IDE functions), which is annoying. OK as a temporary solution, but beg, steal or borrow someone’s old Android phone if you possibly can.
Java is an object oriented programming (OOP) language. You’ll learn exactly what this means when you get started with learning Java, but for now all you need to know is that OOP makes Java very flexible and powerful. One reason is that code written by one person (or team), to perform a particular function, can be made available for use by other people who need that function too. It means that you won’t have to build your app totally from scratch because you can make use of libraries of pre-existing code.
Step 2: Your Mission ...

... should you choose to accept it
You’ll be developing apps in an IDE, on a computer, and then uploading them to your Android device to test them – or else running them in an emulator if you don’t have a real device.
So, what you need to do is:
- Find a suitable course to teach you the basics of Java and XML, and devote several hours a week to working through it.
- Download the Android SDK, JDK and a suitable IDE and get it running on your computer.
- Either get the associated emulator running too, or (better) connect your Android device to the computer and get the two talking to each other.
- Locate the reliable Android help that is out there on the internet, find your way around it and get used to using it when you are stuck – which you will be, often.
- Practise, practise, practise – in other words, start coding. Don’t think that doing one course will teach you everything you need to know, but the right course will teach you how to keep improving your knowledge and building your skills.
The next steps will tell you how to do each of these, one by one. For reasons that will be explained, we’ll start with finding a suitable course.
Step 3: Finding a Course

There are lots of online courses available to teach you Android. Some of the good ones won’t even cost you a penny. You should start by choosing a course because that will determine which IDE you use and, if you have trouble downloading the IDE or getting it to work, there will be help available. The course you are following will also advise you which components of the Android SDK and the JDK to download and install. All of this can be very confusing if you are trying to do it on your own.
The help provided may be no more than a troubleshooting guide or an online forum for your fellow-students, but that should be enough. You can bet that, if you choose a MOOC (massive open online course) with 10,000s or even 100,000s of other students enrolled, someone will have had the same problem as you even if the course instructors hadn’t anticipated it. This is important, because IDEs are large and sometimes rather clunky applications which don’t come with the support services you get if you buy commercial software. Getting the IDE to work, and becoming sufficiently familiar with it to be able to use it effectively, can take a while.
How to choose an Android course? Well, I give my recommendation at the end of this step, so jump straight there if you want. Otherwise, you could ask around your friends (or your friends’ kids) for a personal recommendation, if you know anyone who is an Android-tinkerer. If someone has completed a particular course and is prepared to help you a bit when you get stuck, then go with that.
One option is to work through the Building Your First App course in the Developer section of the official Android website. You’ll find a whole series of courses in the Training subsection. There are also good Java tutorials provided by Oracle, the company that owns the rights to Java.
But if you’re working on your own then I’d also investigate what the various MOOC platforms are offering. All things being equal, choose a course that runs for a set period rather than the “no start date, always available” type. That way, there’ll be lots of other students working through it with you and the course forums will be a good place to share insights and obtain help when you need it.
A word about MOOCS and MOOC platforms
There are a lot of MOOC platforms nowadays, four of the biggest being Coursera, Udacity, Futurelearn and EdX. All of these offer Android and/or Java courses aimed at beginners. The courses (like all MOOCs) are offered by universities, other prestigious institutions (for example, the British Museum is a member of FutureLearn) and some commercial organisations, including Google (Udacity), the current developer of the Android OS.
In most cases it’s possible to access the course content (usually videos, written material, tests and exercises) and participate in discussion forums for free, although in the last few years the platforms have started to make more of an effort to derive income from their many users worldwide. That means you’ll probably have to pay if you want such things as a certificate at the end of the course to prove you’ve completed it, one-to-one coaching or feedback on your code. But you don’t really need any of that to get started developing Android apps. Step 6 offers suggestions on where to find help for free.
You need to sign up to a MOOC platform to join a course, but you can search for courses without doing so. Some of the platforms offer courses in languages other than English. Go onto each of the platforms mentioned above and put “Android” into the search box to see what’s available at the current time. Look for beginner courses and, for now, reject any that only mention Java – you also need to become familiar with an Android IDE, learn XML and discover how XML and Java (and resources such as images) work together to make an Android app, and that’s best done at the outset. Make a note of any courses that look suitable, and their start dates. Delve into the course info to discover which IDE will be used. If you know anyone who uses that IDE and is prepared to help you, that will be an important consideration.
At this point, you may have found a course you like the look of and be thinking about paying for whatever enhanced service that is offered. After all, learning something new is going to be tough and you’ll need all the help you can get, right? I suggest that you don’t commit to paying, for now at least. You’ll probably find that you can upgrade at any time while you’re working through the course, and there’s little point in paying for a service that you may never need. You may decide in Week 1 that app development isn’t for you, or you don’t like the style of this particular course and want to try a different one. Any help you need can come from other sources – see step 6.
My recommendation
Android Development for Beginners by Google on the Udacity platform. Click on “Access Course Materials” to have a look at the lectures for free, you don’t even need to sign up to do that.
Why do I recommend it?
- It’s a Google course (and Google are Android’s developers).
- It’s free.
- It’s a good taster course that will have you writing simple apps almost straight away.
- The video lectures are fun and engaging.
- No prior knowledge is assumed.
- It encourages students to seek out the answers to their problems for themselves (eg by consulting the Java documentation) rather than spoon-feeding them everything.
- It uses Android Studio, which is now the official (ie Google-supported) IDE. (Previously it was Eclipse.)
- It only takes about 4 weeks (at 6 hours per week).
So, now you’ve chosen a course, you need to download the Android SDK, JDK and an IDE onto your computer.
Step 4: Downloading the Software


The course you have chosen should walk you through downloading and installing the JDK, Android SDK and the recommended IDE. I don’t advise doing this without detailed instructions of the type provided in course notes, because it’s not straightforward, but the download links are provided in the next paragraph for those choosing to fly solo.
The JDK needs to be installed before the IDE, and if you’re using Android Studio as your IDE then you’ll download the Android SDK (and emulator) as part of it. When you click on the Android Studio link it should automatically offer the correct version for your computer’s operating system.
There'll probably be a troubleshooting guide for your course with a list of the problems students most commonly encounter and how to overcome them. Be sure to check that your computer and operating system meet the recommended requirements before you start, including having sufficient free hard disk space.
The best advice I can give is to be patient. The files are large, so download during a quiet part of the day if you have a slow connection. After downloading, the packages may take quite some time to install even on a fairly new computer, and the IDE can take a while to set up and also to get going each time you start it up. Don’t keep pressing keys if nothing seems to be happening, go and get a cup of coffee and then have another look 10 minutes later.
If you are low on hard disk space, or have an older computer or OS that doesn’t meet the recommended minimum requirements for running this development software, there is an alternative. Students enrolled on the Intro to Java Programming MOOC offered by San Jose State University via the Udacity platform can make use of a web-based IDE to perform the coding exercises. This MOOC is a Java course rather than an Android course, but if you work your way through it (estimated time required: 4 months) you will have made a very good start towards knowing what you need to know to begin developing Android apps. Using San Jose’s remote IDE has its limitations (not least, there is no debugger to help you find the flaws in your code), but it’s a lot better than nothing.
There may be other MOOCs that use a web-based IDE too.
Step 5: Connecting an Android Device, or Running an Emulator


Emulation
As previously mentioned, using the emulator feature in your IDE is best avoided if you can, because it will slow down the IDE considerably. Also, certain features simply don't work in an emulator, such as anything that relies on input from the device's accelerometer. But if you don’t have an Android device then you will have to use the emulator. Your MOOC’s set-up instructions should tell you how to do it, otherwise look in the help feature of the IDE you are using. If you plan to distribute your apps via Google Play (or otherwise) then you're going to need to use the emulator sooner or later anyway, to test they work on a range of different devices.
You’ll need to choose which Android device to emulate, and which version of the Android OS. Choose whatever type of device you want to write apps for (smartwatch, phone, tablet, TV or whatever), and within that choose a popular device, or perhaps one that a friend owns – there’s always a chance they may let you try your app on their device. Then choose a version of the OS that is reasonably up-to-date but is used by a large proportion of devices. The versions are backwards-compatible, in other words a device running KitKat will also run apps written for Jelly Bean (and all previous versions), but not vice versa. You can get an indication of how widely used each version is currently by consulting the Android platform version dashboard. At the time of writing (early Feb 2016), the distribution is as follows:
| Name | API | Distribution | Cumulative Distribution |
| (prior to Jelly Bean) | →15 | 5.9% | 5.9% |
| Jelly Bean | 16 | 9.0% | 14.9% |
| Jelly Bean | 17 | 12.2% | 27.1% |
| Jelly Bean | 18 | 3.5% | 30.6% |
| KitKat | 19 | 36.1% | 66.7% |
| Lollipop | 21 | 16.9% | 83.6% |
| Lollipop | 22 | 15.7% | 99.3% |
| Marshmallow | 23 | 0.7% | 100% |
This means that, if you are writing an app that you want to be widely used, then API 16 would be a good choice, because it will work for all but 5.9% of Android devices. Make emulator selections (and choose the Android version you will code in) accordingly. You could instead opt for API 23 and take advantage of all the latest Android bells and whistles, but then only 0.7% of current devices will be able to run your app.
When you first try to run an app on your virtual device, you may find that you need to unlock its screen before you can do anything else. You’ll have to do everything with the mouse that you would do by tapping or swiping the touch-sensitive screen on a real Android device. It can take a bit of getting used to, especially if you’ve never used an Android device before.
Connecting a real Android device
Again, an early lesson in your MOOC should explain how to get your Android device talking to your computer so that you can download the apps you are working on and find out if they run and do what you expected.
On your phone or other Android device, the first thing you are likely to need to do is change the settings to allow it to download through its USB connection. The instructions may vary according to the Android API that the device is running, but on my phone (Lollipop, API level 21) you go to Settings > System > Developer options and click on USB Debugging. Also click OK if a message about the computer’s RSA key fingerprint appears. Before this, you may have to make Developer options visible by selecting Settings > About phone and tapping 7 times on Build number. (Yes, really.) There are more detailed instructions in the Using Hardware Devices subsection of the Android website.
With a Windows computer, you'll need to download an appropriate driver too. With your device connected via a USB cable, follow the instructions on the OEM USB Drivers page of the Developers section of the Android website.
Now you should be ready to run the apps you create (or download from your course) on your device. Connect it with a USB cable and, when you click on Run in the IDE, make sure you have selected the setting to use the actual device and not the emulator. In Android Studio, this means selecting “Choose a running device” - the connected device should be listed - instead of “Launch emulator”.
Step 6: Sources of Help and Advice
The first place to look if you get stuck should be the course material for the Android course you are following. Is there a crib/hint sheet? Can you download a transcript of the relevant video lecture? – some people find it easier to take things in when reading them.
If you can’t get your code to compile, it can be very frustrating, especially in the early days when you don’t know what the Java error messages mean – they can be somewhat cryptic. Try pasting them into a search engine and you may find the answer.
It’s worth persevering with a particular coding task before seeking help, you’ll learn much faster if you are able to spot your own mistakes. The definitive source of Java information is Oracle’s Java documentation. Start there when you need to look something up, but make sure you are consulting the correct version for the JDK you are using (Standard Edition 8 is the latest one) if you get there via a search engine.
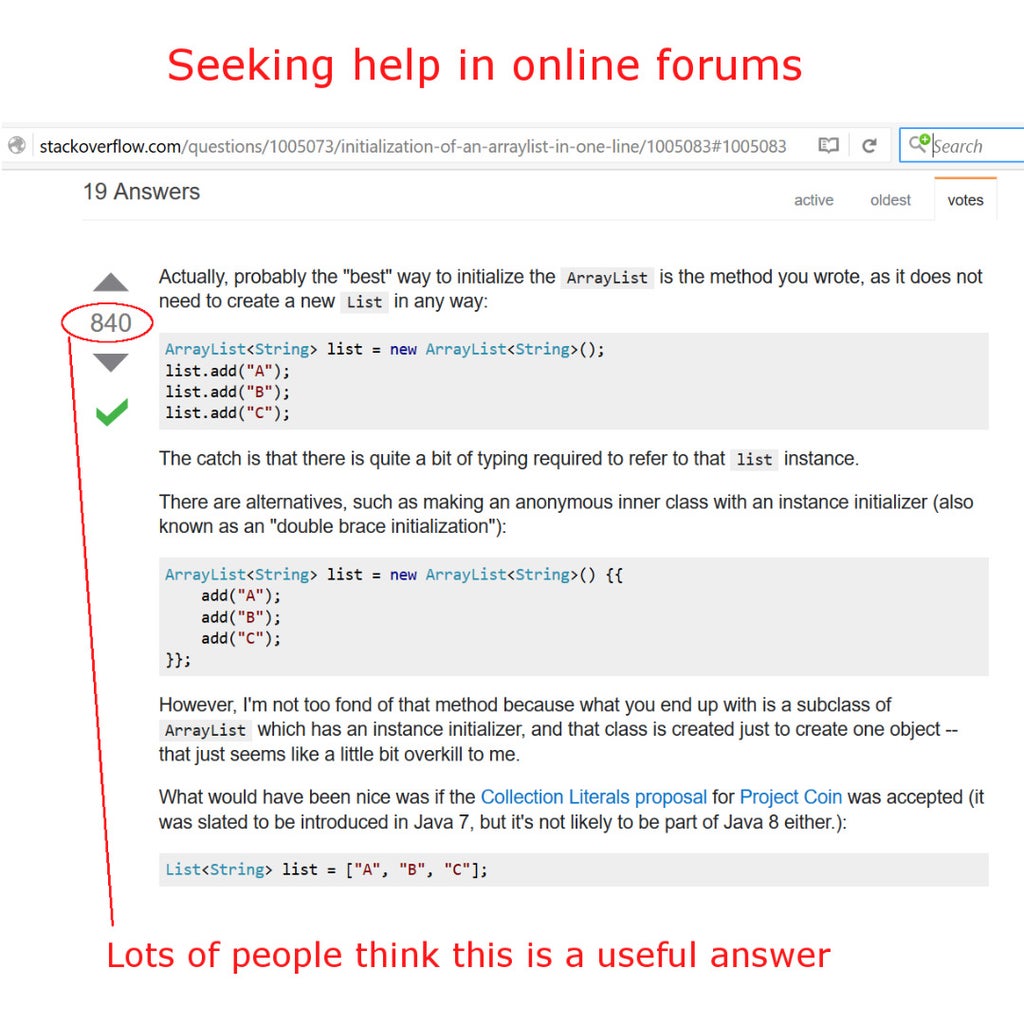
You can also try Googling your problem, and very often a thread on the Stack Overflow website will come up on the first page. Stack Overflow is an online community and forum for programmers, and when you click through to it you will see that members can rate the answers given by other members, and also rate the questions for usefulness. If you can find a question similar to your own problem, and one of the answers has a large number of people who have deemed it useful, then you can be pretty confident that it's a sensible answer.
If you haven’t made any progress after trying to solve a problem for a couple of days, then it’s time to seek more specific help. Have a look in the discussion forums for the course and you may find other students who have got stuck on the same task and then posted their solution or received a hint from someone else. Or you might be able to find yourself a coding buddy who’d be prepared to look at your code and offer advice if you’ll do the same for him/her. (Check that none of this is against the MOOC’s honour code though.) Often it’s much easier to spot the problem in someone else’s work, looking at it fresh, than find the error in your own code that’s been staring you in the face for hours.
Do you know anyone, anywhere in the world, who can code in Java and could help you out by email when you need it? If not, then you could sign up to a website such as Stack Overflow and ask for help from the community. But be aware that basic questions from newbies who haven’t bothered to read the Java documentation will not be well received.
Another good source of information for beginners (as well as more experienced coders) is GitHub. It’s a site to which people can upload code for collaboration or comment, which means it’s a great place to see how other people have tackled particular programming tasks as well as for seeking help when you just can’t work out why your code doesn’t do what it should, or won’t even compile. Like Stack Overflow though, you should make pleas for help only as a last resort; the experienced users of the site expect beginners to do their homework before troubling them with simple problems.
Tips
- Always put in comment statements to explain your code, even if you’re the only person who is ever going to see it. It’s a good habit to get into.
- Unless the code is only a few lines long, get used to writing a “skeleton” and then fleshing it out section by section, checking that it compiles before moving on to the next section.
- Follow the conventions for naming, laying out your code, etc, it will make the code easier for others to read and therefore to help you.
- Similarly, follow the Android material design guidance (which covers such things as colour palettes and button sizes) to create user-friendly, good-looking apps.
- If you are having difficulty writing your own code from scratch, then start by amending code provided on your course or elsewhere (eg GitHub) to add extra features, until you improve in confidence.
- Sooner or later, any decent Android course will cover use of the debugger in the SDK. Learning how to use it, and to understand the output messages from the compiler, are key skills. Unfortunately, getting familiar with the debugger is nowhere near as interesting as coding, but make sure you don’t skip that part of the course because you’ll waste a lot of time if you do.
- Try putting in a temporary print output line (eg
System.out.println("Variable newCounter = " + newCounter);if you are trying to find out whether the code gets as far as where the variable newCounter is used) and then moving it down the code, bit by bit, until you reach the problem area. - Don’t try to reinvent the wheel: there are standard, accepted ways of achieving certain results. If you’re trying to do something which seems like it might be a common task (eg swapping two items in a list), do an internet search to see how it’s usually done. The Android website provides some useful code samples.
- Look at others’ code and/or invite more experienced coders to comment on yours, because there are usually multiple ways of getting from A to B. Just because your solution works, it doesn’t mean it’s a good one.
Step 7: Practice Makes Perfect


As well as working through the exercises and projects in your Android course, you should start writing your own mini-apps as soon as you can. Each time you learn a new skill, build an app that uses it, or go a little further and build an app that takes it a step beyond. For example, if the course walks you through creating a counter app that uses plus and minus buttons to increment the total on the screen, then you could look up in the Java documentation how to code a spinner or radio buttons and create a counting app that allows the user to select a starting total other than zero.
Practising will help to fix the new knowledge in your brain and also reveal any gaps in your learning.
Inspiration for apps
When you start out, you won’t be able to do very much, but within a few weeks you may be thinking of useful things you could do with your new skills. But if inspiration is lacking, then try asking any friends or family members who have an Android phone what they’d like an app to do. Or look on the Google Play app store, or ITunes, to see if there’s anything there you could re-create for your own use.
Fairly easy things to do are:
- Counting and keeping track of things (such as laps of a running track, or units of alcohol consumed based on glass size and alcohol percentage)
- Dividing up the bill after a meal in a restaurant, and working out the tip
- Emitting different noises depending on how the phone is moved
- Working out the average, max and min when a lot of individual readings have been entered
- Generating fractal images, based on starting parameters inputted by the user
- Simple manipulation of images, eg converting a colour photo to black and white
- Simulating a roulette wheel or the throw of a dice
Learning Java (or any programming language) can be a frustrating experience and there will be times when you feel like giving up, but stick with it. Developing apps is a fascinating mix of knowledge, creativity, ingenuity and maths, and each app you produce will be a little more sophisticated than the last.

Participated in the
Rainy Day Challenge

Participated in the
Digital Life 101 Challenge

Participated in the
Full Spectrum Laser Contest 2016

![Tim's Mechanical Spider Leg [LU9685-20CU]](https://content.instructables.com/FFB/5R4I/LVKZ6G6R/FFB5R4ILVKZ6G6R.png?auto=webp&crop=1.2%3A1&frame=1&width=306)


