

Introduction: How to Fix an ATX Power Supply!


Chance is you can get your hands on an old power supply, or maybe you've already got one but with a broken fan, or one that doesn't run at all! Well in this instructable we will look at the most common issues and their fixes so you can save your wallet and landfill.
For those who don't know, PSU stands for Power Supply Unit. And the wires coming out a PSU are often referred as rails.
Some common signs of a broken PSU, or one not operating at its peak include the following:
- No power output
- The fan doesn't run
- The fan runs but very slow
- The fan makes a clunking noise
- Doesn't turn on
Warranty
Opening your PSU will void its warranty. So if it is still in date, just contact the seller and get them to help fix/replace it. If yours is second-hand, or very old, you can ignore this warning about warranty.
Disclaimer
All makers and hackers love ignoring the electrical warnings printed on devices, but as with all electronics, opening them up should be done at your own risk. If you aren't scared of electricity, you probably should be. A fan repair can be done fairly safely but power supply units have high voltage capacitors and these can hold a charge for a very long time. Make sure you know what you are doing and only do invasive repairs when you have no other option. At the end of the day, your life is more important than a weekend project, so if you don't fully understand what you are doing, just buy a new PSU or find someone with more electrical knowledge to help you.
With that said and done, let's get on with the repair!
Supplies

As well as your broken PSU you will also need the following tools:
- Phillips screwdriver (A screwdriver set works perfectly)
- Flat-Head screwdrivers
- Multimeter
- (Optional) Long nose pliers
- A small jumper cable
We will identify the specific issue your PSU has in the following steps, but you might also need the following:
- Light Machine Lubricant or Mineral Oil (For noisy fan issues)
- A fuse (To replace a blown fuse)
- A brush, Compressed Air or another method of removing dust (For issues with dust build-up)
- A soldering iron + solder
Step 1: Plug in Your PSU


The first and most obvious step is to isolate (disconnect) your PSU and provide power to it. Some PSU's have a switch for 230v/120v make sure you have chosen the correct input power, this is a very common cause of blown fuses and components. The PSU will not turn on until the green wire has been grounded. As you can see in the images above, use a jumper cable to connect the green wire to any black wire.
Don't be tricked, some ATX PSU's (mainly industrial or very high-power ones) will pulse on and off when powered but no load is plugged in, or they will simply turn off immediately. If this is the case for your PSU, you need to plug in a "dummy" load on the 5V rail. This is referred to as a base load. Connecting a 4.7 ohms 10W resistor between the red (+5v) and black (ground) is a well-proven way to do this. Sometimes you might need to connect a load to the 5V standby wire (purple) rather than the 5V wire directly.
At this point, the fan should spin up and you should be getting power outputs on all the wires. Regardless of whether the fan is working or not, move to the next step to check power outputs.
Step 2: Checking Power Outputs


Whilst you can go ahead and check all the different power outputs, really you only need to check a few. In this case, I have chosen +12v, +5v and +3.3v.
Connect your multimeter's negative lead to a black wire (ground), and then connect the positive lead to one of the coloured wires as written below:
- Red: +5V
- Yellow: +12V
- Orange: +3.3V
If you need specific power outputs, you could also test:
- White: -5V (not present on some supplies)
- Blue: -12V
If you have power outputs but also have fan issues, open the PSU as shown in the next step and then move on to step 4.
If you have no power outputs, open the PSU as shown in the next step and then move on to step 5.
If you have power outputs and your fan is running well, then your PSU doesn't appear to have any issues!
Step 3: Opening Your PSU


Before you do anything disconnect the power.
Now that you've done that, locate the screws that secure the top onto the base. Normally one or two screws are hidden under stickers so make sure you don't miss any. Then carefully slide off the lid.
Dust

You might find there is a huge build-up of dust, this not only causes components to heat up but also causes the fan to seize up. To clean your PSU, take it outside and put on a respirator/dust mask, then use a brush or compressed air to remove the dust particles. Make sure you hold onto the fan blades when using compressed air to stop them from spinning and damaging the fan.
Step 4: Fan Issues


The most common issue of an old PSU is the cooling fan. More often than not, the fan has run out of lubricant and due to that, it no longer runs smoothly.
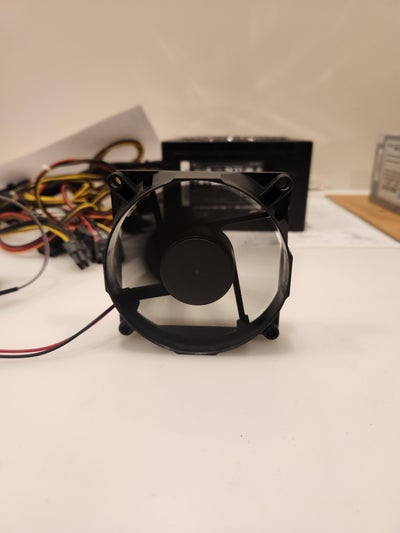
To start, unscrew the fan from the case and unplug it from the circuit board. We can now fully isolate the fan and start our repairs. First, try powering the fan with a completely separate 12V power supply (If it works then there is an issue with the circuit board, and you can wire 12V from one of the output wires to the fan internally - However this is almost never the case). If the fan still doesn't run or runs slowly it is time to start the disassembly.
Remove the sticker covering the back, try to save this as we want to stick it back on at the end. Then use a screwdriver or pliers to remove the plastic cover as seen below:

Then remove the plastic split ring. This can be tricky to do, but with 2 thin screwdrivers, you shouldn't have an issue. I have only put it on the end of an exacto-knife to show you what it looks like.

You can then remove the small rubber O-ring. Some are half-red half-black and if that is the case, remember which colour was down so that when you reassemble it later, you put it back in the correct orientation.

Now remove the blades. You can do this by gently pulling them away from the frame. They are magnetically held in place so you do need to pull them off, but it only requires very little force.

Now remove the rubber O-ring from inside the fan blades. This can just be done with your fingers.
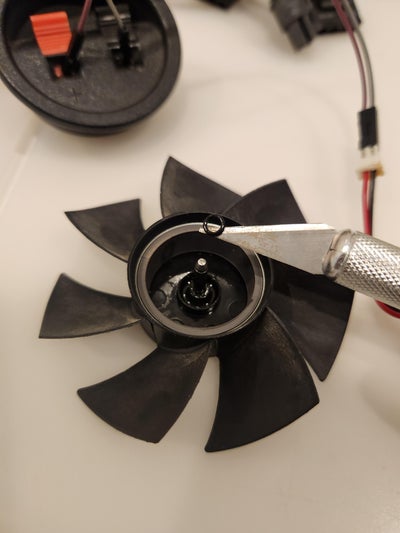
Using a clean cloth or rag, wipe off all the existing grease. You might need to use a screwdriver or knife to scrape off any solidified dirt but be very careful so you don't damage the fan. Then take your lubricant (Light machine oil or mineral oil are some examples) and pour a very small amount through the main shaft hole, and using a slightly soaked rag, wipe it onto the main shaft and the plastic around it. Push the fan blades back into place and spin it by hand to make sure everything gets an even coating. Then remove the fan blades once more, wipe off any excess or drips, and reassemble the fan in the opposite order we took it apart (You can refer back to the images above).
Here you can see the result of a fan I fixed, which initially wouldn't start due to the grease being completely dried up.
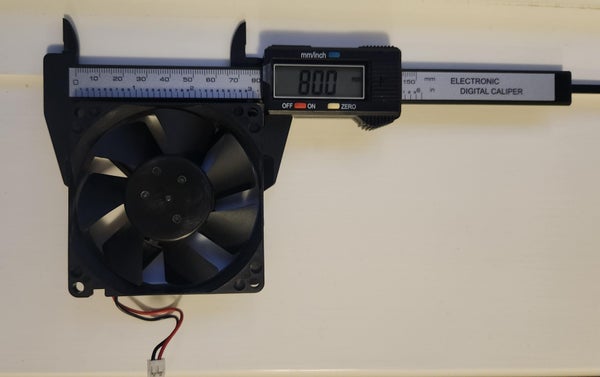
If lubricating the fan didn't work, try replacing it. The specifications of your fan can normally be found on the sticker stuck to the back. Normally they are about 12v 0.1A. Your replacement fan should match the original voltage and size, and have a current draw equal too, or less than the original. You measure a fan as shown below:
Step 5: Blown Components or Loose Wires


If you are reading this step, the chance is you've got a blown component or a loose wire. Checking the issues listed below in order can help you figure out what needs fixing.
Wires and Plugs
After opening your PSU, the first thing to check is nothing is unplugged. Sometimes external impacts can cause wires to be knocked loose or connections to come unplugged. If any wires are disconnected or unplugged, look for where they belong and reattach them/solder them back in place. You can refer back to the wiring schematic (that is hopefully) provided by the supplier, or read the little text that is printed onto the circuit board.
Power Switch
If all the wires are intact, check the switch is working. Using your multimeter in continuity mode, connect the leads to both terminals of the switch. The switch should have 2 positions, "on" (The multimeter should beep, or indicate the circuit is closed), and "off" (The multimeter should remain quiet or indicate the circuit is open). If your switch is broken, you can remove it, and replace it by sourcing another at a local electronics store.
Fuse
Given the wires are ok, and the switch is working, it is time to check the fuse. Identify the fuse which is likely soldered onto the board near the live wire (The brown wire in my case, coming from the panel-mounted socket). Use your multimeter in continuity mode to check the fuse by touching one lead on either side and checking your multimeter beeps (or otherwise indicates that the circuit is closed). If the fuse is blown, you need to desolder it and find a replacement to solder back onto the board. The new fuse must have the same rating (You can find the rating written on the fuse, or on the board). As you can see in the photo, my fuse was wrapped in black heat shrink, to replace it I simply cut it off and soldered on a new 12A 250V fuse.
Other Components
If none of these fixes have solved your issue, you've likely blown a different component. There is a group of 4 diodes that sometimes blow, but for those at entry-level electronics, I would advise stopping here. Those with more experience will know how to fix and replace specific components already and I'd advise checking the diodes first.
Step 6: Final Comments

Fixing something may take a bit of time as well as trial and error, but it is very rewarding. The more you can fix, the less you have to buy, and the planet benefits too.
I hope this instructable helps someone out and please comment on other fixes or solutions you've found too!
Other References and Instructables
Possibly the best ATX PSU instructable out there I could find is by LynxSys, you can find a link to his instructable below, additionally, I copied his reference list below for convenience as he has some great links if you want more information!
LinxSys ATX Power Supply Guide
General Information on ATX PSUs:
Wikipedia's page on Computer PSUs
Wikipedia's page on the ATX standard (link is pinned to the section on the PSU connector)
Great info on load-balancing and rails, as well as a nice page on connectors
Pin-outs for all common PSU connectors
Pinouts.ru wants you to know how every connector ever is pinned!
Helpful Project Pages from Outside Instructables:
WikiHow has a page with some helpful photos and good tips
From the above page: From 1996-2000, Dell used non standard wire-colors! Gah!
An interesting project to create a variable-output benchtop power supply from an ATX PSU
Other good Instructables on PSU modification:

Participated in the
Fix It Contest

![Tim's Mechanical Spider Leg [LU9685-20CU]](https://content.instructables.com/FFB/5R4I/LVKZ6G6R/FFB5R4ILVKZ6G6R.png?auto=webp&crop=1.2%3A1&frame=1&width=306)


