

Introduction: How to Interface With RF Transmitter and Receiver


In this tutorial, we are going to teach you some basics on using RF transmitter and receiver of 315MHz. These basics are applicable to RF transmitter and receiver type 433MHz too.
Step 1: Introduction
RF Transmitter
Description:
These RF Transmitter Modules are very small in dimension and have a wide operating voltage range (3V-12V). The low cost RF Transmitter can be used to transmit signal up to 100 meters (the antenna design, working environment and supply voltage will seriously impact the effective distance). It is good for short distance, battery power device development. These wireless transmitters work with 315MHz receivers. They are breadboard friendly and also work great with microcontrollers to create a very simple wireless data link.
Specifications:
- Working Voltage: 3V~12V
- Working Frequency: 315MHz
- Modulate Mode: ASK
- Dimensions: 19mm x 19mm x 5mm
RF Receiver
Description:
These RF receiver modules are very small in dimension. The low cost RF Receiver can be used to receive RF signal from transmitter at the specific frequency which determined by the product specifications. Super regeneration design ensure sensitive to weak signal. The receiver has 4 pins, but we actually use 3 of them: GND (Ground), VCC (5V) and one DATA pin. Same as RF transmitter, these RF receivers are breadboard friendly too. Both RF transmitter and receiver must work in pair in order to communicate with each other.
Specifications:
- Working Voltage: 5.0V ± 0.5V
- Working Frequency: 315MHz
- Modulate Mode: ASK
- Dimensions: 33mm x 13mm x 5mm
Step 2: Pin Definition


Step 3: Sample Hardware Installation

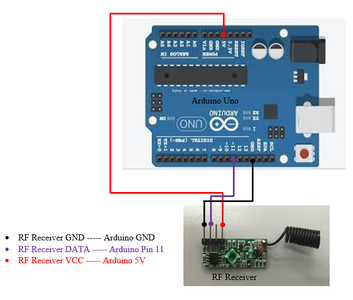
*Note that for each RF module, we are using different Arduino Uno to install them. For instances, RF transmitter is connected to Arduino Uno A while RF receiver is connected to Arduino Uno B.
And also, the sample hardware installation above is applicable to RF transmitter and receiver type 433MHz too.
Step 4: Sample Source Code
For the attachment section, source code for both RF transmitter and receiver is being uploaded.
rf_tx_2.zip is the source code for RF transmitter while rf_rx_2.zip is the source code for RF receiver.
Note: kindly download the library attached below for your own use. The above sample source code is compatible with RF transmitter and receiver type 433Mhz too.

Step 5: Ways to Open Serial Monitor


Step 6: Result

The picture above shows the result on the Serial Monitor after the message sent by RF transmitter is being received by RF receiver.


