

Introduction: Learn How to Setup the Wifi Module ESP8266 by Using Just Arduino IDE


In This Tutorial, I Will Show You How To Setup ESP8266 Module just By Using Arduino IDE not External TTL converter.
Step 1: Turn on Your ESP8266 Module
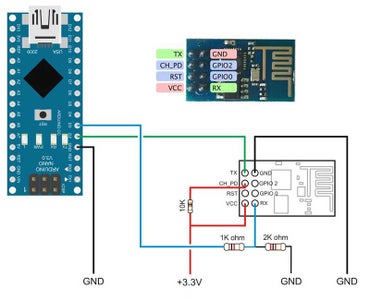
Turn On Your ESP8266 Module by Using Arduino Nano 3.3V Dc Output Pin. Remeber sometimes Arduino board is not delivering sufficient voltage to the ESP8266 module. You can use a 3.3 V ( Do not exceed input voltage from 3.3v) regulator ( AMS1117 ) to power this module. A voltage divider circuit is used to drop the Arduino 5V to ESP8266 3.3 V.
Step 2: Schematic Diagram
Here is the schematic Diagram, in my code, I used Digital pin 2 as a Tx and D3 as an RX.
Source Code
Step 3: Open Arduino IDE
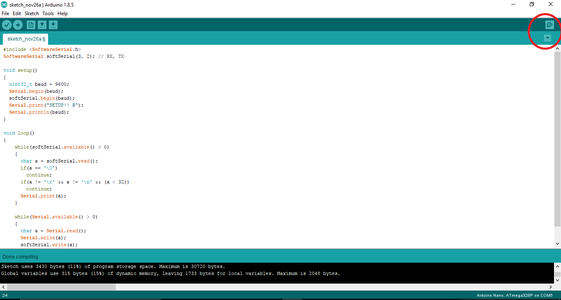
Open Arduino IDE and Paste the source code in the window just like shown in the picture.Open Serial Monitor and Set Your Baud rate to 9600.
Step 4: Send at Commands to Your ESP8266 Module

You are ready to send At Commands to Your ESP8266 Module. Remember you will see a Garbage value during Serial Communication.
AT – Will give OK on the serial monitor, if Not just unplug vcc Pin of ESP8266 Module for a moment and reconnect again.
Send AT+RST – Command to Restart module / Optional Command
Send AT+GMR – To get the firmware version
Send AT+CWMODE? – Set Module to a Dual Mode Sucha as Standalone + Access Point mode.
Send AT+CWLAP – Command to Search Nearby Wifi Access Point. Find your Wifi Name in the Search Result.
Send AT+CWJAP="Your Wifi Name","Your Wifi Password" – Command to Connect to WIFI.
Send AT+CIFSR – Command to Check Allocated Ip given by your Wifi to your ESP8266 Module/Optional Command.

![Tim's Mechanical Spider Leg [LU9685-20CU]](https://content.instructables.com/FFB/5R4I/LVKZ6G6R/FFB5R4ILVKZ6G6R.png?auto=webp&crop=1.2%3A1&frame=1&width=306)


