

Introduction: Modern Side Table Build


Building A Modern Oak and Metal Side Table
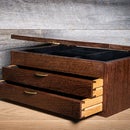
In this video I build a modern side table for my living room. Featuring A hand cut dovetail drawer, an awesome inset metal drawer pull, and continuous mitered edges.
I have been on a mission to upgrade my home as of recent. Probably because I no longer live alone, and I do have the skills to improve my home's equity. With those improvements comes new furniture to go with it. So after making my Concrete Coffee Table I wanted to complement it in the room with some wood. So I came up with the design for this beautiful Modern Side Table.
If you want to see how I built it, check out the full video HERE!
Step 1: Break Down / Glue Up Panels

Breaking down the lumber is the same as any basic standard process. Rough cut, joint, and plane the material to thickness. From there glue up all 4 panels.
Step 2: Flatten & Miter Panels


When the panels are out of glue up, you want to flatten and and prep these panels for final glue up. Using a hand plane, flatten each panel, and sand and scrape them. Cut one side miter to 45* and then set the table saw to cut the opposite side to make sure all panels are the same size.
Step 3: Cut Joinery & Glue Up Carcass


I use a domino Xl to reinforce the miters. I do recommend reinforcing them with some sort of joinery, whether its a biscuit, domino, or spline. As the wood moves it will expand apart due to its size. I glue it up using a ratchet strap to get uniform clamping pressure.
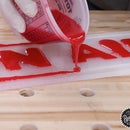
Step 4: Create Drawer Front


Cut the drawer front to size based on the inside distance from the glues up carcass. Cut the joinery for the inset pull. I used my Axiom CNC for this, but can easily be done with a router. Then shape your metal handle using basic metal working tools.
Step 5: Hand Cut Drawer Box


Cut a drawer box to fit the chosen slides and sizing specifications you look for. I chose to cut mine by hand, and after 3 screw ups, got it right.
Step 6: Cut & Assemble Base


Using flat bar, or cutting strips from plate like I did. Weld the base together and grind it flat and smooth. Prep it with your favorite primer and finish combo.
Step 7: Sand, Finish, and Assemble


Final sand the piece down to 220 Grit. I chose a simple and beautiful finish with Minwax Wipe On Poly. I love this finish for projects like this. Its highly durable and so easy to apply.
Hope you enjoyed this project
If you would like to see more check out my Whole channel here

Participated in the
Furniture Contest 2018


