

Introduction: Pinhole Camera for Teaching and Research


Build some simple pinhole cameras to learn about the fundamentals of what a camera is, and how it works.
This Instructable teaches, in the most fundamental way, the first and foremost
element of imaging: what a camera is.
The word "camera" is an abbreviation of the Latin term "camera obscura" which means "darkroom". "Camera" is Latin for "room", and "obscura" is Latin for "dark". Early cameras were large darkrooms and people would go inside the camera to see the picture. Leonardo da Vinci wrote about this in his Treatise on Painting.
In the old days, many years ago, sometimes people would setup or build a tent or other structure and put a blank
framed canvas inside to make a painting of the image that appeared there.
which will provide useful background.
In this Instructable you will experiment with the camera obscura principle.
In the first part of the Instructable you will build 2 cameras, a large one and a small one, and experiment with various aperture sizes and note the effects of aperture size versus camera size on the sharpness and light qualities in the camera.
The pinhole camera is typically a box (such as a room, lab, wood shed, tree fort, or large or small cardboard box) with a small hole in it that lets light in on one side, and a white or light-colored surface on the opposite side where an image (picture) is formed.
In the second part of the lab you will try to understand the mathematical principles behind this very simple form of imaging, considering periodic (repeating) subject matter as imaged by an ideal pinhole.
Supplies
You can build a really simple pinhole camera using everyday household items like an existing room with a window you can cover with black cardboard, or a large or small box, white paper, black paper, tape, scissors, etc..
Step 1: Plan Your Design and Calculate Your Aperture Size Based on the Size of Your Room or Box

In order to really understand the pinhole camera, you are going to design two cameras, a large one, and a small one, so you can really understand what's happening as a function of scale (size).
Ideally the large camera will be big enough that you can fit inside it, e.g. ideally a nice large room, or at least a large crawl space. For example I built a camera in a spare room in my house, and I also build one in my darkroom, and in one of my labs at University of Toronto, and one in my wood shed (storage room). Many people build one by accident without even trying. For example, growing up, we often find ourselves in a tree house or shed made of wood, and there's a knot in the wood that lets light in. Sitting there we might see an image on the opposite wall. Have you ever slept in late one morning and had the curtains to your room slightly open just a small crack at the top, and been able to see moving shadows on the ceiling as someone walks by outside?
Measure up your room or space or box or whatever you're going to make the camera in.
The most important dimension is the distance from the hole (aperture) to the screen (image plane).
This will determine the optimum size to make the aperture (pinhole).
The optimal pinhole size is based on a tradeoff between classical optics (i.e. that light travels in straight lines) and modern optics (diffraction effects). Classical optics would have that a smaller hole gives a sharper image. So a big window makes a really fuzzy image, but blacking out most of the window except for a small hole makes a sharper image. But today it is well-known that the far-field diffraction pattern is the Fourier transform of the electric field across the aperture. So when you make the aperture smaller the diffraction pattern gets bigger. Take a look at this for example from Lecture 1: http://wearcam.org/html5/mannkeynotes/images/plotter_stepper_motors_interference_patterns_varying_spacing.gif.
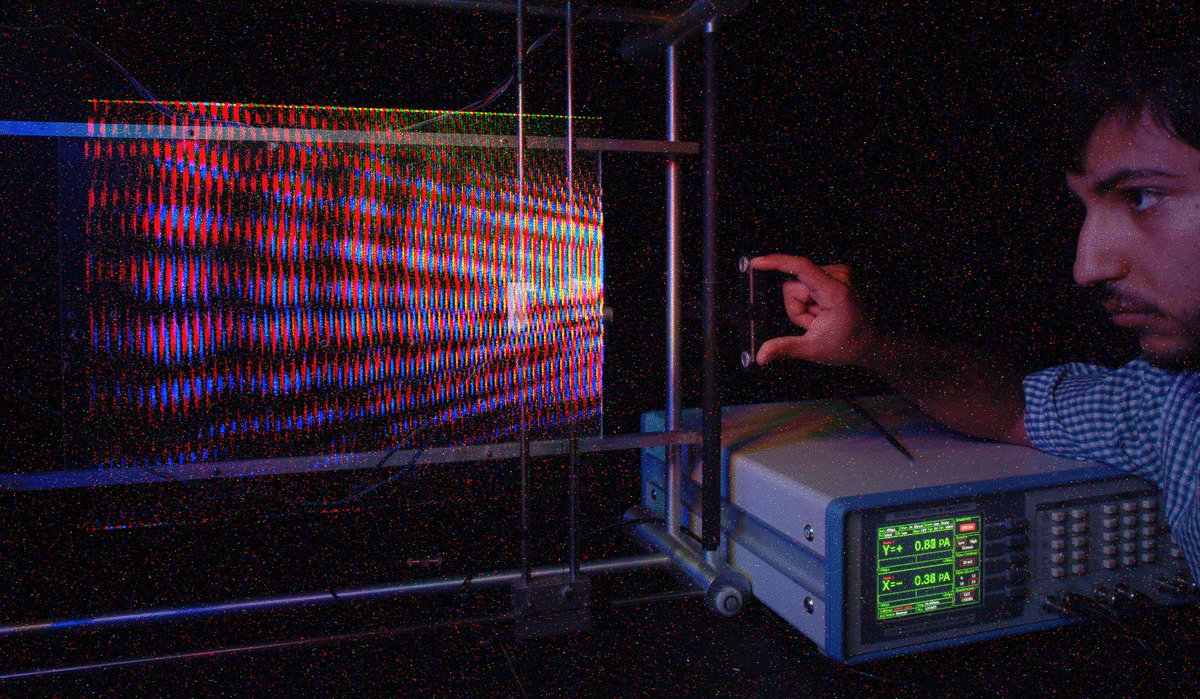
As you can see there is a kind of reversed effect: at some point a smaller hole gives you a fuzzier image (more spread-out diffraction pattern). Notice in the above .gif animation that when the aperture (opening) is made smaller (when my student, Alex, squeezes the transducers closer together) the waves spread apart more and have less detail. When the transducers are further apart, the waves are closer together and have more fine detail. Thus from diffraction, a larger aperture produces a sharper image.
A great deal of research has been done regarding the optimum aperture size. Here's the general formula for diameter of the aperture:
d=c √(fλ),
where
d = optimal hole (aperture) diameter;
f = focal length (distance from aperture to image plane);
λ= wavelength of light, e.g. pick something around the middle of the range of human vision such as green = 550nm (which is also the wavelength to which human vision is most sensitive), or to which your sensor or film is most sensitive;
c = a constant related to the Rayleigh criterion 1.22λ/d (with some adjustment for other factors).
We usually use something in the range from c=1.56 to c=2.
So if your screen is 50cm from the aperture, it should be about 1mm in diameter.
If the screen is 1 metre from the aperture, it should be about 1.5mm in diameter,
and if 2 metres away, 2mm in diameter, 4 metres away, 3mm in diameter, and so on.
Likewise going smaller, your aperture should be about 1/2 a millimeter in diameter if it is 10cm away,
1/5 a millimeter (200 micrometers) in diameter if it is 2cm away.
That last example matches closely to the pinhole camera I made from a 35mm camera by simply replacing the lens with a 200 micron hole in a piece of metal foil. It is about 2cm away giving the camera a roughly 90-degree horizontal field-of-view (approx.±45 deg.).
So think it through a bit, but don't overthink. For some of us, the "Jazz approach" (tinquiry = tinkering as a form of inquiry) is better than the classical (planning) approach. Cardboard boxes are free if someone's throwing them away and I learn a lot more by just making a bunch of pinhole experiments and keeping the best ones.
Someone asked me for a "Steve Mann aphorism" and I said "Measure once, cut thrice.", meaning when materials are free (or cheap) it is often faster to make one quick rough measurement and then cut three times (thrice), i.e. cut iteratively. In fact I often measure zero times and cut several times, e.g. rather than planning too much, I like to use the "Let's get started" approach. Tinquiry is about not doing Gantt charts, and just trying things quickly at first. Planning is for later when you want to make a really nice prototype. For initial rapid prototypes, I would say "Later means never." (i.e. "later" is a close-cousin of "never") and sometimes time "planning" is better spent "doing".
Step 2: Building a Large "Camera Obscura"


Build a large "camera obscura" and a small one.
For the large one you can use a room in your house, or a nice large box that you can look into easily.
For the small camera build something into which you can fit a smartphone or a smartphone lens to take a picture of a picture in the camera. In either case you are taking a picture of a picture. This is called metadocumentary, metaphotography, or metavision, or Through The Viewfinder (TTV) photography. Meta is a Greek word that means "beyond", e.g. a meta-conversation is a conversation about conversations, or a meta-argument is an argument about arguments. Meta-data is data about data, e.g. the GPS location in which a photograph was taken embedded into the header of a JPEG photo.
For the large camera I built a few variations, one in my darkroom which has a skylight cover (into which I made a hole), one in my lab (the door of which I drilled a hole in), one in my wood storage shed (also drilling a hole in the door), and one in a room in my house.
The easiest and most effective was the room in my house. I chose a room with white walls to serve as the projection screen, and on the opposite wall which had a window, I covered the entire wall with black paper except for a small hole.
It is best to make the hole large enough to let a good amount of light in to see initially the general effect, and then make that hole smaller using black electrical tape. The tape is thinner than the cardboard and makes a better edge.
A North-facing window works best so that the sun is behind you (behind your camera), rather than shining on the aperture (hole) which can cause glare.
In the room I also put some furniture: a white chair and a white table on a white rug, so everything including the white door is a surface to see the images on, and the black wall is to keep the contrast high. The room must be dark except for the pinhole, so I had to block off a few light leaks with black tape.
It takes a while for your eyes to adjust to the dark.
It is best to have a larger aperture to see brightly and then smallify it with a simple "f-stop" (black tape with round hole) for taking a picture with your smartphone or other camera. I used ISO 3200 at 30 seconds on a cloudy day but when the sun came out I was able to shoot around ISO 800. Images shot on a sunny day tend to have better contrast and appear sharper even though their resolution is about the same.
Step 3: Building a Small "camera Obscura"


I like to think of "large" as meaning something I can fit inside of, e.g. a room, woodshed, or a large box that's big enough I can put my head into so I feel like I'm inside the camera.
But it is also interesting to build a smaller camera such as a box that you experience the image from outside-of.
The easiest way to do that is to put a piece of white paper on the inside of the box along one face, and a piece of black paper on the opposite face.
Cut a hole about 1 inch by 1 inch square into the black end of the box, right in the middle.
Then make the hole smaller by using black electrical tape, which has a nicer edge than the rough cut edge.
Also the cardboard is kind of thick and would restrict the camera's field of view.
Black electrical tape is nice and thin and results in a nice wide field of view.
The horizontal field-of-view of the image is about 90 degrees (+- 45 degrees) so the image provides a nice wide view.
You can see the image on the screen (sheet of paper) as well as beyond the screen.
Step 4: Comparison Between a Large Pinhole Camera and Small Pinhole Camera
An easy way to capture your results is to take a picture of a picture. This is called metadocumentary, metaphotography, or metavision, or Through The Viewfinder (TTV) photography.
Meta is a Greek word that means "beyond", e.g. a meta-conversation is a conversation about conversations, or a meta-argument is an argument about arguments. Meta-data is data about data, e.g. the GPS location in which a photograph was taken embedded into the header of a JPEG photo.
Explain what you noticed about the large camera versus the small camera.
What size pinhole worked best for the large camera? What size pinhole worked best for the small camera?
Consider two cameras, one that has f=1m (distance from aperture to screen is 1 metre), and the other having f=4m. The optimal diameter of the aperture would be about 1.5mm for the small camera and 3mm for the large camera. Note that the large camera is four times bigger but the hole is only twice as big in diameter, so we can expect the bigger camera to capture a "better" (i.e. more detailed) image of the subject matter. The larger camera requires 4 times as much light because the aperture lets in four times as much light (the amount of light let in is the square of the diameter), but since it has 4 times further to go, it is reduced 16 times (inverse square law). Thus 4/16 = 1/4 the sensitivity. Another way to think of this is that the larger camera has an "F" number (f/d) twice is high. Twice the F number requires 4 times the light, like when you go from F11 to F22 you need four times as much light.
Thus the big camera needs more light, and provides less depth-of-field, but captures more detailed pictures.
You should confirm this experimentally.
Step 5: Building a Really Small-scale Pinhole Camera


Another thing I tried was just using a camera with removable lens and replacing the lens with a pinhole.
The camera has a 24mm by 36mm sensor array. I put a pinhole about 1.8cm from the sensor array. The diameter of the hole is 200 microns (0.2mm).
The pictures are kind of soft and dreamy which produces an interesting photographic effect. It also shoots 4k video (turned a beach trip into creative art... https://www.facebook.com/100000075701043/videos/3927162877296197/).
The depth-of-field is quite extreme, i.e. things that are 1mm away from the camera are as in-focus as things that are infinitely far. Nothing's really in focus but nothing's really out-of-focus either.
This afforded lots of creative potential.
See my previous video on the mathematical relationship arising from a simple pinhole projection model.
For a fun look at pinhole mapping of periodicity, see my article in the MIT arts journal,
Step 6: Projective Chirping


One thing I experimented with was "periodicity-in-perspective".
I shot a variety of subjects in which there was repeating patterns. You can see the "chirping" effect in which the spatial frequency goes up or down depending on which way the subject is oriented. Position your pinhole camera at a 45 degree angle from a railing or brick wall or tiled wall or the like, and observe the "chirping" effect.
Be sure to click "I Made It" (the box further down the page that looks like this " )" and post your results.


