

Introduction: Reclaimed X Style Trestle Table | How to


Check It out!
In this video I build a reclaimed wood dining table 100% from completely reclaimed wood. I morphed a pedestal base with a trestle style and it came out killer! Make sure you check out the video and subscribe to my Youtube Channel for more builds like this!
To attempt this project you'll need a few tools
Step 1: Pick Out Your Lumber, and Mill Everything Square


To begin your project you're going to want to pick all of your lumber and mill it down to square. This is the standard process for any build, but take your time if you're using reclaimed wood. Make sure to remove as many nails and metal for the material as possible. I use a roll punch, plyers, a cats paw, and a hammer when I de-nail reclaimed stock.
Step 2: Glue Up the Table Top


- When building tables I always get the top handled first. That way its done and you can focus on the base joinery. This table I use a liberal amount of glue and some clamps. Simple and easy.
- Once you let the top dry overnight, attach your breadboard ends. I use floating tenons and my Domino XL for this. To compensate for movement make sure you only glue the tenons into the breadboard, and the center tenon on the table. Use loose joints in the all the tenon joints except the center. You will pin the tenons in place on the bottom of the table using glue and this will lock the breadboard in place.
Step 3: Mill Up Base Stock and Glue Up Posts


Moving on to the base, you'll want to mill down all your materials. I glue up the posts for the centers of the base and set those aside. After they dry I'll have a rough 3.5" x 3.5" post for the base centers.
Step 4: Cut Bracing and Joinery for Base Posts. Then Assemble


After squaring all you material, cut the gussets for the "x bracing. Then cut your jointer for attaching them to the post. I use a Domino XL for this part, using titebond 2 for the tenons and clamping it with CA glue and activator. This lets the strength some from the titebond, and you dont have to rig up an awkward clamping situation.
Step 5: Cut Lap Joints for the Stretcher and Glue Up the Base Top and Bottom


I use lap joints on the stretcher for the pedestals top and bottom. Its a simple and easy joint that holds square and is easy and fast. I cut mine on the mitre saw and assemble with some screws.
Step 6: Fasten Base Top and Bottom


I fasten the base posts with 10" lag screws and use 3" Deck screws to fasten the supports. With the angled joinery this is the fastest and easiest way to add the gussets in.
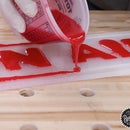
Step 7: Flatten Top, Tape Off for Epoxy Fill


I flatten the top once its dried from glue up, and then tape off the holes and fill them with a slow setting epoxy. This makes for a better eating surface in the final product, but it not 100% necessary.
Step 8: Sand and Finish


Sand the base and top to your desired grit, I sanded to 220. Then apply finish. I prefer General Finishes Endurovar, It has a high build and a great "hue" to it, for being water based.
I spray on my finish and screw the top to the base using a large hold for expansion and 3" Lag screws
If you would like to see more about this build check out my Youtube Channel, and my website.
Thanks!
John Malecki


