

Introduction: Remote Detection of Objects Tilted or Not


In this project, we will show how to check the tilt sensor values on NodeMCU, then send these values to the OSOYOO IoT APP, so we can use the APP to get these values remotely, then determine whether the object is tilted .
Supplies
Hardware:
- NodeMCU board x 1
- Tilt sensor x 1
- 10k Resistor x 1
- Breadboard x 1
- Jumper wires
- Computer x 1
https://osoyoo.store/products/osoyoo-nodemcu-iot-starter-kit?variant=18429822238838#utm_source=instructable+1&utm_medium=instructables+page&utm_campaign=instructable+1&utm_id=instructable
Step 1: Connection
Overhere,we use A0 as the analog input pin.

Step 2: Upload Sketch
Connect the NodeMCU to computer via USB cable,open this sketch by using Arduino IDE(Version1.6.4+):
Edit the code to fit your own WiFi settings as following operations:
1)Hotspot Configration:
#define STASSID “***” // replace *** with your wifi SSID
#define STAPSK “***” // replace *** with your wifi password
Find above code line,put your own ssid and password on there.
2)UDP local port Settings
// Define the local port to listen on
unsigned int localPort = 8888;
We use the “8888” local port here, you can change it to your own local port.
3)Boad & COM Port Settings
After do that,choose the coresponding board type and port type as below,then upload the sketch to the NodeMCU.
- Board:”NodeMCU 1.0(ESP-12E Module)”
- CPU Frequency:”80MHz”
- Flash Size:”4M (3M SPIFFS)”
- Upload Speed:”115200″
- Port: Choose your own Serial Port for your NodeMCU
Step 3: UDP APP Settings
About how to config the UDP APP,check this link.
Click the setting icon button, you can see the UDP configration page.
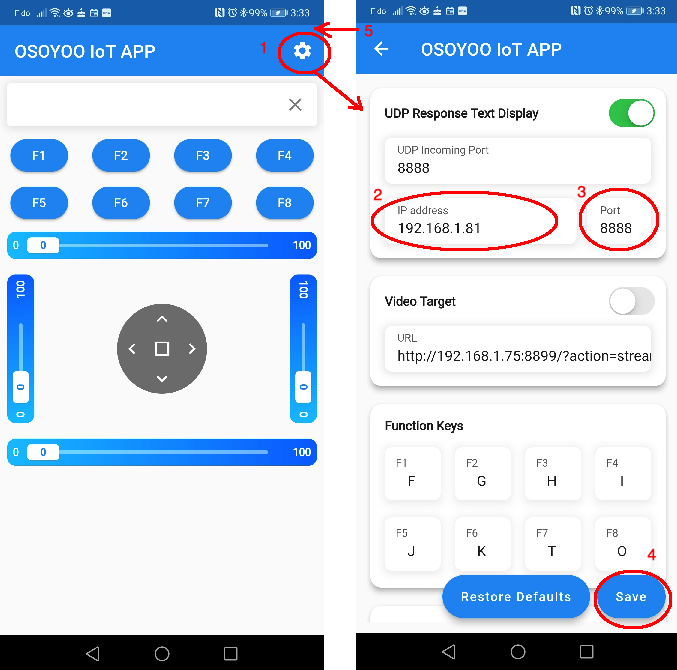
UDP response text display enable button – Enable text play
UDP Incoming Port – Use this port to listen for and accept connections from remote UDP devices, keep the default setting : “8888”
IP address – Change it to your NodeMCU IP address, you can get the IP address from the Arduino IDE Serial Monitor after the code upload down.
Port – Keep the default setting: “8888”.
Keep other settings as default, then click the “Save” button to save your changes.
Step 4: Running Result
Upload the code to Arduino board, then open Arduino Serial monitor in the upper right corner.
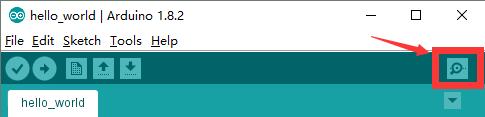
Now please set your Baud Rate to 115200
you will see NodeMCU IP address as following:
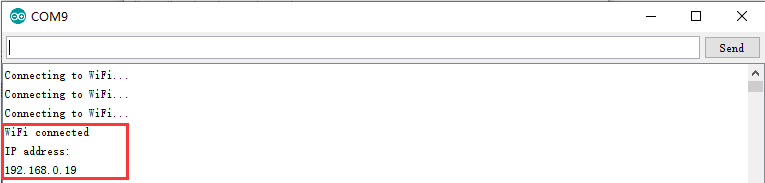
Above result shows your NodeMCU IP address (in my case, 192.168.0.19) , NodeMCU is now waiting for UDP message at port 8888.
Onece the upload done,if wifi hotspot name and password setting is ok and UDP APP is connected, open the Serial Monitor, when you put down the tilt sensor linked to A0, you can see a corresponding value:
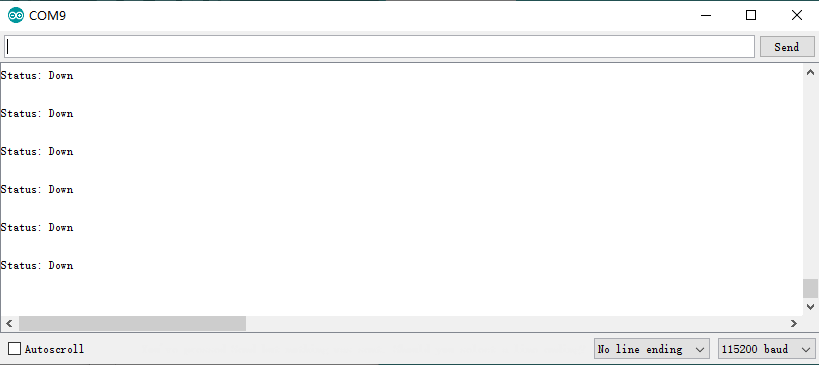
At the same time, open the UDP APP ,press any function button on the APP,


