

Introduction: SIMPLE BUT PROFESSIONAL TELESCOPE FOR BEGINNER ASTRONOMERS


SIMPLE BUT PROFESSIONAL TELESCOPE FOR BEGINNER ASTRONOMERS
Here is a really good, and very cheap DIY-telescope for beginner astronomers.
The budget is under 15 euros (or 16 $), you only have to spend a small money for the lenses, but this means that the image of your tiny scope will be an excellent, sharp, professional-like, so you are able to see the Jupiter and Venus as a globe, you can see the rings of Saturn, an hundreds of the craters and other surface object on the Moon using it, or, in clear weather maybe this scope can show even the four main (Galilean) moons of the Jupiter.
Step 1: THE PARAMETERS AND THE LENSES


The scope is a simple Kepler, its magnification is almost 20x, which is enough to start some astronomical stargazing. The image is shown upsidedown in it, so the terrestrial using is not recommended, but you should know, to "stand up" the image is necessary with plus lenses, but the quality of seen image is alvays poorer using extra optical elements. Astronomers don't mind the upsidedown, because they prefer the sharp, rich contrast images, and, in the space there is not any meanings of the earth-centered directions.
The lenses are the most important parts. Perhaps you would use simple eyeglass or acryl lenses laying over in the drawers or in forgotten boxes on the attic, but there are two important reason to avoid them. First you never know the exact focus, and rarely can find lenses with the optimal parameters for a good telescope. The other reason comes from the cruel facts of optics: simple lenses (like eyeglasses, glass or acrylic magnifiers) never can image an object in the focus without distortion.
There are two very serious problem with them: the spherical and the chromatic aberration, (and even one of these can totally ruin the image, but these distortions always exist in both). Well, that's why every trying to make scopes with eyeglasses or home magnifier glasses ends with a sad disappointment, when the beginners look through thein DIY scope to gaze a star or planet. The seen object in these scopes are fuzzy, rainbow-edged spots, which may be beautiful as disco light, but doesn't show any details on a celestial body. So I recommend you guys, when you decide to build this small scope, DON'T use simple lenses, but follow my instructions to get lens, and your scope will be a semi pro instrument for cheap.
The optimal lenses for a good telescope are achromats. This means these are planned with two, different material lenses, which have different refraction, well designed surface curves to fit each other, for the distortion-free imaging, and to neutralize the chromatic aberration. The entry level achromats are glued together (also known as 'glued achromats'), and have very clear and sharp image in a telescope. You should get these to build an excellent Kepler-scope.
But how to get them? Very easy, here is a site where you can find them (and others, too). You will need three lenses (originally it's enough to use only two ones, but this alignment is more professional). Two lenses are the same size, and the third is bigger. But now let's see the parts of a Kepler-scope, where I'll explain the whole project.
Step 2: THE KEPLER-TELESCOPE


This arrangement is a very old and very simple way to magnify distant objects. The parallel lightbeam from the object reaches a large diameter and relatively long focused collector lens, gets refracted and travels to the focus point, where gets into a small diameter, short focused lens, which magnifies the image. The large lens is the 'objective', the small is the 'eyepiece'. The focus lenght of the objectice and the eyepiece added together gives the total lenght of your telescope, the ratio of the lenses gives the magnification. But in this scope I planned a twist, because, if you put two similar achromatic lenses together as seen on the picture, you get a very good eyepiece with double magnification, named Ploessl-eyepiece. Thus we use 3 lenses with the following sort:
The objective - 5 eur
focus = 250 mm diameter = 30 mm
Art.Nr.: 569.OAL - this is the number you can identify the objectiv lens.
Here is its datasheet on the AstroMedia: http://astromedia.eu/Material-fuer-Selbermacher/O...
You have to get 1 of this lense for the objective.
The eyepiece - 4,6 eur.
focus = 26,5 mm diameter = 18,0 mm
Art.Nr.: 551.OAL - this is the number you can identify the eyepiece lenses.
Here is its datasheet on the AstroMedia: http://astromedia.eu/Material-fuer-Selbermacher/O...
You have to get 2 of them for the Ploessl-eyepiece. But one lens for a simple eyepiece with 10x magnification is also possible.
Step 3: MATERIALS AND TOOLS
Over the lenses, you will have to get some elements, but those are very common.
Let's see the materials:
The 3 achromat lenses, as explained above
A hoover tube, plastic or metal (26-27 cm lenght)
An old pen or some plastic tube (cca. 5-6 cm lenght)
2 bigger plastic bottle cap Black sheet (not glossy!)
Insulate tape
Some cardboard stripes in some mm-s to drive and keep the eyepiece tube.
And the tools:
Cutter or scissors
Glue tape, and some liquid glue
Step 4: ASSEMBLING OF THE MAIN TUBE


The tube of this telescope will be made of an old hoover tube. Its outer diameter is 30 mm, but it has a wider part at its end which inner diameter is a bit more than 30 mm. This is ideal for our small objective lens, and gives a short overrunning edge at the lens - this ring-like part doesn't let in the ambient light around the telescope.
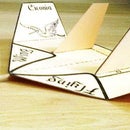
With this ible I count with the mentioned lenses, but you can easily convert my sizes for other lenses, too. The lenght of main tube is the focus of the objective. In this case this size is 28 cm. The smaller tube (as seen on my drawing) is the eyepiece tube, it will slide when pushed-pulled in the main tube. And you have to cut a piece of foto cardboard, if you have, to cover the inner surcace of tubes, to avoid the unwanted reflections inside.
Take the plastic tube, cut it to the reqired lenght (27-28 cm), and roll around a black cardboard sheet, and put it into the tube in 20 cm lenght from the wide end. Now try your bigger lens into that end - it must be fit easy. If you done it well, you got a tube with black inner part.
Now take two bottle caps, and carefully cut their edge to get two plastic rings. These rings will support the lens without any gluing - you will have to cut a short piece from them to be able to roll them a smaller diameter when inserting. Push one of them into the wide end of the main tube, push it into the neck of the wide part, and be sure if it doesn't tilt inside. Now carefully put the big (30 mm diam.) lens out with its convex side to the sky, and push the other ring above it firmly. You can strenghten it with a small glue, but only the plastic ring, not the lens. If the lens is moving a bit inside, it's not a big problem. But never forget: the large lens must placed with its convex side to the sky. And with this operation you almost finished the assembling of the main tube.
Step 5: ASSEMBLING OF THE EYEPIECE TUBE (AND BAFFLES)


The eyepiece tube is different a bit. Find an old pen or any else plastic tube with cca. 20 mm inner diameter, and at least 5 cm lenght. Then take the two small lenses, set them face to face, as seen on my plan, with the convex sides towards each other. This is a very important part; the Ploessl-eyepieces are very efficient because of this trick. Let the distance between them 1-2 mm, not more.
Now try to roll this system into the insulating tape, but be careful, don't let the parts tilt or move. The axial symmetry is very important at this case. Roll the unit into the tape untin it fits into the eyepiece tube firmly, and set it into balanced position, because this unit must fit properly there, at the end of the smaller tube.
Optional baffles: If you want a professional edged eyepiece, then before the assembling the lenses cut a small disk from cardboard with the diameter of your lenses, and carefully cut out its inner part, to get a 2 mm, flat ring. The diameter of the inner hole must be cca. 12-14 mm. Make 4 baffles like this, and arrange them with the lenses as following: baffle - lens facing right - two baffles - lens facing left - baffle. This last baffle may have smaller inner diameter, cca. 10 mm. With this trick your viewing field will be reduced a bit, but its edge will be sharp. But the correct hole sizes must tried before the final assembling.
You may have small inconvience with the size of the inner ring of baffles, perhaps its not so elegant, because you will see all of your cutting errors magnified, but this is a little problem, and may be avoided, if you try the rings before fit them into the ploessl, or use a metal hole puncher set to cut industrial like holes. Here you should do some experiments to reach the best, but this part hasn't any influence to the imaging, only to the wieving area and its border. And try to find some proper size washer for screws what you can use. Be creative! I haven't made baffles in this scope, so my viewing field is fuzzy at the edges, anyway...
WITHOUT PLOESSL
If you want to spare money, you can build the scope with a simple eyepiece. In this case you should buy only one small lens (and spare cca. 5 euros). But then your magnification will be halved, about 10x. Even this magnification is enough to notice craters on the Moon, but the Jupiter and Saturn won't show details. If you use one eyepiece lens, its convex side should face to your eye.
Step 6: FINAL STEPS


Now you have almost finished the telescope, just only one small part is missing: to push and pull the eyepiece firmly but smoothly, you must glue 3 small stripes of some layers of cardboard into the free end of the main tube. Fold them in half, and put them in pointing the 'V'-shape to the end of the tube. When ready, carefully push the small tube into the large one, and try to sharpen the image. If you were succesful, you must see an upsidedown image in very good quality - with fuzzy viewing field edge, if there was not baffles, or with sharp edges, if there was.
If you can't find the sharp image moving the eyepiece tube, maybe your tube is too long or too short - in this case try to use some math: the focus of the objectiv is 25 cm, the ploessl is 1,4 cm, add them together, and measure the path of the light from lens to lens. Try to pull the objective out a bit (that's why you shouldn't glue it), or cut from the main tube at its eyepiece side, or try to use a longer eyepiece tube than the recommended 5-6 cm. When use the one lense eyepiece, remember that's focus is 2,6 cm.
Step 7: USING THE TELESCOPE

This scope (with the Ploessl-eyepiece) has serious magnification, so you will use it hardly with in hands. Place it on a camera tripod, to aim more easily, or lean your tube holding arm to the wall. But this optics worth for a tripod, because it is not easy to gaze the Jupiter satellites from hand. Look at the surface of Moon, it's amazing.
And, if you are an experience chasing guy, try to build this scope also with acrylic lenses, and notice the difference.
This scope - if you have done it accurately - is a very good small instrument for stargazers, and the only real difference from the serious observing refractors is its small objective diameter (and so its weak light gathering ability). If you want to build a valuable, serious observing scope up to 60-80x magnifications, the method is similar, but of course the price of a 60-70mm diameter achromatic objective is not five euros. But with a 70 mm scope you can observe a lot of objects which are invisible for the naked eye stargazers (globular clusters, bright galaxies, the rings of Saturn, details on Jupiter, and more...)
And some words at the end: Galilei's most sophisticated telescope was a poorer one than this. Smaller wieving angle, weaker optics. Be proud, if you could make it, and use it. And - perhaps some years later - you will buy (or build) a larger scope. I hope so:-)


